Select Edit () > Lens Blur.
Last updated on
Oct 10, 2023
Learn more about new features and other enhancements in the latest release of Adobe Camera Raw.
Adjust the depth-of-field of a photo using the AI-powered Lens Blur in Adobe Camera Raw. The new tool lets you blur the background or foreground by making a depth map of the photo using Adobe Sensei.
-
-
To automatically apply the blur using Adobe Sensei, select Apply. Once the blur is applied, you can do the following:
- Adjust the strength of the blur effect with the Blur Amount slider.
- Select any Bokeh effect from the given options: Circle, Bubble, 5-blade, Ring, or Cat Eye.
- Adjust the brightness of out-of-focus light sources with the Boost slider.
TipIf a photo has an existing depth map, Lens Blur will use it, unless you specify otherwise.
-
Use the Focal Range to adjust the range of depth values that are in focus.
- Subject Focus: Automatically sets the focal range using AI-powered subject detection.
- Point or Area Focus: Manually set the focal range by clicking or dragging on the photo.
-
Select Visualize Depth to view the depth map and focal range. To make manual adjustments, select Refine and then adjust the Focus or Blur amount using the Brush Size, Feather, and Flow sliders.
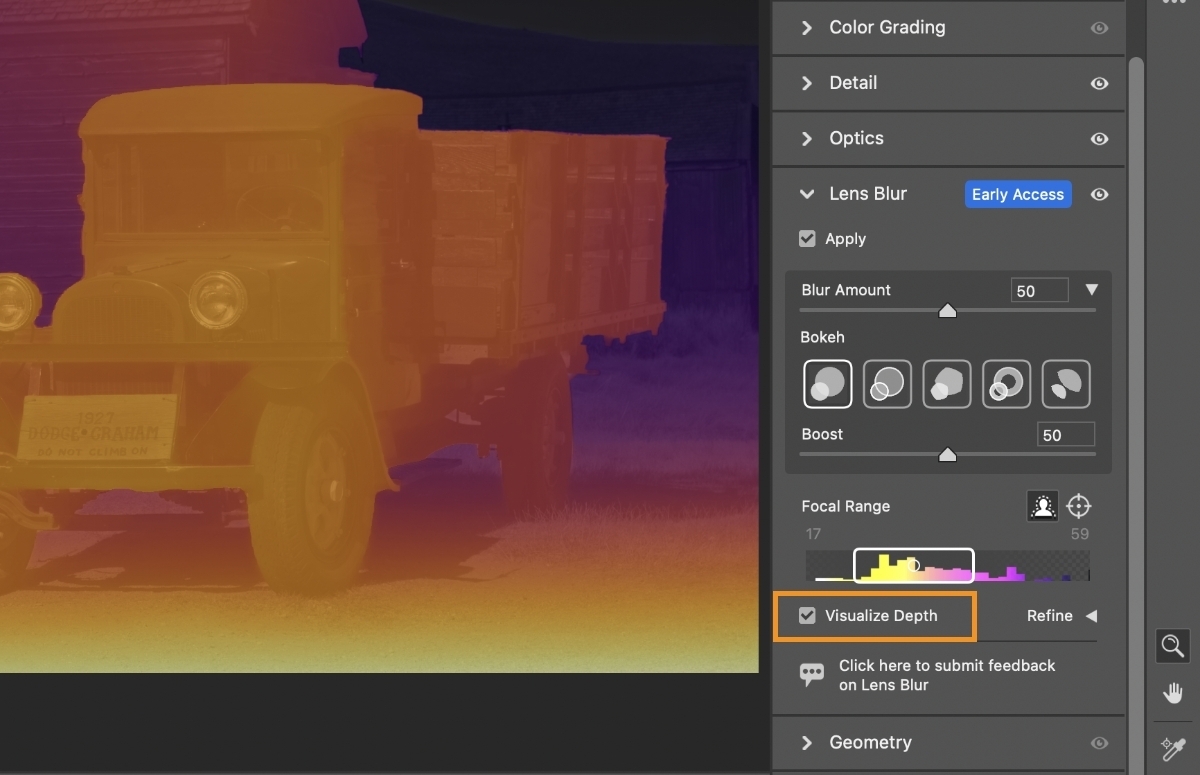
Visualize Depth toggle is selected to view the Lens Blur visualisation in Adobe Camera Raw.
Visualize Depth toggle is selected to view the Lens Blur visualisation in Adobe Camera Raw.
Note
As this feature is Early Access, you can share your experience and feedback on Adobe Camera Raw community.
Edit, display, and save images in High Dynamic Range. Experience increased depth with brighter highlights, deeper shadows, and more vivid colors. You now have the ability to view and edit HDR images with compatible HDR displays. HDR displays offer greater brightness and contrast than Standard Dynamic Range (SDR) displays. Images optimized for HDR displays result in greater impact and give a sense of realism.
To learn more on how to edit, save, and work with HDR output, refer to Edit and export in HDR.
Adjust individual colors with precise control over colors, including the ability to control the range across Hue, Saturation, and Luminance. Point Color can also be used with Masking, giving greater control over specific colors.
-
Select Edit > Color Mixer > Point Color.
Point Color tool in Adobe Camera Raw. Point Color tool in Adobe Camera Raw. -
Use the picker to select a color from the image. A swatch of the selected color will be created next to the picker. You can create and store up to eight swatches at a time.
TipRight-click a swatch for options to delete the selected swatch or all swatches.
-
Drag the circle in the color field and the vertical slider to change the Hue, Saturation, and Luminance of the selected color.
For precise adjustments in the color field:-
- To change only Hue, click on the color field and simultaneously hold Command/Control while dragging the pointer along the desired path.
- To change only Saturation, click on the color field and simultaneously hold Shift while dragging the pointer along the desired path.
- For precise movement, click on the color field while simultaneously holding Option/Alt and drag along the desired path.
-
Alternatively, you can also use the Hue, Saturation, and Luminance sliders to make adjustments to the selected color.
TipSelect Visualise Range to view the areas affected by the current color selection.
-
Use the Range slider to control the range of the selected color. You can control the Hue Range, Saturation Range, and Luminance Range independently to control every aspect of color correction. Narrow down the color range by:
- Selecting and adjusting the arrow on either end of the Hue, Saturation, and Luminance ranges
- Adjusting the slider box
- Dragging, expanding, or contracting the slider box

To reset settings, hold the alt or command key and select Reset or double-click the setting you want to reset. Learn more about enhancing color and tone in Adobe Camera Raw.
Check out the following articles to find newly added cameras and lenses in the full list of supported profiles: