User Guide Cancel

Set quiz preferences for Adobe Captivate Classic

  1. Captivate Classic User Guide
  2. Introduction to Captivate
    1. What's New in Adobe Captivate
    2. Adobe Captivate System Requirements
    3. Responsive Project Design with Adobe Captivate
  3. Captivate Classic Release Notes
    1.  Adobe Captivate Classic 11.8.3 Release Notes
    2. Adobe Captivate Classic 11.8.2 Release Notes
    3. Adobe Captivate 11.8.1 Release Notes
    4. Adobe Captivate 11.8 Release Notes
    5. What's New in Adobe Captivate (2019 release) Update 5
    6. What's New in Adobe Captivate (2019 release) Update 2
    7. Adobe Captivate Release Notes
  4. Create Projects
    1. Create different types of projects in Adobe Captivate
    2. Customize the size of an Adobe Captivate project
    3. Responsive Project Design with Adobe Captivate
    4. Create Virtual Reality (VR) projects
    5. Work with responsive text in Adobe Captivate
    6. Work with themes in Adobe Captivate
    7. How to apply view specific properties in responsive projects
    8. How to create backup files for Adobe Captivate projects
    9. Asset panel
    10. Create branching and forced navigation in Captivate
    11. Replace image on the stage
  5. Add and Manage Objects
    1. Work with multi-state objects in Adobe Captivate
    2. Object effects
    3. Insert web objects in Adobe Captivate projects
    4. Work with object styles in Adobe Captivate
    5. How to rotate objects in Adobe Captivate
    6. How to manage objects with the Main Options toolbar
    7. How to merge objects in a slide
    8. How to manage objects in the library
    9. How to group objects in Adobe Captivate
    10. Edit object information using the Advanced Interaction panel
    11. How to copy, paste, and duplicate objects in Adobe Captivate
    12. Control the visibility of objects
    13. How to change the display order of objects in Adobe Captivate
    14. Apply shadows to objects
    15. How to align objects in Adobe Captivate
    16. How to add reflection to objects in Adobe Captivate
    17. Import assets into a Captivate project
  6. Slides
    1. Add slides to an Adobe Captivate project
    2. Editing slides in an Adobe Captivate project
    3. Delete Adobe Captivate project slides
    4. Change slide order in Adobe Captivate
    5. Set slide properties in Adobe Captivate
    6. Add and convert slide notes to audio files with Adobe Captivate
    7. Set up knowledge check slides in Adobe Captivate
    8. How to add slide transitions in Adobe Captivate
    9. How to work with master slides in Adobe Captivate
    10. How to lock Adobe Captivate slides
    11. How to hide or exclude slides in an Adobe Captivate project
    12. How to group and ungroup slides in Adobe Captivate
  7. Timeline and grids
    1. Use rulers and guides
    2. Work with grids in Adobe Captivate
    3. Work with the timeline
    4. Shortcut keys in Adobe Captivate
    5. Working with the filmstrip
    6. How to customize the Adobe Captivate workspace
    7. How to use the Adobe Captivate Library
    8. How to use the Branching panel in Adobe Captivate
  8. Create Quizzes
    1. Insert question slides in Adobe Captivate projects
    2. Set quiz preferences for Adobe Captivate
    3. How to enable learners to submit all quiz responses simultaneously
    4. How to set up question slides with Adobe Captivate
    5. Using random question slides in Adobe Captivate
    6. How to allow users to return to quiz
    7. Import questions from CSV format files
    8. Import questions from GIFT format files
    9. How to insert pretests in Adobe Captivate
  9. Audio
    1. How to insert audio into an Adobe Captivate project
    2. How to preview audio in Adobe Captivate
    3. How to edit audio files with Adobe Captivate
    4. View audio details in Adobe Captivate
    5. Set audio recording preferences and recording audio
    6. How to export audio from Adobe Captivate
  10. Video
    1. Slide videos
    2. Work with event videos in Adobe Captivate
    3. Differences between events and synchronized videos in Adobe Captivate
  11. Interactive Objects
    1. Add interactive buttons to your Captivate projects
    2. Create click boxes in Adobe Captivate
    3. Add text entry boxes with Adobe Captivate
    4. How to add audio to boxes and buttons
    5. How to add JavaScript to boxes and buttons in Adobe Captivate
  12. Interactions
    1. Create drag-and-drop interactions in Adobe Captivate
    2. Use Adobe Captivate variables in widgets
    3. Set the properties of widgets with Adobe Captivate
    4. How to create static, interactive, and question widgets in Adobe Captivate
    5. How to add widgets to your Adobe Captivate project
  13. Non-interactive objects
    1. Create and edit smart shapes
    2. Edit and create text captions with Captivate
    3. How to use images and rollover images with Captivate
    4. How to customize smart shapes in Adobe Captivate
    5. How to create zoom areas in Adobe Captivate
    6. How to set audio for noninteractive objects
    7. How to create rollover slidelets in Adobe Captivate
    8. How to create rollover captions in Adobe Captivate
    9. Change mouse properties in Adobe Captivate
    10. Use highlight boxes in Captivate
    11. Work with swatches in Adobe Captivate
    12. Fix size and position of non-interactive objects
    13. Add animations to a Adobe Captivate project
  14. Advanced Editing and Project Reviews
    1. How to link Adobe Captivate projects
    2. Import, export, and delete content
    3. Skins
    4. Create accessible projects in Adobe Captivate
    5. Create a table of contents (TOC) with Adobe Captivate
    6. Resize Adobe Captivate projects
    7. Projects and project preferences
    8. How to preview projects in Adobe Captivate
  15. Variables and Advanced Actions
    1. Adobe Captivate variables
    2. How to create user-defined variables in Adobe Captivate
    3. Advanced actions in Adobe Captivate
    4. Shared actions in Adobe Captivate projects
    5. Edit or delete user-defined variables in Adobe Captivate
    6. How to assign advanced actions to an event
  16. Record Projects
    1. Create interactive videos
    2. Automatic and manual recording with Captivate
    3. Set recording preferences in Adobe Captivate
    4. Record video demonstrations with Adobe Captivate
    5. How to record software simulations in Adobe Captivate
    6. How to pause recording
  17. Publish Projects
    1. Preview and publish responsive projects
    2. Publish project to Adobe Captivate Prime
    3. Publish projects as HTML5 files with Adobe Captivate
    4. Publish projects as executable files
    5. Publish projects as MP4 files with Adobe Captivate
    6. Set publishing preferences in Adobe Captivate
    7. Using web fonts from Adobe Fonts in Adobe Captivate
    8. Report quiz results to an internal server
  18. Use Adobe Captivate with Other Applications
    1. Import and edit PowerPoint presentations in Captivate
    2. Upload an Adobe Captivate project to a Learning Management System
    3. Learn about the Common JavaScript interface for Adobe Captivate
    4. How to publish Captivate projects to Microsoft Word
    5. Using Adobe Connect with Captivate
    6. How to add Captivate projects to a RoboHelp online help system
    7. How to package multiple SCOs using the Adobe Multi-SCORM Packager
  19. Troubleshoot Adobe Captivate
    1. Resolve known issues and limitations in the latest versions of Adobe Captivate, Adobe FrameMaker, and Adobe RoboHelp.
    2. Early build for Captivate (2019 release) on macOS Big Sur (macOS 11)
    3. Hotfix for VR content not playing on devices
    4. Configure SSL for Live Preview on Devices
    5. Captivate (2019 release) activation issues on macOS Catalina
    6. Captivate responsive courses will not auto-play on browsers
    7. Issues with Asset panel in Adobe Captivate (2019 release)
    8. Error 103 while installing Adobe Captivate
    9. Issues when previewing a Captivate project

  • Now available : Mac OS Catalina compatible Adobe Captivate update for 2019 release users . Get update now!
  • Asset Panel not loading in Adobe Captivate (2019 release)? Read More to find a solution.

Set general quiz preferences

  1. Select:

    • Edit > Preferences (Windows)
    • Adobe Captivate Classic > Preferences (Mac OS)
  2. In the Preferences dialog box, select Settings from the Quiz menu.

    Settings options in Quiz preferences
    Settings options in Quiz preferences

  3. Enter the information in the following fields:

    Name Enter a name for your quiz. In a project with more than one quiz, naming helps identify a quiz easily.
    Required

    Select one of the following options from the menu:

    • Optional ‐ The User Can Skip This Quiz Allows users to skip the quiz and move on with the project.
    • Required ‐ The User Must Take The Quiz To Continue The project moves to the next slide only after the user has moved through all the question slides.
    • Pass Required ‐ The User Must Pass This Quiz To Continue The project moves to the next slide only after the user has scored the required points in the quiz.
    • Answer All ‐ The User Must Answer Every Question To Continue The project moves to the next slide only after the user has answered all the question slides. 
    Objective ID The ID of the quiz to which the question slide belongs. In a master quiz containing multiple quizzes, an objective ID helps identify the quiz to which the question belongs.
    Interaction ID Prefix Every action that the user performs on a question slide is assigned a unique interaction ID. For example, when the user attempts a question incorrectly the first time, and gets it right the next time round, Adobe Captivate Classic generates two interaction IDs. Use this field if you want to customize the generated interaction IDs by prefixing them with the assigned characters.
    Shuffle Answers For question slides with multiple answers, the answers are shuffled when the user attempts the same question slide the next time.
    Clear Select to display a Clear button for all quiz questions.
    Back Select to display a Back button for all quiz questions.
    Skip Select to display a Skip button on all quiz questions.
    Review Mode Navigation Buttons Adds << and >> buttons to cycle through quiz so participants can review their answers after completion. 
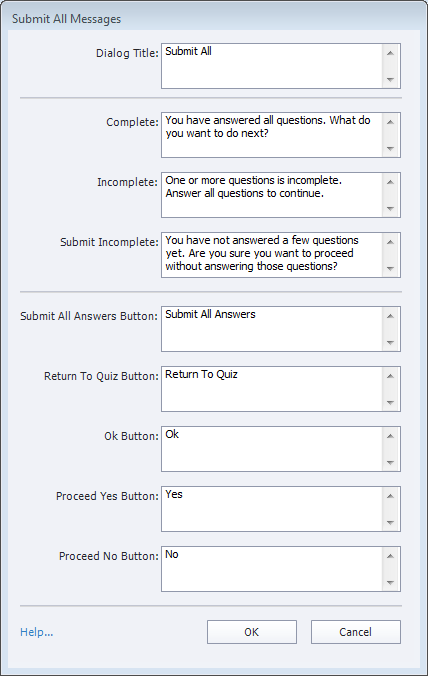
    Submit All

    Enable this option to let users review and modify answered questions and submit all questions simultaneously.

    For more information, see Submitting all answers simultaneously.

    When you enable the option, the Submit All Messages dialog box displays, where you can customize the messages that appear on submitting a quiz.

    Branch Aware

    Use this option to calculate the final score based only on the questions in the ‘branch' that users have viewed. For example, consider that a project contains a quiz that branches into two modules that in turn contain a quiz each. If a user reaches the module with three questions and 10 points each, the total score is considered as 30 points.

    If this option is not enabled, the scores are calculated on the total number of questions in the project and not the module that users actually viewed.

    Note: Pretests are branch-aware by default.

    Show Progress

    Select this option to show users which question number they are currently working on within the quiz.

    For more information, see Set progress indicator preferences.

    Allow Backward Movement Select to allow participants to visit slides that were attempted previously.
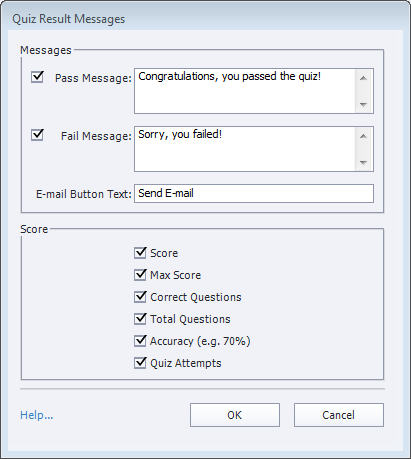
    Show Score At End Of Quiz

    Lets users view their score at the end of the quiz. You can customize the message that appears when the user passes or fails the quiz. Click Quiz Result Messages to customize the messages. You can also customize the options that you want to be displayed on the score slide.

    When you enable this option, the Quiz Result Messages dialog box displays, where you can customize the passing and failing messages, and choose the scores to be displayed at the end of a quiz.
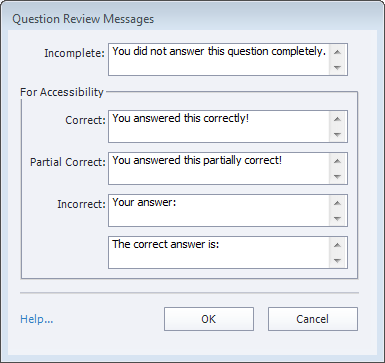
    Allow User to Review the Quiz

    Users can review a quiz after they have completed attempting it and the score has been displayed. This option allows users to find out questions they answered incorrectly, and their correct answers. You can customize the messages provided in the feedback.

    When you enable this option, the Question Review Messages dialog box displays, where you can customize the messages that appear upon reviewing the quiz.

    Hide Playbar in Quiz

    Select this option to hide the playbar on the question and result slides.

    Note: A playbar is never displayed for pretest questions.

Quiz reviews

When users review the quiz after attempting to answer it, Adobe Captivate Classic provides feedback graphically through images.

Image/Message

Meaning

Displayed in Question Type...

Question is answered incorrectly

All

Question is answered correctly

All

Answer to the question is partially correct

Multiple choice questions, if partial score is enabled.

For example, if two choices are correct answers for the question and user selects one of them.

You did not answer this question completely

(Default message specified in Preferences > Quiz > Settings > Question Review Messages)

Question is skipped

Any type of ‘graded' question skipped by the user.

Skipped answers

Matching question, Sequence question, Multiple choice questions, Fill in the blank questions with multiple answers

For example, when a user does not select an option in the combo box of a matching question.

Correct answer

All

List of correct answers

Matching question, Sequence question, Fill in the blank questions

For example, when users answer a sequence question incorrectly, the sticky icon provides the correct sequence of answers.

Correct answer (in a hotspot question)

Hotspot question

Incorrect answer

All

Incorrect answer (in a hotspot question)

Hotspot question

This icon is displayed on all the wrong clicks by the user in a hotspot question.

These images are in the <installation folder>/Gallery/Quiz/QuizReviewAssets folder. You can replace the images (PNG, FLA, and SWF files) with custom images. However, ensure that you maintain the same size as the default ones for best results.

Set pass or fail preferences

You can set the minimum score required to pass a quiz. You can also define the action that should take place after the user passes or fails a test.

  1. Select:

    • Edit > Preferences (Windows)
    • Adobe Captivate Classic > Preferences (Mac OS)
  2. In the Preferences dialog box, select Pass or Fail from the Quiz menu.

    Pass or fail preferences options
    Pass or fail preferences options

  3. In the Pass /Fail options, do one of the following:

    • Pass/Fail Options: Set whether participants need to have a percentage or more of total points to pass, or a set number or more of points to pass.
    • Pass/Fail Grade Actions: Set what actions the quiz will carry out if the participant passes the quiz, or fails. Can also set the number of times a user can attempt the quiz.
  4. To decide the course of the project after the user passes a quiz, select an action in the If Passing Grade section.

    Passing actions
    Passing actions

  5. To decide the course of the project after the user fails a quiz, select an action in the If Failing Grade section. The actions are similar to those in the If Passing Grade section.

Specify messages and button labels

  1. Select:

    • Edit > Preferences (Windows)
    • Adobe Captivate Classic > Preferences (Mac OS)
  2. In the Preferences dialog box, select Default Labels from the Quiz menu.

    Default labels options
    Default labels options

    1

    You can change the key via which you want to continue from a question slide. The default key is set to 'Y' for any new project.

    2

    Display the default message feedback when conditions are met (for example, a correct message is displayed when a question is answered correctly)

    3

    Lists all the default button labels displayed on any buttons added to the quiz. 

    4

    Displays a preview of the message/button currently being edited.

  3. Change the default labels and style for the Submit, Submit All, Clear, Skip, and Back buttons in the Default Question Button Labels section. The four buttons are displayed on any question slide unless you have disabled them in the Property Inspector of that slide.

    To create a new style for the labels, click Create New Style. See Object style for more information.

Set progress indicator preferences

The progress bar displays the user's progress through the questions.

To set preferences for progress indicator,

  1. Select:

    • Edit > Preferences (Windows)
    • Adobe Captivate Classic > Preferences (Mac OS)
  2. In the Preferences dialog box, select Quiz > Settings.

  3. In the Settings section, select Show Progress.

  4. Specify a progress type. This decides how the progress bar displays the user's progress through the questions.

    • Relative Progress lists the current question and the total number of questions (for example, "Question 3 out of 10").

    • Absolute Progress lists just the question number (for example, "Question 3").

    Note:

    In branched quizzes, the branching path can be indefinite. For example, if users click button A, then they go to branch 1 else branch 2. In such cases, Adobe Captivate Classic omits the total number of questions even if Relative Progress is selected.

Download sample projects

To learn more about Captivate Classic and how you can create engaging learning content, download the following projects:

 Adobe

Get help faster and easier

New user?

Adobe MAX 2024

Adobe MAX
The Creativity Conference

Oct 14–16 Miami Beach and online

Adobe MAX

The Creativity Conference

Oct 14–16 Miami Beach and online

Adobe MAX 2024

Adobe MAX
The Creativity Conference

Oct 14–16 Miami Beach and online

Adobe MAX

The Creativity Conference

Oct 14–16 Miami Beach and online