ColdFusion 10 implemented WebSocket by providing a messaging layer for the WebSocket protocol, which you can control using CFML and JavaScript. The messaging layer has features that make WebSocket reliable and scalable. Using WebSocket, you can develop real-time applications for stock, charting, online gaming, social networking, dashboard for various purposes, and monitoring.
As you are already aware of, WebSocket connections use the standard HTTP ports (80 and 443) for sending and receiving data packets. Due to this reason, WebSockets are mostly firewall-friendly since almost all firewall configurations allow net traffic on the HTTP ports. Hence the HTML5 WebSockets do not require new hardware to be installed, or new ports to be opened on internal networks.
When there is no proxy server, reverse proxy server, or a firewall between the browser and the ColdFusion Server, the WebSocket connection works perfectly, as long as both the server and the client understand the WebSocket protocol. However, most of the times, there will not be any direct connection between the server and the client. ColdFusion 11 has introduced the proxy support for WebSocket. There is a new proxy module (that runs inside IIS and Apache Web Server) that can intercept the ColdFusion WebSocket requests and redirect the requests to the ColdFusion Server.
What is new
ColdFusion 11 supports the following new features:
- Proxy support - Support is now provided for setting up a proxy server for using ColdFusion WebSockets.
- SSL support – Support is now provided for enabling SSL for ColdFusion WebSockets.
- Cluster support – Support is now provided for enabling the cluster support for ColdFusion WebSockets.
Using ColdFusion WebSockets
The support for WebSocket was available in the previous version of ColdFusion. What is new in ColdFusion 11 is the support for WebSocket proxy.
Consider the following usage strategies for WebSocket proxy:
- Strategy 1: When you don’t have a firewall configured – You CAN use the WebSocket proxy
- Strategy 2: When you have a firewall configured – You MUST use the WebSocket proxy
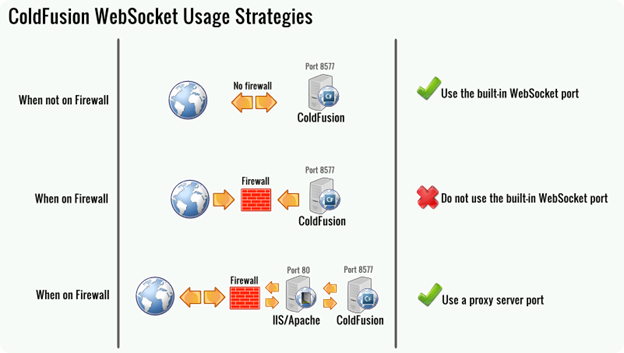

Strategy 1 - Using the built-in WebSocket server (ColdFusion 10)
For more information, see, Using ColdFusion WebSocket.
Also, see:
- Browsers and fallback
- ColdFusion and WebSocket
- How is WebSocket different from conventional communication models
- WebSocket communication models
- What is WebSocket
- Using WebSocket to broadcast messages
- Using WebSocket in point-to-point communication
- Error handling in ColdFusion WebSocket
- Using ColdFusion Administrator for WebSocket Configurations
- Browser support for WebSocket
Strategy 2 - Using a proxy server for WebSockets (ColdFusion 11)
ColdFusion 11 has introduced the proxy support for WebSocket. There is a new proxy module (that runs inside IIS and Apache Web Server) that can intercept the ColdFusion WebSocket requests and redirect the requests to the ColdFusion Server.
You can use one of the following external servers along with the ColdFusion Server:
- IIS 8 or higher running on Windows 8 or Windows Server 2012
- Apache 2.2 or higher
The following steps enable you to quickly configure a WebSocket Proxy server for ColdFusion.
Step 1 – Configuring the external server
Before you begin setting up a WebSocket proxy, you need to configure the external server to support the WebSocket protocol.
Configuring IIS
For enabling WebSocket protocol for IIS, see this document.
Configuring Apache Server
No configuration required.
Step 2 – Enabling WebSocket Proxy
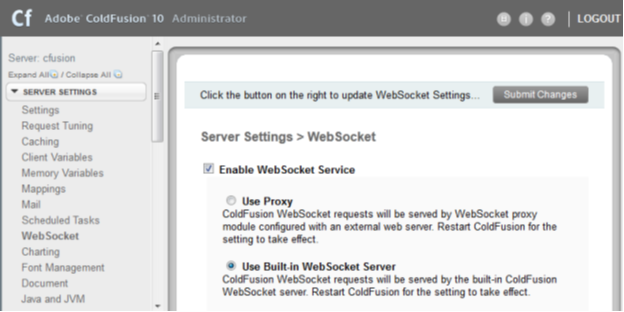
You need to enable the WebSocket Proxy port at the server-level through the ColdFusion Administrator. Perform the following steps:
- Go to the ColdFusion Administrator page.
- Click Server Settings > Web Socket
- Click Enable WebSocket Server and select Use WebSocket Proxy Port:

Step 3 – Adding the external server
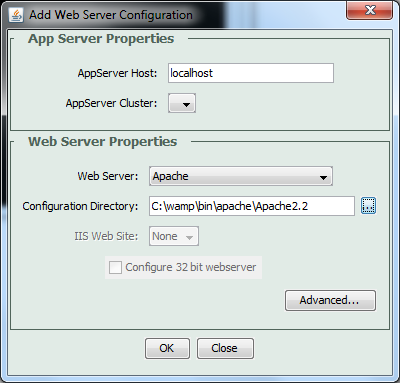
You need to configure the external Web Server connector with the ColdFusion Server using the wsconfig tool.
Perform the following tasks:
- Go to <CF_INSTALL_HOME>/cfusion/runtime/bin
- Run the wsconfig tool
- In the GUI, click Add
- In the Web Server drop down field, select the external server
- In the Configuration Directory field, browse and select the path to the external server’s configuration directory:
- Click OK

- If the external server is not running, you will be prompted to start the server:


- Click Yes to start the external server
- Click Exit
Step 4 - Setting up the WebSocket Proxy Server
ColdFusion 11 has introduced a new configuration tool, wsproxyconfig, which will allow you to quickly setup a WebSocket Proxy. Perform the following tasks:
- Go to <CF_INSTALL_HOME>/cfusion/bin
- Run the wsproxyconfig tool
- In the GUI, click Add
- In the Web Server drop down field, select the external server
- In the Configuration Directory field, browse and select the path to the external server’s configuration directory:
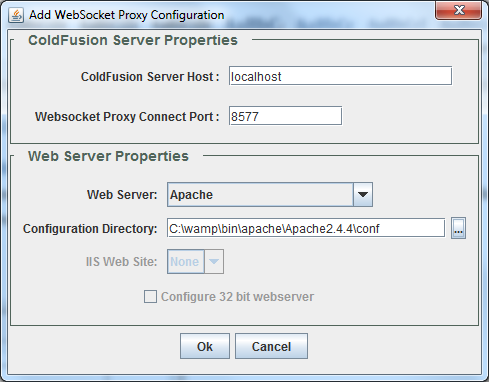

- Click OK
- If the external server is not running, you will be prompted to start the server:


- Confirm the proxy configuration:
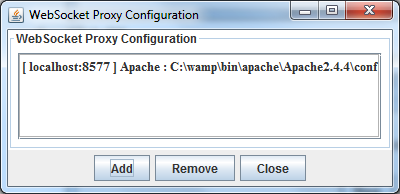

- Click Close
Step 5 – Verify the proxy configuration
After you have successfully configured the WebSocket Proxy, verify if the required proxy files are created at <CF_INSTALL_HOME>/config/wsproxy/1
You can also manually modify the config.ini file located at <CF_INSTALL_HOME>/config/wsproxy/1.
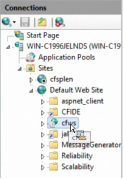
Also, a new application, cfws will be made available under the application root of the external servers:

The <cfwebsocket> tag supports a new attribute:
- secure – (Optional) If only secure port (SSL) is configured for the WebSocket server (for web service communication), all the WebSocket communication happens over the secure channel automatically. But in the case if both ports (non-SSL and SSL) are defined , if you require the communication to be set through a secured TCP socket, you must set secure to true. Default is false.
ColdFusion 11 has been enhanced to provide enterprise-level capabilities like real-time message broadcasting across cluster of nodes and SSL support for secure websocket communication (WSS protocol).
Cluster Support
If your application is running across various nodes and on publishing a message to a single node, you want the same to be broadcasted across all the nodes, you can use this feature.
For example, Node1 has two clients (C1 and C2) subscribed to the 'stock' channel. Similarly Node2 has two clients (C4, C6) and Node3 has two clients (C8, C10) also subscribed to the 'stock' channel. When client C1 tries to publish a massage on this 'stock' channel, rather than just sending this message to just C1 and C2 only, the clients from other nodes C4, C6, C8, and C10 must also receive this message.
On using this feature, you can publish a message to all the subscribers of the channel across various nodes of the cluster by enabling cluster. To enable the feature, choose the cluster option and define the multicast port to broadcast node up and node down (events).
Note: The cluster support is not available in the standard edition. |
JavaScript Functions
The following JavaScript functions were enhanced to auto-support the cluster functionality:
Functions |
Argument |
Return Type |
publish |
("channelname", messageBody, {filterOptions} |
boolean |
getSubscriberCount |
(“channelname”) |
boolean |
invokeAndPublish |
("channelName", cfcName, cfcMethod, [function_parameter] ,{custom_options}) |
boolean |
publish
In ColdFusion 10, this function was enabled to send messages to a specific channel based on the filter criteria. In ColdFusion 11, this function is enhanced to send message to all nodes in a cluster by default.
Publish("channelname ", messageBody, {filterOptions}); |
getSubscriberCount
In ColdFusion 10, this function was enabled to get subscriber count from a specific channel based on the filter criteria. In ColdFusion 11, this function is enhanced to fetch the subscriber count from all nodes by default.
getSubscriberCount(“channelname”) |
invokeAndPublish
Use this function for message publishing and CFC invocation to be executed as separate thread.
invokeandPublish("channelname ", cfcName, cfcMethod, [function_parameter] ,{custom_options}) |
In-built ColdFusion functions
To further facilitate cluster support, the following in-built functions are enhanced for ColdFusion 11:
WSPublish
Trigger a message publish from the server without any input from client. A new parameter "Clustered" has been added to facilitate message broadcasting to all subscribers connected to multiple nodes.
wsPublish(“channel name”, messageBody [clustered]) |
Or
wsPublish(“channel name”, messageBody , {filterOptions},[cluster]) |
If the "clustered" parameter is not defined, then the default value will be taken based on the cluster <Enable/Disable> setup.
WSGetSubscribers
Fetches the subscriber information from all the configured nodes. A new parameter "Clustered" has been added to fetch subscriber information from all configured nodes.
WSGetSubscribers("channel") |
Or
WSGetSubscribers ("channlName" ,[clustered]); |
If the "clustered" parameter is not defined, then the default value will be taken based on the cluster <Enable/Disable> setup.
WSGetAllChannels
Fetches the sub-channel information from all the configured nodes. A new parameter "Clustered" has been added to fetch sub-channel information from all configured nodes.
WSGetAllChannels ("channel", clustered) |
If the "clustered" parameter is not defined, then the default value will be taken based on the cluster <Enable/Disable> setup.
Secure WebSocket communication (WebSocket over SSL)
The Websocket screen (Administrator Console > ColdFusion Administrator > Server Settings > WebSocket) has been enhanced in ColdFusion 11 with the following options:
- Enable SSL
- SSL port
- KeyStore File location
- KeyStore password
Option |
Description |
Enable SSL |
Enables Secure Sockets Layer (SSL) for running WebSocket over SSL. |
KeyStore File location |
The location of keyStore in server’s file system. For example, C:\OpenSSL\bin\keystore.jks. |
KeyStore password |
Password for the keyStore. |
SSL port |
Default port is 8543. |
To enable Web socket cluster from the Administrator node, select Server Setting > Web Socket. In the Web Socket screen, select the Enable Web Socket Cluster check box and enter the Multicast Port details. In the Multicast Port field, the default Multicast Port 45566 is displayed. Change the port details if required. Make sure the multicast port value is same across all the nodes in the cluster.