
Sign in to Acrobat Web at https://documentcloud.adobe.com with your Adobe ID and password, or with your social (Facebook or Google) account.
Last updated on
May 23, 2023
|
Also applies to Acrobat PDF Pack
You can get documents or agreements signed by others using the Request Signatures service, which relies on cloud services provided by Adobe Acrobat Sign.
Alert:
An error message such as "Request entity too large" or "Server Error" is typically the result of a request delivering an excess of cookie data to the Adobe servers.
To correct, clear your browser cookies and try again.
Updates to the Request e-signature feature are currently being rolled out in a phased deployment. You can readily determine if your account has been updated to the modern version by checking the interface when opening the Request e-Signatures tool:
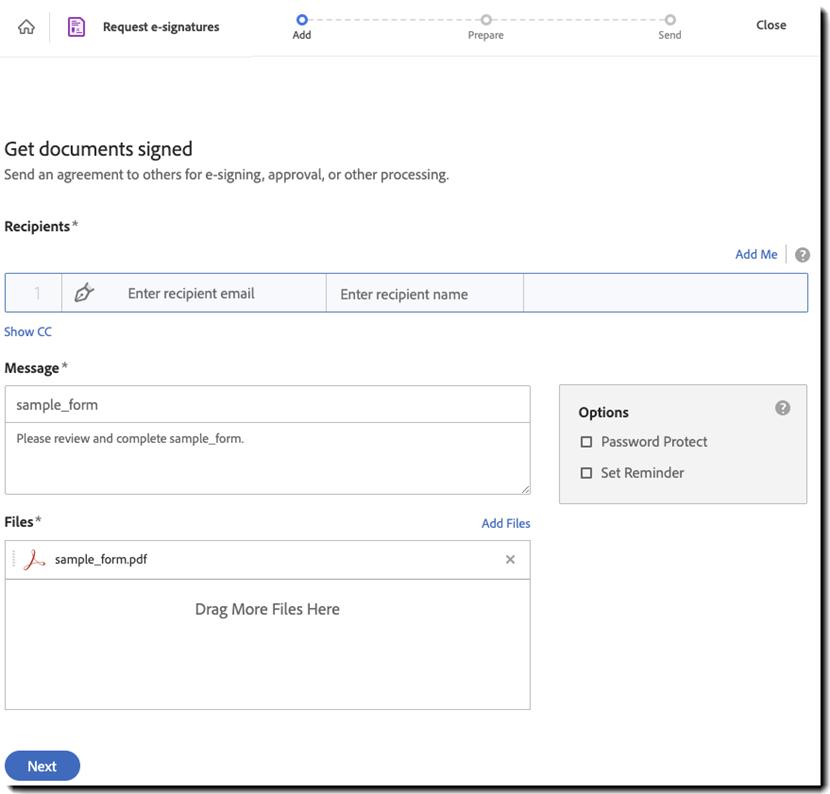
The classic landing page exposes the full configuration interface:
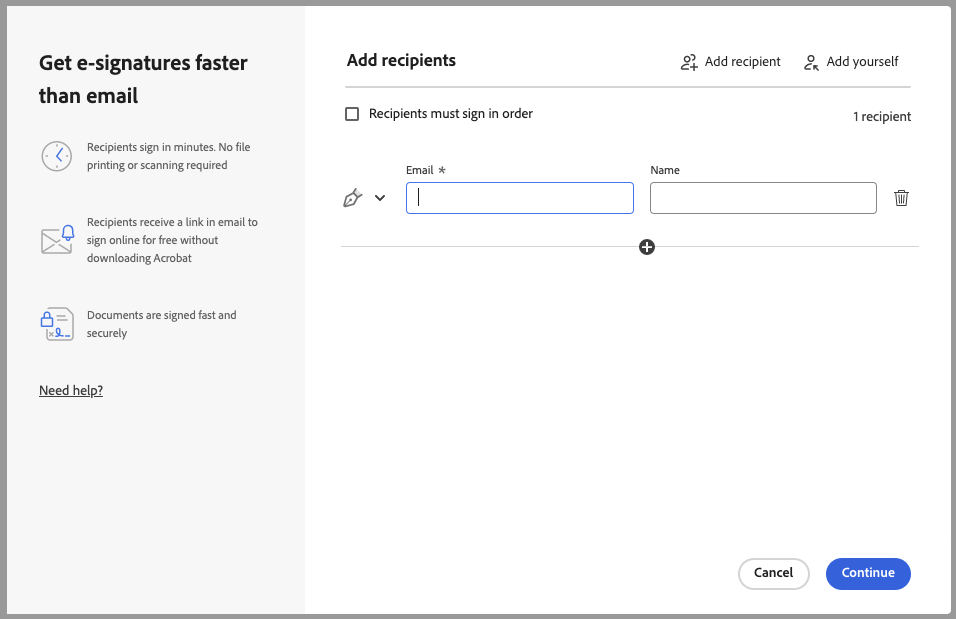
The modern landing page uses a guided process that prompts the user to upload a file first, and then progresses to configuring the recipients:
Select your interface:
Supported file types for signing
Besides PDF, you can send Microsoft Office files, various image and text files for signing. Supported file types are: DOC, DOCX, RTF, XLS, XLSX, PPT, PPTX, TXT, TIFF, TIF, BMP, GIF, JPG, JPEG, and PNG.
Note:
Complete your edits before you send the documents for signature. The signed agreement is certified by Acrobat Sign. Edits to the signed agreement will lose the certification.
Sending documents for signature
-
-
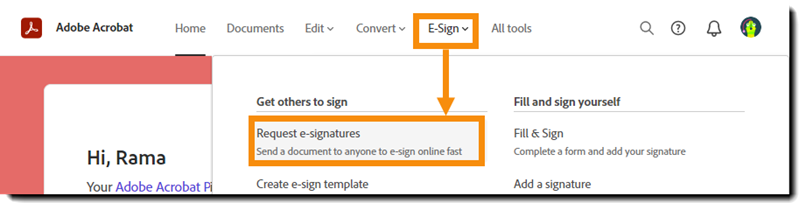
In the top navigation bar, click Sign > Request Signatures.
-
In the Request Signatures landing page, do the following:
- In the Recipients field, add recipient email addresses.
(Optional) Click Add Me, if you want to be included as a signer of the document. - Change the default text in the Message area as appropriate.
(Optional) If you want to add more people just for information, use the Show CC button to add their email addresses to the CC list. - (Optional) Select Password Protect if you require recipients to enter a password to open and view the signed PDF file.
- (Optional) Select Set Reminder to set the frequency of reminders to be sent until the agreement is completed.
- Click Add Files and then browse and select the document.
A. Recipient email B. Message C. Password protect D. Completion deadline E. Set reminder F. Add files G. Preview and add fields
Note:To get a detailed description of any of these options, click the question mark icon.
- In the Recipients field, add recipient email addresses.
-
Click Next.
The document is now ready for adding fields that you want the signers to fill in or sign.
Note: If you have added multiple documents, the documents are converted into PDFs and combined into a single file. The combined file is opened for you to add appropriate fields.
-
The Specify Where to Fill & Sign page is displayed. If you are sending a flat-form, you see the simplified mode, else advanced mode is displayed.
- Simplified mode
This mode provides simplified authoring with the capability of assigning fields to multiple signers. When you select a signer from the right pane and add fields in the form, the fields are assigned to the signer. That means those fields will be available to the signer for filling the information and signing the form. To place a signature or another field, click at the desired location in the document and then set the field's properties from its context menu.
You can switch the assignee of any field using the floating toolbar. The assigned colors to the signers make it easy to distinguish the fields for respective signers.
Floating toolbar Floating toolbar Choose signer Choose signer Choose the field type Choose the field type - Advanced mode
Click Switch To Advanced Mode, to see the options as shown below. Click the upper-left button to place the detected form fields in the PDF document. Alternatively, drag fields from the tabs in the right pane and drop them at the desired location in the document.
For more information on adding form fields, see Prefill Agreement fields and assign form fields to recipients.Note:You can switch between simplified mode and advanced mode for multiple signers. To switch mode, click Switch To Simplified Mode in the right-pane.
- Simplified mode
-
When you've placed all desired fields in the document, click Send. A confirmation message is shown, and then a preview of the sent agreement is displayed. From the right pane of the agreement preview, you can do the following:
- View Status of the agreement.
- Set Reminder for yourself or the recipient.
- Cancel the agreement.
- Download the PDF agreement.
- Download Audit Report.
- Hide Agreement.
- Share agreement to let others view and access the agreement along with its status from their Acrobat Sign account.
- Add Notes.
- Download Individual Files, if you have added multiple files in the agreement.
- To view the timestamp of each Activity, expand the list by clicking the arrow key (>).
A copy of the sent agreement is also stored in your Adobe Document Cloud account. The Recent section at the bottom area of the Home page lists all the agreements you’ve sent recently. Alternatively, to see the list of all your agreements, click Documents in the top-menu bar, and then click All Agreements.


Tracking agreements sent for signature
In addition to the existing Acrobat Sign Manage dashboard, you can also use the new Adobe Acrobat web interface to track and manage your agreements and templates.
-
In the top-menu bar, click Documents > All Agreements. All the agreements are displayed along with the following information:
- Recipients: Displays the names of the recipients of the agreement.
- Sender: Displays the name of the sender of the agreement.
- Title: Name of the agreement sent for signature.
- Status: Number of people who have completed the agreement.
- Modified: The timestamp of the last activity performed on the agreement.
A. All Sign agreements B. View agreements by status C. View templates
B. View agreements by status: The agreements are listed by last modified date. To view the agreements as per their current status, click the appropriate status - In Progress, Waiting For You, Completed, Canceled, Expired, Archived or Draft.
C. View Templates: To see Sign templates, click Templates.
- Recipients: Displays the names of the recipients of the agreement.
-
Select the agreement to view more details. A thumbnail of the agreement is displayed in the right pane. You can perform any of the following actions:
- View agreement Status.
- Open the Agreement.
- Set Reminder for the recipients or yourself.
- Cancel agreement.
- Download PDF agreement.
- Download Audit Report.
- Hide Agreement.
- Share a copy of the agreement.
- Add personal Notes.
- Download Individual Files, if you have added multiple files in the agreement.
- To view the activity, expand the list by clicking the arrow key (>).


If you want to switch the view from Adobe Acrobat agreements and templates view to Acrobat Sign view or vice versa, use the preference from within the Adobe Acrobat settings as mentioned below.
-
In the Adobe Acrobat home, click your profile and then click Settings.
-
In the Document Cloud settings dialog, select the option Use Acrobat Sign Manage and click Save.
-
In the top-menu bar, click Documents > All Agreements. The Acrobat Sign Manage dashboard is displayed.
From the dashboard, you can do the following:
- Manage agreements and get transaction-specific information
- See the status of your agreements
- View the audit trail of an agreement
- Upload a signed copy of an agreement
- Cancel an agreement


More like this

Adobe MAX
The Creativity Conference
Oct 14–16 Miami Beach and online
Adobe MAX
The Creativity Conference
Oct 14–16 Miami Beach and online