In the project, you'll insert a variable on the stage. When you'll preview the project, the value will display.
In the Captivate project, insert a text box, as shown below.
Variables are entities whose values are subject to change. For example, in real life, if 'color' is considered a variable, red, blue, and green are some of the values logically associated with that variable. So variables can be considered as placeholders for different values.
Literals are fixed values. A literal can be either an alphanumeric value, or it can be a number. For example, in real life, John, Sarah, 100 are literals as they are fixed values.
And, for a string literal, like “John”, if you use it with any function in conventional programming, the value of the literal changes. If you want to reverse the literal above, use “John”.reverse().
System variables are pre-defined variables in Captivate.
For example,
User variables are defined by the user. These variables can also be made to accept a set of values, and reject the other entries.
For example, you can define a variable 'fruit' to accept fruits as values. You can also restrict the values accepted by the 'fruit' variable by specifying that the entries be one of apples, oranges, grapes, or bananas. This helps you in collecting values in the variable which are of interest to you.
You can create a variable of the following data types:
You can create user variables in your Captivate project by choosing Variables in the Project Properties panel. This opens up the Variables dialog box. To create a user variable, click +. Then specify the name of the variables, its type, and the value.
It's a good practice to name the variables in a way which helps you identify its function later on. You can also enter an initial value to the variable in the Value field.


The name you assign to a user variable must not conflict with Captivate’s internal functions, reserved keywords, exposed system variables, or other hidden variables.
There are some conventions while naming a variable. They are:
For example, avoid using the keywords like: class, while, case, float.
Example: MyVar1, MyVar2
Example: Input_Name, Display_Education
Example: Input_Name variable accepts name entered by the candidates.
After creating a variable, if you want to modify the variable, such as the name, value, or the description, click the one you'd like to change, and modify its contents.


To delete a user variable, in the Variable dialog, select the variable that you want to delete. Click the Delete button.


To Copy and Paste a variable, select the variable, click Copy, and then click Paste. You can also copy and paste multiple variables at once.
To search a variable, click the Search button, and type the name of the variable or part of the variable. Any partial match will also return the variables, both user and system.


After you create a variable, now it is time to use that variable in a project. Follow the below to insert a variable in a project.
In the project, you'll insert a variable on the stage. When you'll preview the project, the value will display.
In the Captivate project, insert a text box, as shown below.


In the text box, insert the variable that you had created. Type $$, select the variable from the list, and then enclose the variable with $$.


Preview the project. You will see that the value of the variable now displays.
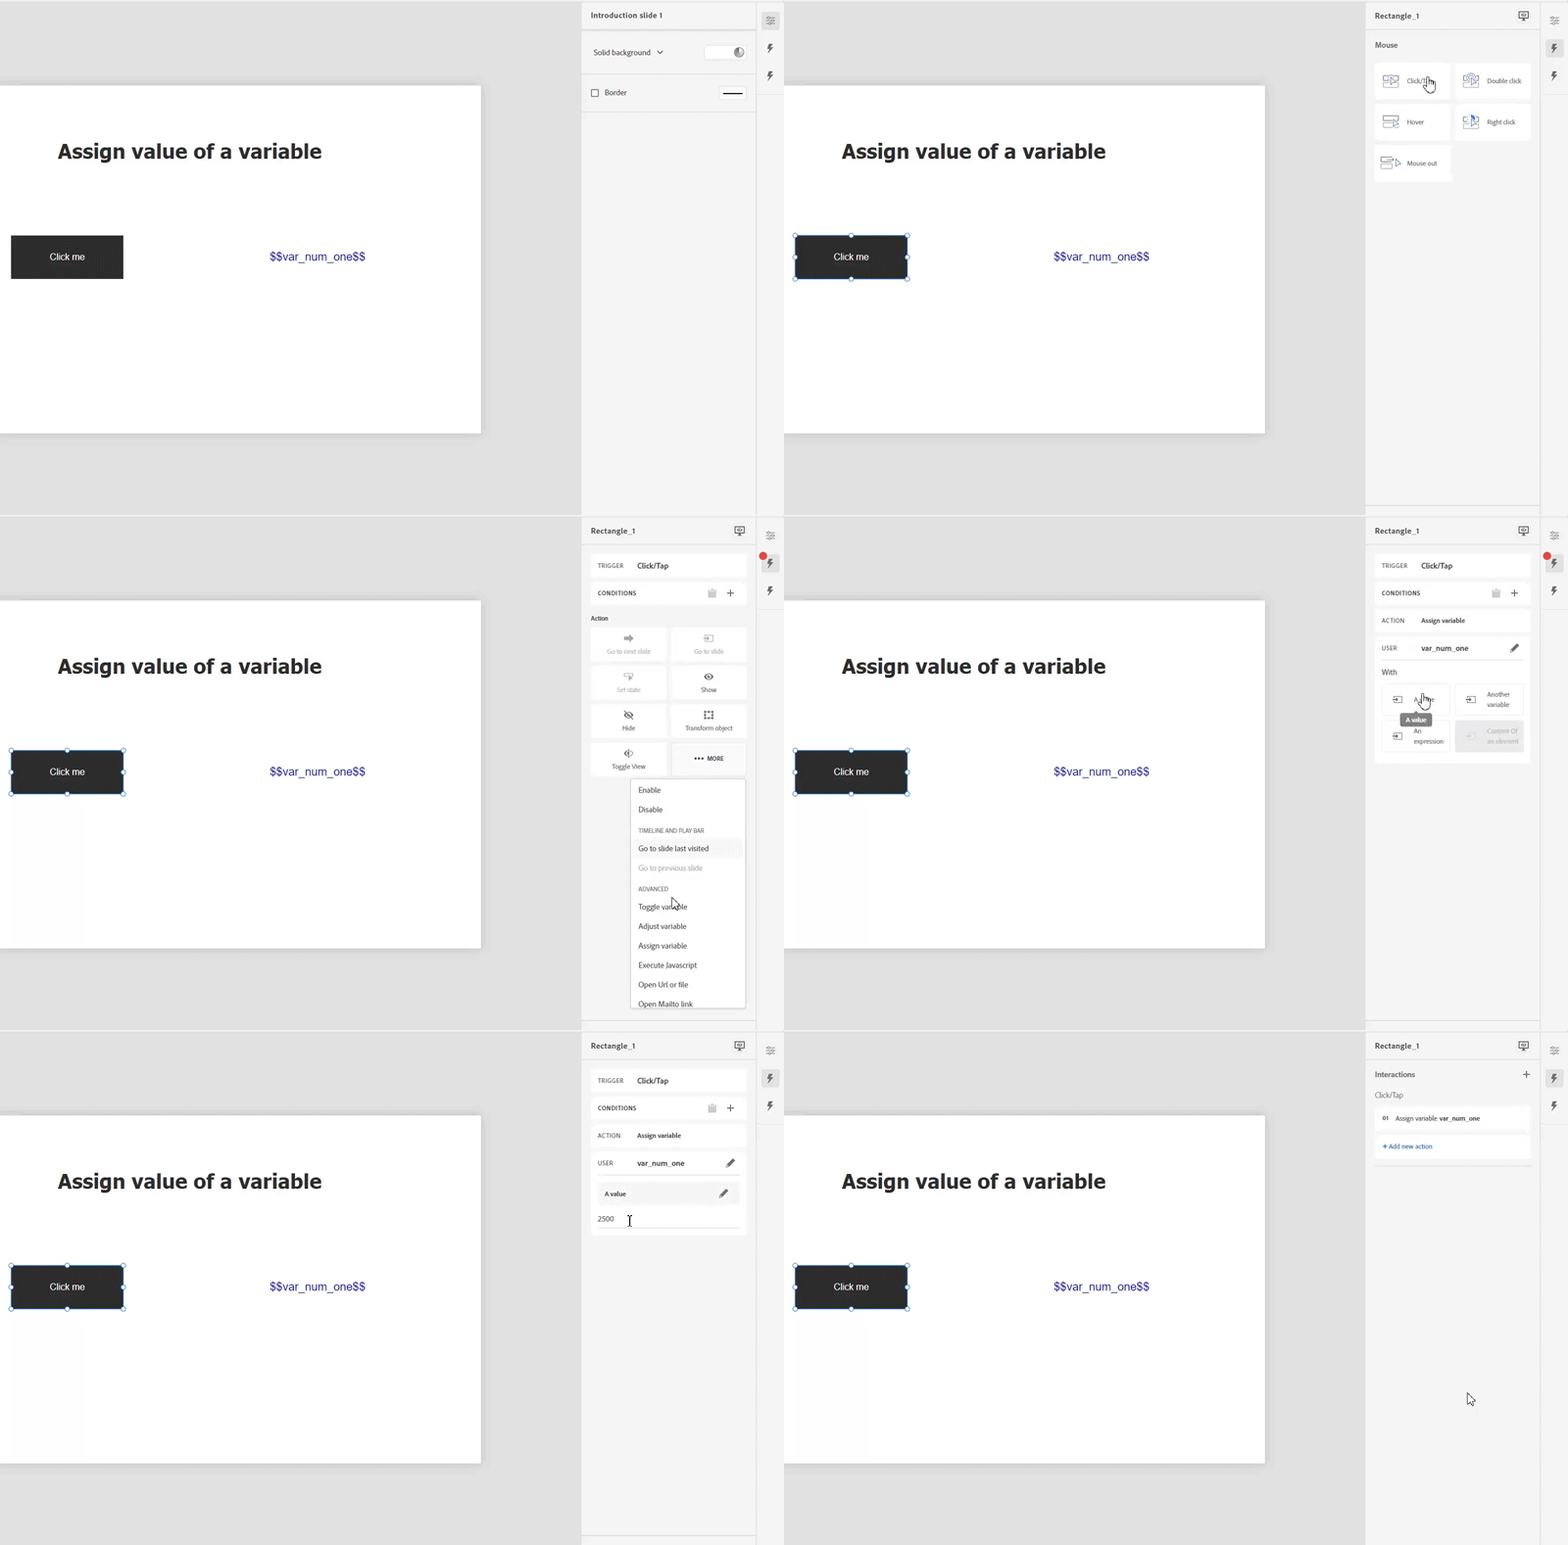
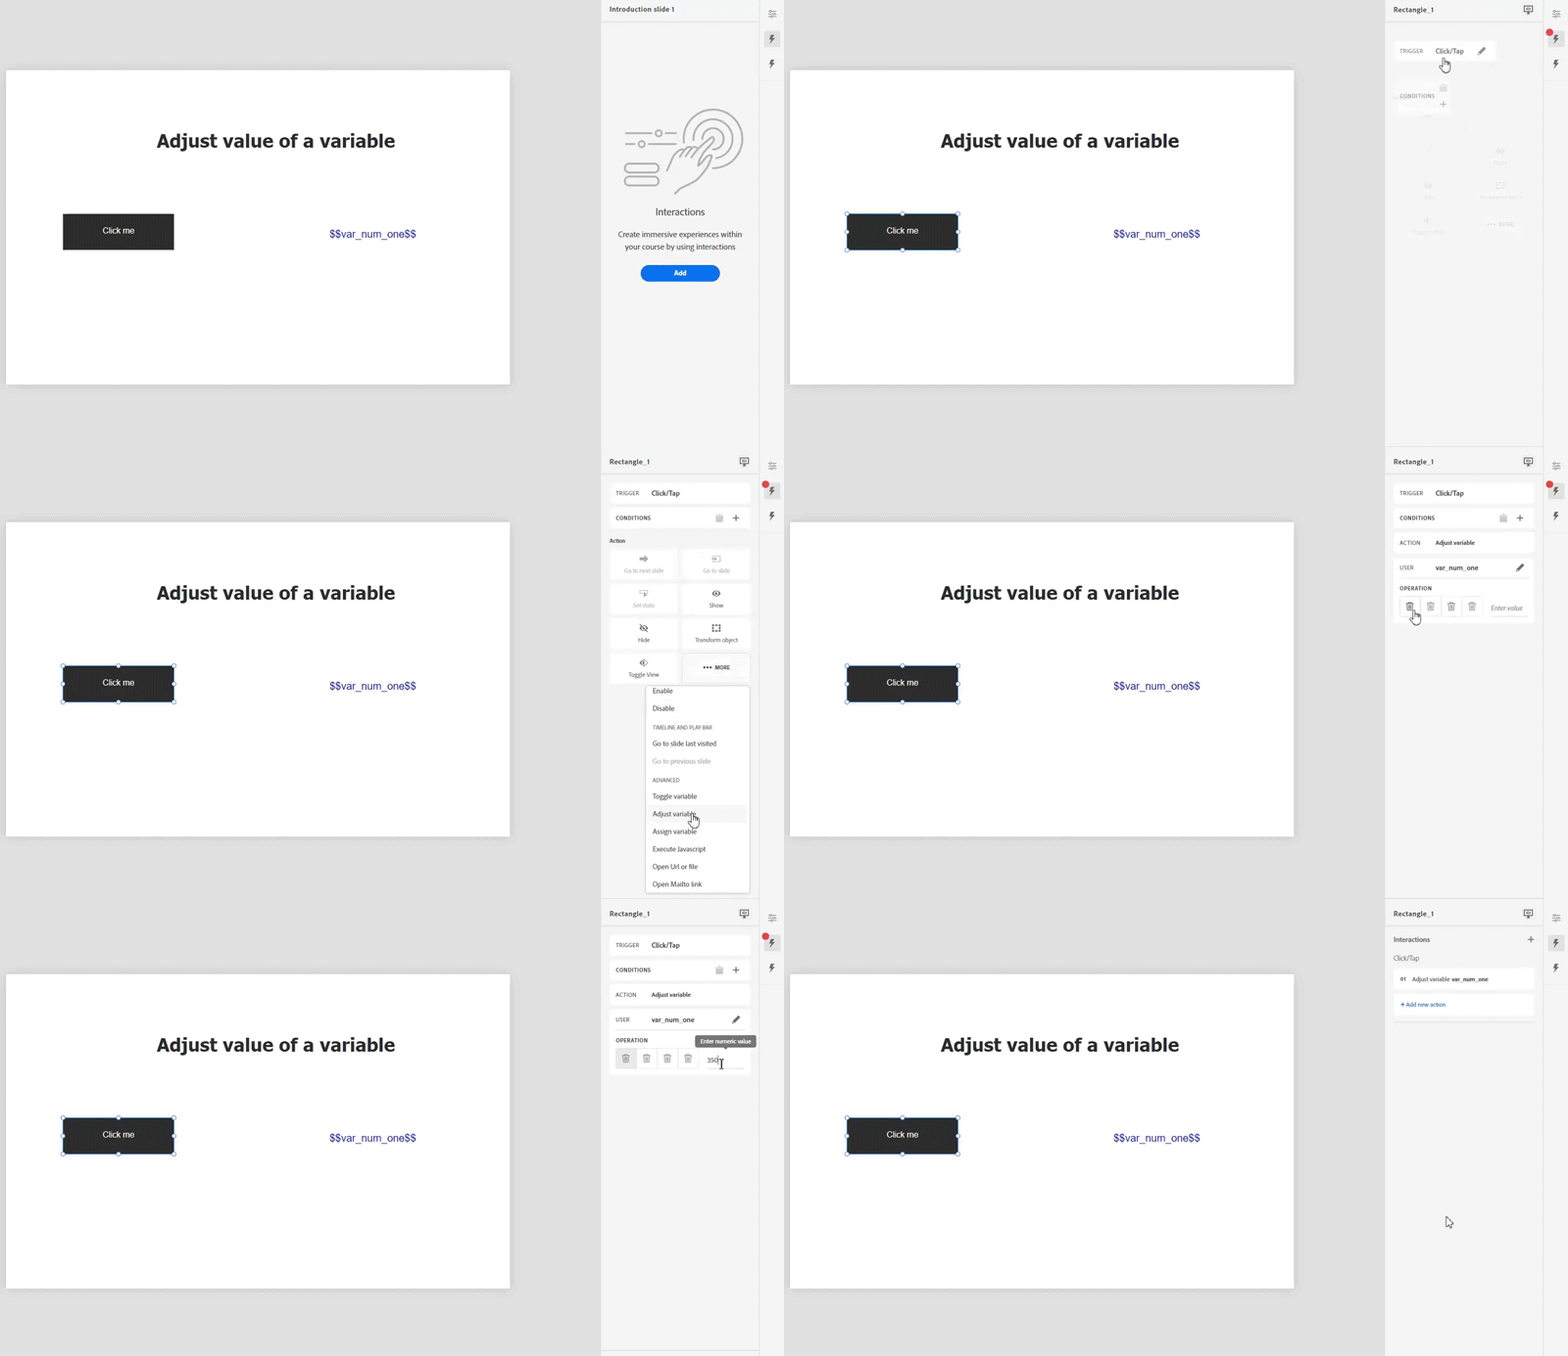
You can assign another value to variable, which already had a value assiged to. In addition to a value, you can also assign the value of another variable, an expression, or content of an element.
Insert an object and a text box on the stage. Insert a variable in the text box and make the object clickable. When you'll click the object, the value in the text box will change to the newly assigned value.


Insert an object and a text box on the stage. Insert a variable in the text box and make the object clickable. When you'll click the object, the value in the text box will change to the newly modified value.


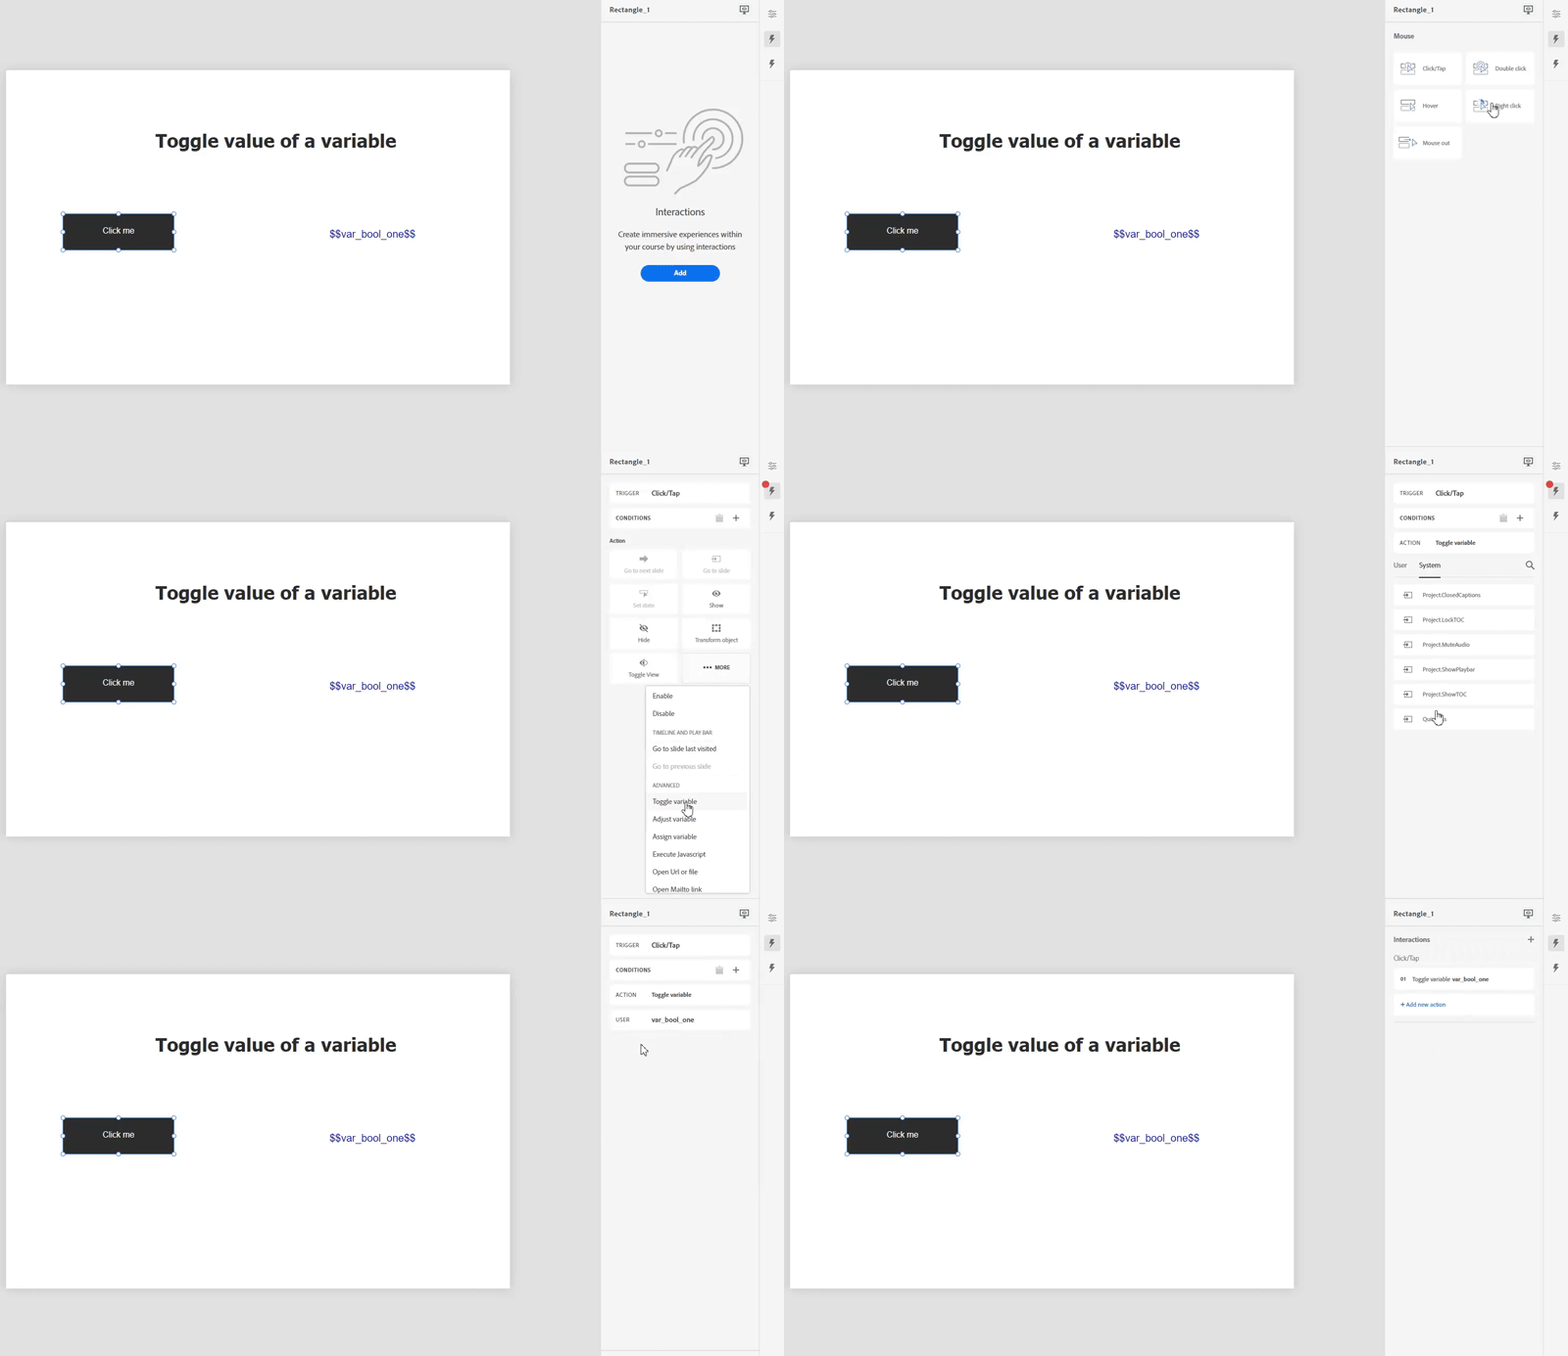
Insert an object and a text box on the stage. Insert a Boolean variable in the text box and make the object clickable. When you'll click the object, the value in the text box will toggle to either True or False.


Conditional actions, as the name suggests, are actions that are contingent upon a condition or a set of conditions. In other words, IF a certain condition exists, (or does not exist), THEN perform an action or a sequence of actions, or WHILE a condition exists or does not exist, then perform some actions. Conditional actions exist in our day to day lives, such as:
When designing eLearning content using conditional actions, you pretty much follow the same logic. For example,
Captivate supports the following types of conditional actions:
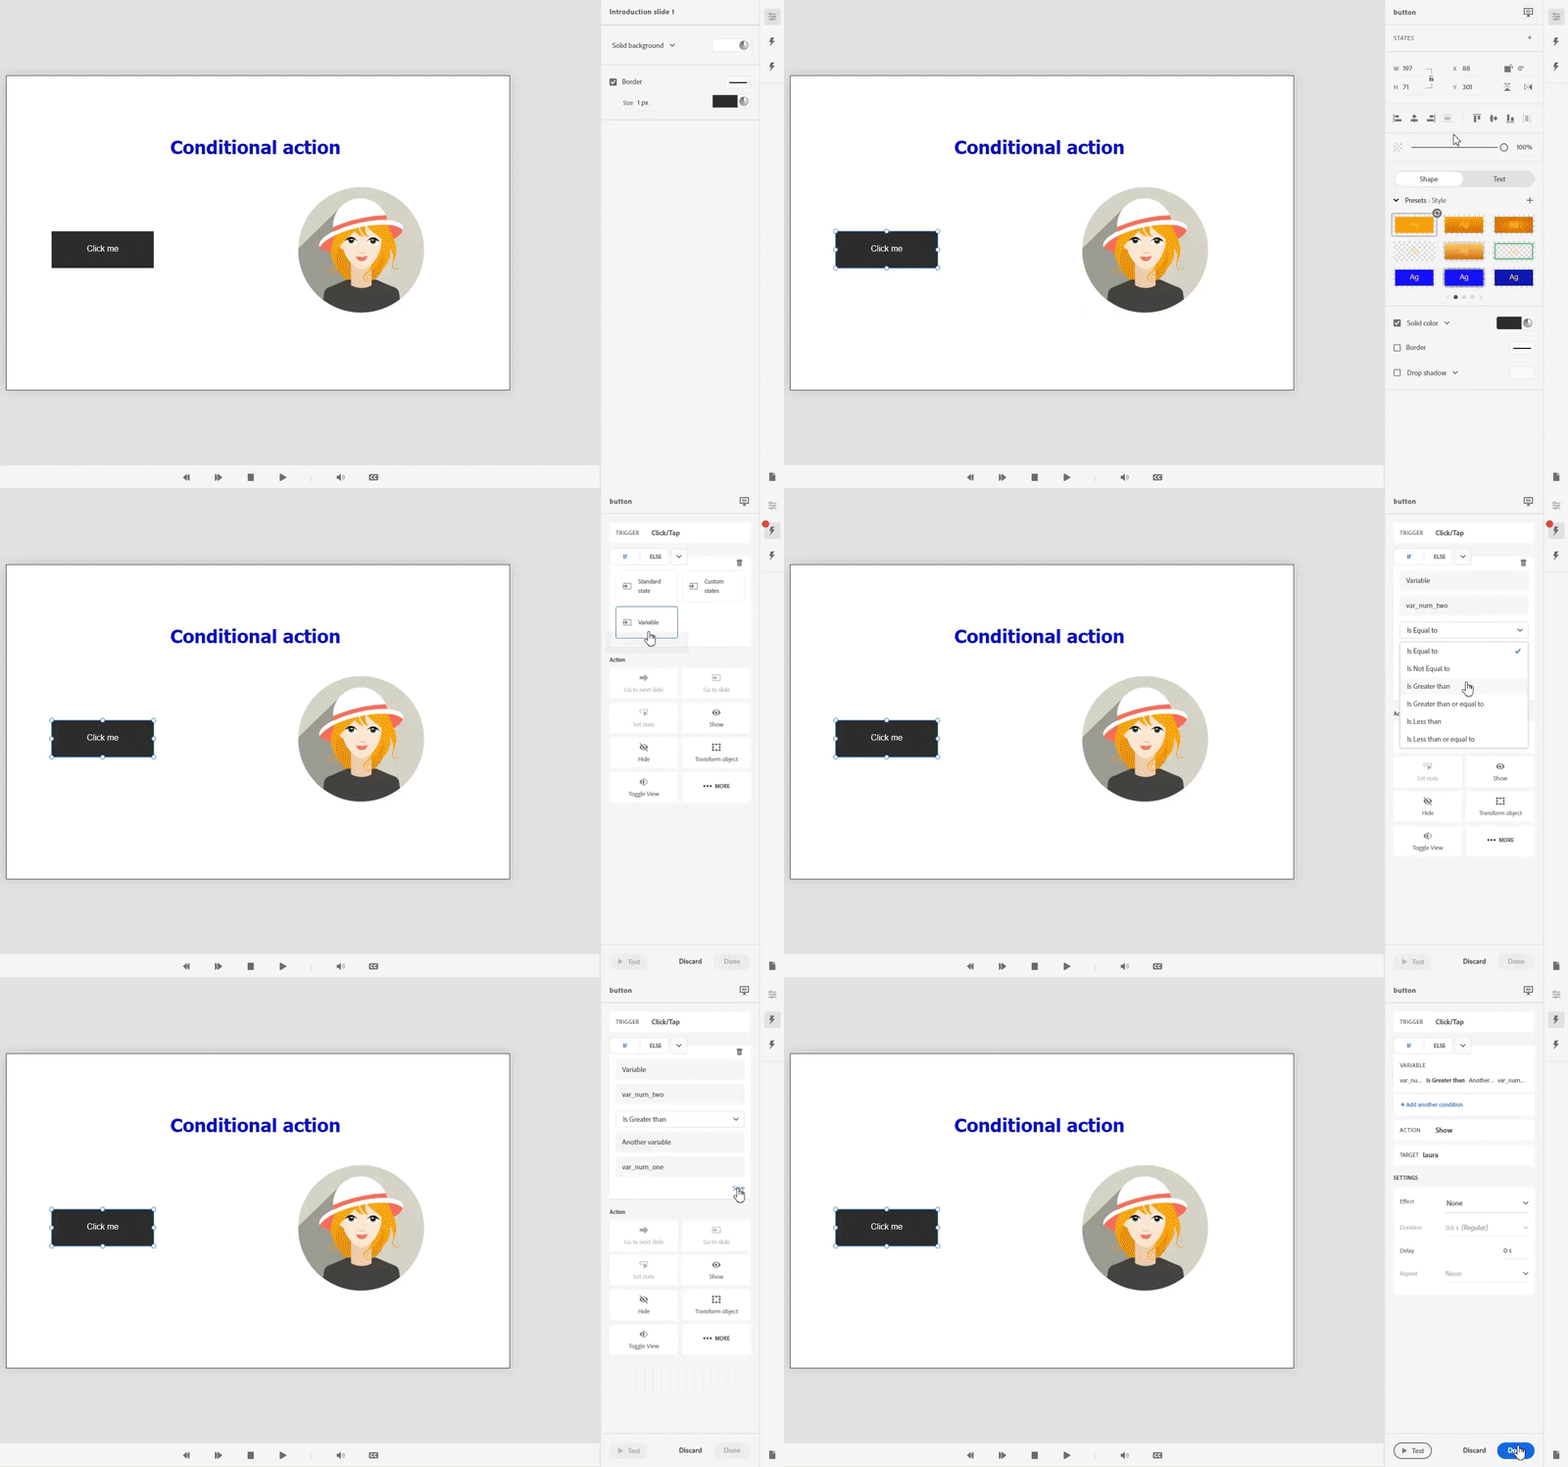
Here, you'll create a conditional action where upon clicking an object, a condition is evaluated (for example, value of a variable is greater than 100), and based on the condition, an action is performed (for example, hide an object or apply object effects.).
In the demo below, when you click the button, depending upon a condition, the image will be displayed (the image is hidden on the stage).
Condition
Define two variables var_num_one and var_num_two. When defining the condition, if the value of var_num_one is less than var_num_two, then execute the action, which, in this case, is displaying the image.
The stage


Variables
Select the object and click Interactions. Add an interaction for the object. Click the interaction Click/Tap.


Click Conditions.


In this step, you'll perform the following:


Choose the two variables. You'll compare the values of the two variables and depending on the condition, execute the action.


Define the condition.


Save the changes.
Now, you'll define the action based upon the condition assuming that the condition executed successfully. You'll display the image that was initially hidden on the stage. Click the action Show and choose the image, as shown below:


Click Next and save the interaction.
Upon previewing the project, if you click the object, the image displays because the condition was true. The entire workflow is represented in the gif below.


To copy a condition, perform the steps below:
After you paste the condition, you can see that a copy of the condition has been created.


To delete a conditional action, click the options menu of the action, and click Delete.


To edit a conditional action, hover on the the action, and click Edit.


To disable and enable a conditional action, click the options menu of the action, and click Disable or Enable.


Adobe Captivate is event driven. In other words, whatever a learner sees on the screen at run time is the result of changes that occur in the application. When an event happens, for example, a learner clicks an object, an object may change its shape or gets hidden/displayed. This change in the object is triggered by the event. Captivate, based on the event, evaluates a condition or a set of conditions, and executes an action.
Captivate supports the following triggers:
In the example below, you'll configure a condition based on custom states.
On the stage, add a button and an image. For the image, add two states, Light and Dark.


On the button, set a Click/Tap trigger, and assign the action, Set state. Set the target state of the image to Dark.


Click Done.
Now insert another object, a second button, which when clicked changes the state of the object if the object has been viewed previously.
On the second object, add a Click/Tap trigger, and add the condition Custom States.
Choose the image and then choose the required state.


After you choose the state, choose the option All Selected from the Visit drop-down.


Click Next.
After you've selected the option, set the condition of the state as Viewed. Choose the option Viewed. If you choose this option, the image will change state only after a previous state has been viewed.


After you've specified the condition as a state being viewed, you must set the action. In the Action panel, select the required action. For example, you can set it to Go to Next Slide.
Build immersive eLearning experiences with Captivate
Speed up authoring with simplified workflows and ready-to-go slides and assets.