Before starting Premiere Elements, connect and turn on all external DVD burners.
With each new release of Adobe Premiere Elements, Adobe reviews industry standards, market trends, and user feedback to define the new feature set. In Premiere Elements 2018, support for Blu-ray and AVCHD disc burning has been removed. You can still export in H264 AVCHD and H264 Blu-ray formats using the Advanced Settings option under the Custom tab in the Export & Share workflow.
After you have previewed your movie and are satisfied that it is complete, you are ready to burn the project to a DVD or Blu-ray Disc. Make sure that the disc you’ve selected is compatible with both your burner and player. Also, you must have enough available hard disk space to accommodate the compressed files as well as any scratch disk files created during export. If you don’t have enough free disk space on one drive partition, you can specify a different partition for the scratch disk files using the Edit > Preferences > Scratch Disks / Adobe Premiere Elements > Preferences > Scratch Disks command. (You can verify the space needed in the Burn dialog box.)
If your DVD burner is not compatible with Adobe Premiere Elements, you can burn the project to a DVD folder, and then burn the folder to DVD using the software that came with your burner.
Disc burning
Depending on the complexity and length of the project and your computer speed, encoding (compressing) video and audio for a disc can take hours. If you plan to burn multiple discs with the same content and quality, you can save time by burning them in the same session, which compresses the project only once.
Disc burn failure
When a disc burn operation is unsuccessful due to a hardware failure, Premiere Elements creates and saves an ISO image. You can then burn the ISO image to a disc, at a convenient time. See Disc burn failures.
Premiere Elements converts all audio to the 16-bit depth and 48 kHz sample rate required by DVDs. For the best results, record your audio using these settings.
Burn to AVCHD | Premiere Elements 2015 and earlier releases
-
-
In the Export & Share panel, click Disc.
-
In Disc view, choose AVCHD.
-
Select Disc as the Burn To option.
-
Type a name for the disc. This name appears if you insert the disc into a computer after the DVD burn has been completed. (The default name is a date stamp in 24‑hour format: YYYYMMDD_hhmmss.)
-
Select a burner from the Burner Location menu.
-
Make sure that a compatible disc is inserted in the drive. If you insert a disc, click Rescan to check all connected burners for valid media.
-
In the Copies box, enter the number of discs you want to burn during this session. You are prompted to insert new discs until all have been burned. Encoding the video and audio takes place only once.
-
For Preset Selection, select the option for the television standard used in the geographic location of your audience.
-
(Optional) Select Fit Contents To Available Space. If burning to a DVD, you can deselect this option and drag the slider to choose the video quality you want. (By default, this option is selected for DVD, and deselected for Blu-ray.)
-
Click Burn to begin converting your project to the DVD or Blu-ray format and burning the disc. If you are burning a DVD, and a burner is not available, you can burn to a DVD folder, and then burn the resulting files to DVD when the burner is available.
NoteEncoding the video and audio for disc output can take several hours.
Burn to a DVD folder
If your DVD burner isn’t compatible with Premiere Elements, you can burn the project to a folder instead. This creates a DVD‑compatible file that can be burned to disc using a DVD/ CD authoring program.
.
You can only burn a DVD project to a folder. You cannot burn a Blu-ray Disc project to a folder.
-
If the Disc view is not displayed, click Export & Share to display the Export & Share panel, and then click Disc.
-
From the Burn To menu, select one of the Folder options as your destination for the project. For movie projects bigger than a single‑layer 4.7 GB disc, select Folder (8.5 GB), which can accommodate dual‑layer discs.
-
Type a name for the folder.
-
Click Browse to specify a location for the folder.
-
Click Burn to begin creating the folder.
NoteEncoding the video and audio for disc output can take several hours.
Export as AVCHD and burn to DVD | Premiere Elements 2015 and earlier releases
Use AVCHD if you want to export your video to a high definition format that can be burnt on a DVD. The generated files are Blu Ray compatible and can be played using an AVCHD compatible Blu Ray player.
Alternatively, you can export the generated files to a folder on your computer.
You can copy the exported files to a pen drive and play them by plugging the drive into the USB port of a Blu Ray player. You can also play the files on your computer using a media player that supports Blu Ray files.
The procedure to burn your project in the AVCHD format is the same as the procedure for burning to discs or folders. For more info, see the associated sections on burning to discs and folders.
Adobe Premiere Elements supports stop markers in DVD only. If your project includes menu stop markers, they are available only if you burn the project on a DVD. The stop markers aren’t available if you burn the project on a blu-ray disc or AVCHD.
Disc burning guidelines and compatibility
If a compatible burner is connected to your computer, you can create a DVD or Blu-ray Disc directly from Premiere Elements. You can play the disc that you create in either a TV or computer disc player. Premiere Elements creates video discs. (It does not create data or audio discs.) Desktop DVD burners use a recordable DVD-5 disc (DVD+/-R), which has a 4.7 GB capacity and can hold approximately two hours of high-quality standard-definition video.
Typically, a Blu-ray Disc has a 25 GB capacity and can hold 135 minutes of high-definition video using MPEG-2 plus 2 hours of standard definition bonus material, or it can hold a total of 10 hours of standard-definition content. Blu-ray Discs come in BD-R (recordable) and BD-RE (rewritable) formats.
Premiere Elements supports single‑layer, 4.7 GB DVDs of the following types: DVD+R, DVD+RW, DVD‑R, and DVD‑RW. It also supports dual‑layer 8.5 GB DVD+R discs. Choose the media supported by both your DVD burner and the DVD player on which you plan to play the DVD. Not all DVD burners and DVD players support all types of DVDs. For example, many, but not all, TV DVD players recognize DVD+R discs.
DVD-R
This format uses write‑once recordable discs, and is compatible with both stand‑alone DVD players and DVD‑ROM drives. DVD‑R discs are available in two media types: General Use and Authoring. Most consumer DVD‑R burners use the cheaper General Use discs, and some professional burners use Authoring discs. You must use the correct media type for your burner. However, once written, the discs should be readable in either type of DVD player or drive. (General Use DVD‑R is designed to prevent backup of encrypted commercial DVDs.)
DVD+R
This non-rewritable format is compatible with most DVD players and DVD‑ROM drives. The first generation +RW burners did not support DVD+R recording, and probably cannot be upgraded to do so. However, all current models of DVD+RW burners support DVD+R recording. Compatibility of DVD+R discs in stand‑alone DVD players is similar to that of DVD‑R.
DVD-RW/DVD+RW
These formats are similar in functionality and compatibility with DVD burners and players. DVD‑RW and DVD+RW use rewritable discs that can rewrite more than 1000 times in ideal situations. The majority of stand‑alone DVD players play video recorded on DVD‑RW and DVD+RW discs, but the compatibility is not as high as with DVD‑R and DVD+R. Current DVD‑RW burners can also burn to DVD‑R.
If your DVD burner is not compatible with Premiere Elements, you can burn the project to a folder, which allows you to use the software included with the burner to burn the final DVD.
Compatibility issues for DVDs
When choosing media and hardware, consider the following compatibility issues:
The DVD+R and DVD-R formats are compatible with more set-top players than DVD+RW and DVD‑RW.
DVD-ROM drives are compatible with more DVD formats than set-top DVD players, often because computers can update firmware and drivers easier than a set-top player.
Older DVD players support fewer DVD formats.
Select the preset for a given format in accordance with the available space on the target medium and the needs of the target audience.
Burn to DVD or Blu-ray or AVCHD ISO image
Burn to Blu-ray or AVCHD applicable to Premiere Elements 2015 and earlier releases
If your DVD burner isn’t compatible with Premiere Elements, you can burn the project to an ISO instead. This creates a DVD/Blu ray/AVCHD-compatible iso file that can be burned to disc using any burn iso to disc software.
-
If the Disc view is not displayed, click Export & Share to display the Export & Share panel, and then click Disc.
-
Click Yes if you want to add a DVD menu to your disc. Click No to burn without a menu.

Build a DVD menu 
Build a DVD menu -
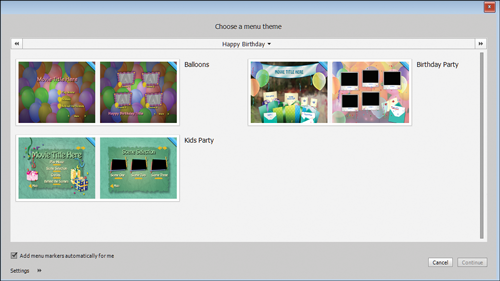
You can choose a menu theme for the DVD menu. Click on a theme to select it.
For more themes, click the drop-down list to expand the menu and view other themes. Click Continue.

Select theme 
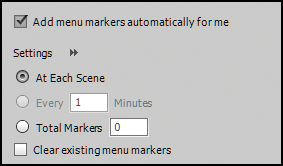
Select theme Select Add menu markers atuomatically for me to add menu markers to the menu theme. Click Settings to expand the settings section and configure the following settings:
- At Each Scene: Select this to add a menu marker to each scene.
- Total Markers: Select and enter the number of menu markers you want to add.
- Clear existing menu markers: Check this option to remove all the existing menu markers.

Menu markers - settings 
Menu markers - settings - At Each Scene: Select this to add a menu marker to each scene.
-
Select DVD, Blu ray or AVCHD.
-
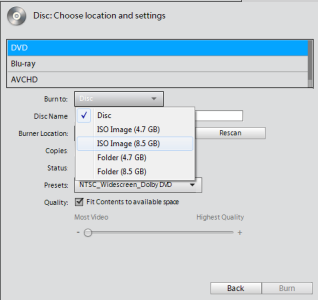
From the Burn To menu, select one of the ISO options as your destination for the project. For DVD/AVCHD movie projects bigger than a single‑layer 4.7 GB disc, select ISO (8.5 GB), which can accommodate dual‑layer discs.
For Blu ray movie projects bigger than a single‑layer 25 GB disc, select ISO (50 GB), which can accommodate dual‑layer discs.

Select the ISO type 
Select the ISO type -
Type a name for the ISO file.
-
Click Browse to specify a location for the ISO file.
-
Click Burn to begin creating the ISO image.
Video encoding for DVDs and Blu-ray Discs
Making a DVD or Blu-ray Disc involves encoding your video into the MPEG‑2 format or the H.264 format (Blu-ray only). Compression reduces your video and audio files to take up less storage space. For example, a 60‑minute video in Premiere Elements takes up approximately 13 GB. However, a single‑layer DVD holds only 4.7 GB. (Dual‑layer DVDs hold 8.5 GB.) To maintain maximum quality, Premiere Elements compresses the movie only as much as necessary to fit it on the disc. The shorter your movie, the less compression required, and the higher the quality of the video on the disc.
The Blu-ray presets are suitable for exporting AVCHD-quality files.
Compressing video and audio for use on a disc is very time consuming, even on high‑end, dedicated systems. The time required varies depending upon the speed of the computer processor, the amount of available memory, and the complexity and length of a project. A standard video project of 60 minutes may take from 4 to 6 hours to burn. Many DVD and Blu-ray Disc producers burn a project overnight.
The Blu-ray format H.264 is computationally intensive and, hence, takes a long time to encode. However, the compression is high and allows more video data per MB. MPEG-2 is not as computationally intensive, so it is faster, but the amount of video information per MB is less.
Creating discs for different geographical regions
If you are sharing your DVD or Blu-ray Disc with someone from a different country, you may need to burn the disc using a different TV standard. Typically, video devices (from camcorders to DVD or Blu-ray Disc players) conform to one of two TV standards: NTSC in Japan and North America, or PAL in most of Europe and the Middle East.
Premiere Elements can create both NTSC and PAL movies, so you can create movies appropriate for your region and other parts of the world. However, you get the best results if your captured video matches the TV standard to which you plan to export.
NTSC
North America, parts of South America, Japan, the Philippines, Taiwan region, South Korea, Guam, Myanmar, and others.
PAL
Europe, the Middle East, and parts of the following continents: Asia, Africa, South America.
Guidelines for successful disc burning
Once the movie includes the editing and navigation you want, the burning process is fairly straightforward. However, incompatible devices and media, or unexpected time factors can affect quality and completion. For a successful experience, consider the following guidelines when burning discs.
If encoding errors occur, consult the Troubleshooting section in Help.
Allow enough time. Encoding video and audio for a disc can take hours. Consider burning overnight. If you plan to burn several DVDs or Blu-ray Discs, burn them in the same session by using the Copies option in the Burn dialog box so that you encode the project only once.
Update drivers and firmware. Make sure that you have installed the latest drivers and firmware (software contained in a read-only device (ROM), which has instructions for controlling the operation of peripheral devices) for your burner. You can download updates from the Internet.
Choose a compatible burner. To make a DVD or Blu-ray Disc in Premiere Elements, you must have a compatible burner. First, make sure your system has a burner, not just a CD-ROM, CD-R, DVD-ROM drive, or Blu-ray drive. Then, check to see if the drive is compatible with Premiere Elements by looking for it in the Burner Location menu after you choose Disc from the Export & Share panel.
When burning a DVD, choose quality DVD recordable media and a compatible DVD media format. Not all DVD burners and DVD players support all types of DVDs. However, you can’t burn the DVD unless your DVD burner supports the format of the disc. For example, a burner that supports only +R or +RW discs doesn’t burn to ‑R or ‑RW discs. The same is true for DVD players. Many older DVD players might not recognize some rewritable discs created on a newer DVD burner.
Provide plenty of defragmented, free hard disk space. You must have enough available hard disk space to accommodate the complete compressed files, as well as any scratch files created during export. The space requirements for your project appear in the Burn dialog box.
Avoid making unnecessary previews. Previews of your Quick view timeline or Expert view timeline are useful for checking how your finished movie looks and plays, but they take time to create and are not used in the burning process.
Test your discs. If you make a mistake with a recordable disc, you must use another disc; whereas if you make a mistake with a rewritable disc, you can reuse it. For this reason, consider using a DVD‑RW or BD-RE (rewritable) disc for making test discs and then switching to a DVD‑R General Use disc or BD-R disc for final or extra copies. DVD‑R for General Use is write‑once recordable format that provides excellent compatibility with both stand‑alone DVD players and DVD‑ROM drives.
Avoid running nonessential computer tasks during export. Turn off screen savers and power savers. Avoid scanning for viruses, downloading updates, searching on the web, playing computer games, and so on.