
Navigate to the Microsoft AppSource store.
Last updated on
2 May 2025
- Adobe Connect User Guide
- About Adobe Connect
- Getting Started
- Basics
- New host onboarding
- Understand pods in Adobe Connect
- Layouts
- Create and manage Adobe Connect room
- Adobe Connect Central homepage
- Setup and manage audio in Adobe Connect meetings
- Join Adobe Connect meetings using telephony audio
- Backstage
- Broadcast controls- Green room
- Adobe Connect room search
- Share audio/video
- Engagement in Adobe Connect
- Breakout rooms
- Closed captioning
- Recordings
- Session dashboard
- Microsoft Outlook add-in
- Manage user content in Adobe Connect
- Generative AI features
- Basics
- Adobe Connect Mobile
Learn how to add a Connect room to your Microsoft Outlook event invite.
Important
You must be on Adobe Connect 12.9 and later to use the Microsoft Outlook Add-in.
The Adobe Connect Microsoft Outlook add-in lets you schedule and start Connect meetings and events directly from your Outlook calendar, saving time and streamlining your workflow.
Installing the Adobe Connect add-in with Microsoft Outlook allows hosts to easily access and manage Adobe Connect rooms directly within an Outlook invitation.
Additionally, you can enable the add-in for other team members, making it accessible to your entire team.
This feature allows users to create new rooms without opening Adobe Connect Central and set a default room for quick scheduling.
Deploy Adobe Connect Add-in for Outlook
-
-
Search for Adobe Connect for Microsoft Outlook.
-
Select Adobe Connect for Microsoft Outlook.
-
Add the Outlook add-in.
Grant permissions and access
Ensure that the necessary permissions are granted during the deployment process.
Frequently asked questions
The add-in will be available on the Microsoft App Source store. Admins can deploy it to their users through the Microsoft 365 Admin Center.
Users can install the add-in themselves if their organization's IT admin allows access to the Outlook Get add-in store.
If the IT admin does not deploy the add-in and does not allow users to access the store, the add-in will not be available to the users.
The add-in will be available automatically only if the IT admin deploys it to all users. Otherwise, users will need to install it from the store if allowed.
IT admins can find the add-in in the Microsoft App Source store and deploy it to their users from the Admin center.
The add-in only supports Microsoft 365 Outlook.
Pre-requisites for Adobe Connect Account Administrator
Adobe Connect admins must enable the Outlook add-in from Adobe Connect Central so that account members can access it.
View Configure Outlook add-in settings for more information.
About Outlook add-in
The Outlook Add-in for Adobe Connect simplifies the scheduling and management of Adobe Connect meetings directly within Microsoft Outlook. By integrating Adobe Connect's communication and collaboration features into Outlook, this add-in enhances productivity, allowing users to schedule, manage, and join Adobe Connect meetings without leaving their email client.
With this add-in, users can:
- Schedule Adobe Connect meetings directly from Outlook, eliminating the need to switch between applications.
- Manage Adobe Connect rooms and view a list of available rooms directly in Outlook.
-
Open Microsoft Outlook.
-
Select See more items (...) on the top menu bar of Outlook and then select Get Add-ins.
-
Search for Adobe Connect and then select Add.
Select Add to add the Adobe Connect for Microsoft Outlook add-in Select Add to add the Adobe Connect for Microsoft Outlook add-in

Alert
If the Adobe Connect add-in doesn't appear in All apps, contact your account administrator.
-
In Microsoft Outlook, select New Event to add the invite.
-
Select Adobe Connect from the toolbar.
From the Adobe Connect options , select View Rooms or Add Default Room.Add a default meeting room or view your rooms Add a default meeting room or view your rooms -
Select View Rooms.
-
Select Allow to launch the Adobe Connect login dialog.
-
Enter the Account URL.
Type the Adobe Connect domain Type the Adobe Connect domain -
Type your username and password. Select Login.
Type the username and password Type the username and password -
Select a room from the list. This list contains all the rooms where you are a host. Hover over the room name to view its information. You can also set a default room for quick and hassle-free meetings.
View all rooms View all rooms -
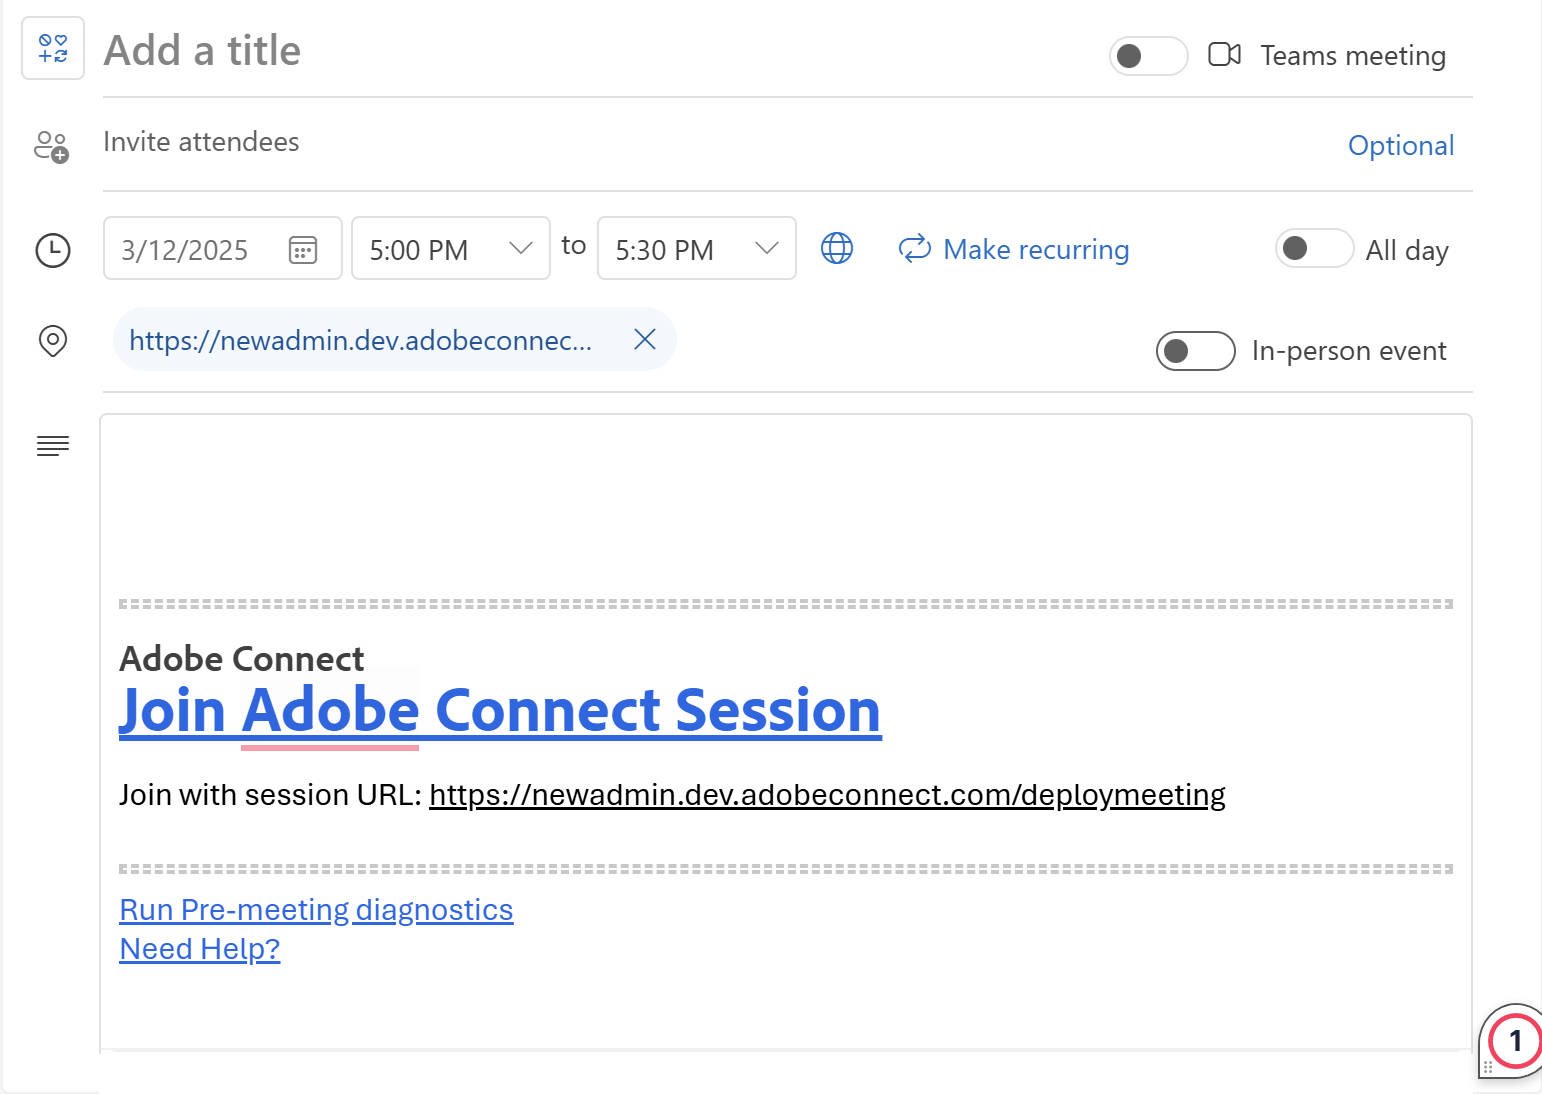
Select any room and then select Add room to add the room link to the body of the meeting invite.


-
In Microsoft Outlook, select New Event to add the invite.
-
Select Add Connect from the toolbar.
-
Select View Rooms.
-
Select Create new room.
Create a meeting room Create a meeting room -
Type the name of the room and select the type of room. The following room types are available:
- Meeting
- Virtual classroom
In the optional Additional settings section, add the meeting URL and select a template for the room. The following options are available:
- Custom meeting URL: Customize the meeting URL. For example, my.adobeconnect.com/(your room name). View Create custom URL for more information.
- Room template: From the dropdown, select a room template. View Room templates for more information.
Create a room and add meeting details Create a room and add meeting details -
Select Create and add to add the room to the list.


-
In Microsoft Outlook, select New Event to add the invite.
-
Select Adobe Connect from the toolbar and then select View Rooms.
-
Select another room in the list.
-
Select Add room to add the room link to the body of the meeting invite.
A default room is a pre-configured room for easy access to meetings, classes, or collaborative sessions. The default room is readily available to add in the invite without searching the list. Use the following steps to set a default room.
-
While creating a room or from the list of created rooms, select Set as default room to set the new or selected room as default.
Create a room and add meeting details Create a room and add meeting details -
Select Add room. When you view all rooms, the selected room now becomes default.