
On the main menu, click Interactions > Button. On the slide, you will see that a button is inserted.
Last updated on
Jun 29, 2023
|
Also applies to Captivate
- Captivate Classic User Guide
- Introduction to Captivate
- Captivate Classic Release Notes
- Adobe Captivate Classic 11.8.4 Release Notes
- Adobe Captivate Classic 11.8.3 Release Notes
- Adobe Captivate Classic 11.8.2 Release Notes
- Adobe Captivate Classic 11.8.1 Release Notes
- Adobe Captivate Classic 11.8 Release Notes
- What's New in Adobe Captivate (2019 release) Update 5
- What's New in Adobe Captivate (2019 release) Update 2
- Adobe Captivate Release Notes
- Create Projects
- Create different types of projects in Adobe Captivate
- Customize the size of an Adobe Captivate project
- Responsive Project Design with Adobe Captivate
- Create Virtual Reality (VR) projects
- Work with responsive text in Adobe Captivate
- Work with themes in Adobe Captivate
- How to apply view specific properties in responsive projects
- How to create backup files for Adobe Captivate projects
- Asset panel
- Create branching and forced navigation in Captivate
- Replace image on the stage
- Add and Manage Objects
- Work with multi-state objects in Adobe Captivate
- Object effects
- Insert web objects in Adobe Captivate projects
- Work with object styles in Adobe Captivate
- How to rotate objects in Adobe Captivate
- How to manage objects with the Main Options toolbar
- How to merge objects in a slide
- How to manage objects in the library
- How to group objects in Adobe Captivate
- Edit object information using the Advanced Interaction panel
- How to copy, paste, and duplicate objects in Adobe Captivate
- Control the visibility of objects
- How to change the display order of objects in Adobe Captivate
- Apply shadows to objects
- How to align objects in Adobe Captivate
- How to add reflection to objects in Adobe Captivate
- Import assets into a Captivate project
- Slides
- Add slides to an Adobe Captivate project
- Editing slides in an Adobe Captivate project
- Delete Adobe Captivate project slides
- Change slide order in Adobe Captivate
- Set slide properties in Adobe Captivate
- Add and convert slide notes to audio files with Adobe Captivate
- Set up knowledge check slides in Adobe Captivate
- How to add slide transitions in Adobe Captivate
- How to work with master slides in Adobe Captivate
- How to lock Adobe Captivate slides
- How to hide or exclude slides in an Adobe Captivate project
- How to group and ungroup slides in Adobe Captivate
- Timeline and grids
- Create Quizzes
- Insert question slides in Adobe Captivate projects
- Set quiz preferences for Adobe Captivate
- How to enable learners to submit all quiz responses simultaneously
- How to set up question slides with Adobe Captivate
- Using random question slides in Adobe Captivate
- How to allow users to return to quiz
- Import questions from CSV format files
- Import questions from GIFT format files
- How to insert pretests in Adobe Captivate
- Audio
- Video
- Interactive Objects
- Interactions
- Non-interactive objects
- Create and edit smart shapes
- Edit and create text captions with Captivate
- How to use images and rollover images with Captivate
- How to customize smart shapes in Adobe Captivate
- How to create zoom areas in Adobe Captivate
- How to set audio for noninteractive objects
- How to create rollover slidelets in Adobe Captivate
- How to create rollover captions in Adobe Captivate
- Change mouse properties in Adobe Captivate
- Use highlight boxes in Captivate
- Work with swatches in Adobe Captivate
- Fix size and position of non-interactive objects
- Add animations to a Adobe Captivate project
- Advanced Editing and Project Reviews
- Variables and Advanced Actions
- Record Projects
- Publish Projects
- Preview and publish responsive projects
- Publish project to Adobe Captivate Prime
- Publish projects as HTML5 files with Adobe Captivate
- Publish projects as executable files
- Publish projects as MP4 files with Adobe Captivate
- Set publishing preferences in Adobe Captivate
- Using web fonts from Adobe Fonts in Adobe Captivate
- Report quiz results to an internal server
- Use Adobe Captivate with Other Applications
- Import and edit PowerPoint presentations in Captivate
- Upload an Adobe Captivate project to a Learning Management System
- Learn about the Common JavaScript interface for Adobe Captivate
- How to publish Captivate projects to Microsoft Word
- Using Adobe Connect with Captivate
- How to add Captivate projects to a RoboHelp online help system
- How to package multiple SCOs using the Adobe Multi-SCORM Packager
- Troubleshoot Adobe Captivate
- Resolve known issues and limitations in the latest versions of Adobe Captivate, Adobe FrameMaker, and Adobe RoboHelp.
- Early build for Captivate (2019 release) on macOS Big Sur (macOS 11)
- Hotfix for VR content not playing on devices
- Configure SSL for Live Preview on Devices
- Captivate (2019 release) activation issues on macOS Catalina
- Captivate responsive courses will not auto-play on browsers
- Issues with Asset panel in Adobe Captivate (2019 release)
- Error 103 while installing Adobe Captivate
- Issues when previewing a Captivate project
- Resolve known issues and limitations in the latest versions of Adobe Captivate, Adobe FrameMaker, and Adobe RoboHelp.
Add interactive buttons to Adobe Captivate Classic projects and add states to the buttons.
Buttons are one of the most common ways of adding a standard object to your Captivate Classic slides.
You can increase the interactivity of your Adobe Captivate Classic projects by adding buttons. To add a button, use the default button style (a plain, white rectangle). You can also import custom button images. You can size and position buttons on a slide. You determine what happens after the user clicks the button.
Adding an interactive button
In Captivate Classic, you can add interaction to a button and have any action when you click the button.
To add an interactive button:
-
-
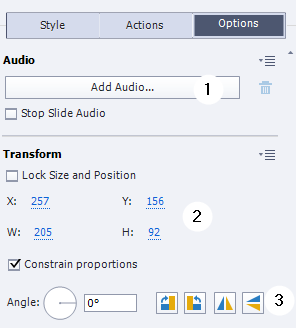
With the button inserted in the slide, you can change the properties of the button from the Properties Inspector panel.
You can change the style of the button (transparent or image) and change the button font.
-
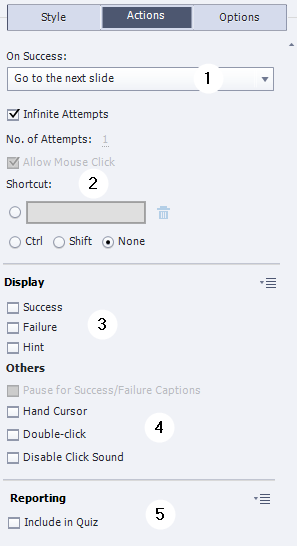
To add an action or interaction to the button, select the button, and click the Actions tab, as shown below:
-
Display Success, Failure, and Hint captions, if required.
- Success: Select this check-box to include a caption to be displayed when the user clicks the button.
- Failure: Select this check-box to include a caption to be displayed when the user clicks outside the button.
- Hint: Select this check-box to specify a hint to be displayed to users. The hint is displayed when the user moves the mouse over the button.
You can delete a button at any time by selecting it and pressing the Delete key. When you delete a button, all associated objects (such as success and failure captions) are also deleted.
-
Preview and/or publish the project.


As example , create a project with an interactive button, which when clicked hides an object. When you click the button again, you can see the object.
Create a variable myVar and set its value to zero. On button success, in the Advanced Actions panel, choose a conditional action with an if statement.
The action checks that if the value of myVar is zero, then hide the object, and increment the value of myVar to one.
Adding a Smart Shape as button
Smart shapes include many categories of readily-available shapes such as arrows, buttons, or basic shapes. You can insert and modify such shapes quickly and easily in your Adobe Captivate Classic projects.
You can convert a smart shape into a button and add interactivity to it.
-
Open the slide to which you want to add a button.
-
On the main menu, click Shapes > choose any Smart Shape.
-
Choose the button and modify the button properties in the Property Inspector panel.
-
Select the Use as Button check-box and define the action when the button is clicked.
-
Preview and/or publish the project.


Adding an Image as button
Image as a button
In eLearning projects, there were situations, when you, as an eLearning developer, wanted to import any image and use it as a button. In earlier versions of Captivate Classic, adding an image as a button involved multiple steps. You had to import an image, add a smart shape over it, change the opacity, and then use the smart shape as a button. It was more a workaround, less a precise workflow.
In Captivate Classic (2019 release) Update 2, you can add an image as button and add interactivity to the button, something that Captivate Classic already does. You can use the object as a button to trigger any action and assign states.
This workflow not only improves your productivity, but also introduces a simpler way to create buttons.
You can use both jpg/bmp and vector images as button. The following are the file formats supported for image files:
· Jpeg, jpg
· Gif
· Png
· Bmp
· Ico
· Emf
· Wmf
· Pot, potx, pict
To convert an image and use the image as a button,

-
Open a project in Captivate Classic.
-
To insert an image, click Media > Image, and select any image.
-
On the stage, select the image.
-
On the Property Inspector, choose the option Use as Button.
-
In the Actions tab, define the action after you click the button when previewing the project or having published the project.
Set the stage
-
Create a responsive project.
-
In the project, on the toolbar, click Fluid Box, and two horizontal Fluid Boxes.
Fluid Boxes Fluid Boxes -
On the right Fluid Box, add the image, conclusion_img_bottom.png.
Insert image Insert image -
Add Dave and Angie to the left Fluid Box.
Dave and Angie Dave and Angie -
On the right Fluid Box, add a smart shape with the title Image as button demo.
Insert smart shape Insert smart shape -
Insert speech bubbles for both Dave and Angie. Also, unlock both the objects from the Fluid Box.
Insert speech bubbles Insert speech bubbles


Assign actions to the objects
Once the stage is set, the next steps are creating a variable, advanced actions, and assigning the button actions to the advanced actions.
-
Create a variable _toggle. The initial state of this variable is 0. When you click a button, the state of the variable becomes 1. For more information, see Variables in Captivate Classic.
Create variable Create variable -
Create the advanced actions.
-
The first advanced action hides both the speech bubbles when you launch the project. Name the action hide_bubbles.
Hide bubble action Hide bubble action In the Property Inspector, under the Actions tab, choose the action hide_bubbles.
Choose action Choose action -
The second advanced action, toggle_Dave, when invoked, reveals Dave’s speech bubble, when you click Dave. The variable _toggle changes its value to 1 when you click Dave. After the speech bubble disappears, the value of _toggle becomes 0.
-
The third advanced action, toggle_Angie, when invoked, reveals Angie’s speech bubble, when you click Angie. The variable _toggle changes its value to 1 when you click Angie. After the speech bubble disappears, the value of _toggle becomes 0.
Toggle Angie Toggle Angie
-
-
Convert both Dave and Angie into buttons. Choose the image, and in the Property Inspector, choose the Use as Button check-box.
Use as button Use as button -
Assign both Dave and Angie to their respective advanced action.
-
After you are done creating your project, you will need to make it available for your users. To do this, you will need to publish your project. Adobe Captivate Classic allows you to publish your project to multiple output locations:
· Your computer
· iOS or Android
· Adobe Connect


Make SVG as button
In this update, you can also make a Scalable Vector Graphic (SVG) button. The process is similar to how you have made other types of buttons as image.
-
On the toolbar, click Media > SVG, and select any SVG.
-
On the Property Inspector, enable the option Use as Button.
-
In the Actions tab, assign any action to the button from the On Success drop-down list.
Fill SVG
You can apply a fill color to the image. To apply fill on the image,
-
Select the SVG on the stage.
-
On the stage, double-click the SVG.
-
On the SVG, choose any path, and apply a color from the color palette. In SVG, you can use a path to create lines, curves, arcs, and more. A path is also a combination of multiple shapes, for example, straight or curved lines. A path can be as complex as a series of polylines; therefore, it is important to know the right path to apply a color to. For example, the screenshots below show a path that has been filled with color. In the first image, the path is filled with red. In the second image, the path is filled with green.
The blue boundary on the SVG shows the path selected in the SVG and changing color would change color for that path only.


Add states to the button
To add states to the button,
-
Convert an image into a button.
-
On the Property Inspector, click State View.
-
Change the properties of the RollOver and the Down states.
-
Exit the State view and preview/publish the project.
The buttons should change states when they are acted upon. You can also add visited state and custom states to image as a button.
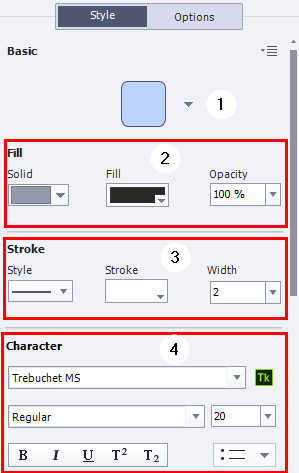
Button properties reference
To view the properties of a button, select it on the slide. The Property inspector displays the properties of the button.When you change the properties, the changes are instantly applied to the selected instance of the button.
Interactive button properties

|
Id |
Description |
|---|---|
|
1 |
Choose any of - Text, Transparent, or Image. |
|
2 |
The button label. |
|
3 |
Change the properties of the button label font. |
|
4 |
Change the button label effects. |
|
5 |
Change shadow and reflection properties of the button. |
|
6 |
Choose to apply the properties to all objects of the same type. |
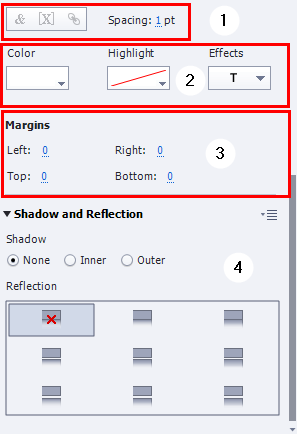
Smart Shape as button properties
|
Property |
Label description |
|---|---|
|
|
1. Change the smart shape. 2. Change the smart shape background color and opacity. 3. Modify the stroke properties of the button. 4. Change the button label font properties. |
|
|
1. Insert symbol, user-defined variable, or hyperlink. 2. Modify button label color properties. 3. Modify button margins. 4. Modify button shadow properties. |
|
|
|
|
|
|
Using interactive buttons in a Drag and Drop interaction project
Drag-and-drop interactions provide an interesting and engaging way of assessing your users’ knowledge. This interaction lets users answer questions by draging and dropping objects in the designated areas or objects.
A drag-and-drop interaction involves a drag source and a drop target. Users drag the drag sources and drop them onto drop targets.
-
Create a drag and drop interaction project specifying the drag sources and drop targets, and the mappings, as shown below.
For more information on creating s drag and drop interaction, see Drag and drop interactions in Adobe Captivate Classic.
-
Add appropriate success and failure captions.
-
To add Undo and Reset buttons to the project, navigate to the Drag and Drop panel, and enable the options Undo and Reset.
-
To add states to the buttons, select a button, click the Properties Inspector, and add button properties for RollOver and Down states.
-
Preview and/or publish the project.


Using interactive buttons in a Quiz project
In Captivate Classic, you can add states to quiz buttons. You can add a RollOver state and/or a Down state to the buttons.
-
Create a quiz project with the buttons, as shown below:
-
Add states to the following buttons:
- Submit
- Back
- Skip
- Review forward
- Review back
- Clear
-
Preview and/or publish the project.

Using interactive buttons in a Master Slide in a responsive mode
You can add states to buttons in a Master Slide in responsive mode and use the Master Slide in your project.
-
Create a responsive project (Ctrl+H) and insert a Master Slide (Insert > Content Master Slide) into the project.
-
Add the title, sub-title, and content placeholders. Add three smart shapes into the project and convert them into buttons.
Master Slide responsive layout Master Slide responsive layout -
Add states to the buttons. Choose a button and in the Properties Inspector panel, add the button properties for RollOver and Down states.
Button states Button states -
Exit the Master Slide view. Insert a content slide, and choose the Master Slide you had created from the list of Master Slides. Insert a title, sub-title, and content to the slide.
Preview/publish the project.
-
To insert Fluid Boxes into the project, click Suggest Fluid Boxes in the Properties Inspector. The Fluid Box automatically creates containers according to the layout of the objects.
Align the objects vertically or horizontally.
For more information on Fluid Boxes, see Fluid Boxes in Captivate Classic.
Master Slide Fluid Box layout Master Slide Fluid Box layout


Automatically resize buttons
You can configure Adobe Captivate Classic to automatically resize a button or caption according to the amount of text in the button. If you edit the text, the button changes size to accommodate the new text.
-
In an open project, select Edit > Preferences (on Windows) or Adobe Captivate Classic > Preferences (Mac OS).
-
In the Preferences dialog box, select Defaults under the Global menu.
-
Select Autosize Buttons in the General panel on the right.
Note
Best practice is to resize buttons before resizing the project. Resizing a project does not resize the buttons automatically.
Modify buttons on question slides
You can modify some properties of buttons on question slides. The standard buttons are Clear, Back, Submit, and Skip.
-
Select the question button that you want to modify.
-
In the Quiz Properties panel, set the values for the various options.
Note
Resize any buttons before resizing the project. Resizing a project does not resize the buttons automatically.
