Select a shape and select the Fill tool.
- Illustrator User Guide
- Get to know Illustrator
- Introduction to Illustrator
- Workspace
- Workspace basics
- Create documents
- Learn faster with the Illustrator Discover panel
- Accelerate workflows using the Contextual Task Bar
- Toolbar
- Default keyboard shortcuts
- Customize keyboard shortcuts
- Introduction to artboards
- Manage artboards
- Customize the workspace
- Properties panel
- Set preferences
- Touch Workspace
- Microsoft Surface Dial support in Illustrator
- Undo edits and manage design history
- Rotate view
- Rulers, grids, and guides
- Accessibility in Illustrator
- View artwork
- Use the Touch Bar with Illustrator
- Files and templates
- Tools in Illustrator
- Tools at a glance
- Select tools
- Navigate tools
- Paint tools
- Text tools
- Draw tools
- Modify tools
- Generative AI (not available in mainland China)
- Quick actions
- Illustrator on the iPad
- Introduction to Illustrator on the iPad
- Workspace
- Documents
- Select and arrange objects
- Drawing
- Type
- Work with images
- Color
- Cloud documents
- Basics
- Troubleshooting
- Add and edit content
- Drawing
- Drawing basics
- Edit paths
- Draw pixel-perfect art
- Draw with the Pen, Curvature, or Pencil tool
- Draw simple lines and shapes
- Draw rectangular and polar grids
- Draw and edit flares
- Trace images
- Simplify a path
- Symbolism tools and symbol sets
- Adjust path segments
- Design a flower in 5 easy steps
- Create and edit a perspective grid
- Draw and modify objects on a perspective grid
- Use objects as symbols for repeat use
- Draw pixel-aligned paths for web workflows
- Measurement
- 3D objects and materials
- Color
- Painting
- Select and arrange objects
- Select objects
- Layers
- Expand, group, and ungroup objects
- Move, align, and distribute objects
- Align, arrange, and move objects on a path
- Snap objects to glyph
- Snap objects to Japanese glyph
- Stack objects
- Lock, hide, and delete objects
- Copy and duplicate objects
- Rotate and reflect objects
- Intertwine objects
- Create realistic mockups
- Reshape objects
- Crop images
- Transform objects
- Combine objects
- Cut, divide, and trim objects
- Puppet Warp
- Scale, shear, and distort objects
- Blend objects
- Reshape using envelopes
- Reshape objects with effects
- Build new shapes with Shaper and Shape Builder tools
- Work with Live Corners
- Enhanced reshape workflows with touch support
- Edit clipping masks
- Live shapes
- Create shapes using the Shape Builder tool
- Global editing
- Type
- Add text and work with type objects
- Add basic formatting to text
- FAQs on fonts in Illustrator
- Fonts and typography
- Create type on a path
- Create bulleted and numbered lists
- Manage text area
- Add advanced formatting to text
- Format paragraphs
- Character and paragraph styles
- Special characters
- Tabs
- Scale and rotate type
- Line and character spacing
- Hyphenation and line breaks
- Spelling and language dictionaries
- Format Asian characters
- Arabic and Hebrew type
- Composers for Asian scripts
- Reflow Viewer
- Preview, add, or replace missing fonts
- Import and export text
- Identify the fonts used in images and outlined text
- Creative typography designs
- Create text designs with blend objects
- Create a text poster using Image Trace
- Create special effects
- Web graphics
- Drawing
- Import, export, and save
- Import
- Creative Cloud Libraries in Illustrator
- Save and export
- Printing
- Prepare for printing
- Printing
- Automate tasks
- Troubleshooting
- Fixed issues
- Known issues
- Crash issues
- Recover files after crash
- Repair damaged documents
- Safe mode
- File issues
- Supported file formats
- GPU device driver issues
- GPU performance issues
- Wacom device issues
- DLL file issues
- Memory issues
- Preferences file issues
- Font issues
- Printer issues
- Media issues
- Missing plugin issues
- Share crash report with Adobe
- Unable to apply effects in Illustrator
- Improve Illustrator performance
- Fixed issues
Create colorful vector illustrations on your iPad! Learn how to apply fill colors, gradients, swatches, and more using Illustrator on the iPad.


Add fill and stroke color using toolbar
Fill color is the color contained in the shape object and stroke is the border of the shape object. The fill or stroke can be a color, gradient, or pattern.


To add a fill or a stroke color,
- Select the object and tap the Fill or Stroke tool displayed at the bottom of the toolbar.
- Choose a solid color from the Color wheel, Color spectrum sliders, Swatches, Color books, and Libraries, or choose a gradient (Linear, Radial, Point).
See also: Paint with fills and strokes in Illustrator on the desktop.
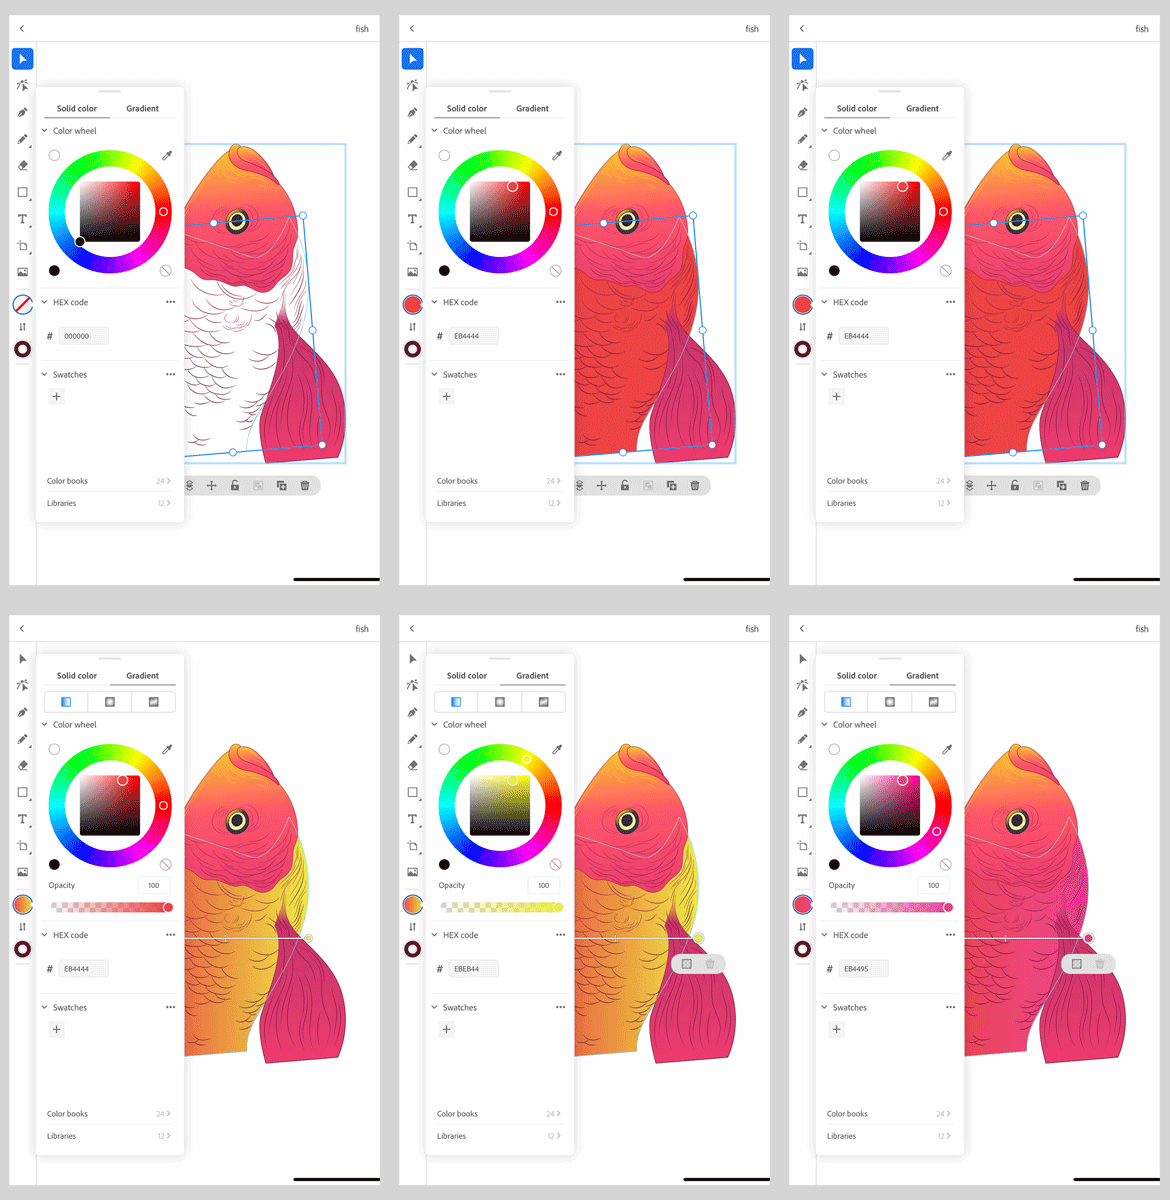

Tap Fill or Stroke tool, and then tap Solid color to view the color options:
- Color wheel: Choose a color from the color wheel and apply in your object using the Color Picker tool.
- Color spectrum: Tap more options to choose a color spectrum.
- CMYK sliders (Process color)
- Grayscale slider
- Hex code (Web color)
- HSB sliders (Hue, Saturation, Brightness)
- RGB sliders (Screen colors)
- CMYK sliders (Process color)
- Swatches: Tap more options to choose from a swatch. Add the selected color to the swatch for easy access.
- Color books: Select from industry-standard swatches.
- CC Libraries: Select from a saved swatch library.
- Add colors using the built-in camera: Select and add colors from the camera screen.
Add solid colors to Swatches using built-in camera
- Tap the Fill or Stroke tool.
- In the Swatches panel, tap to open the camera.
- Position your camera to adjust the photo for an accurate capture.
- Drag the slider on the left side of the screen to increase or decrease the number of colors you want to select.
- Tap the screen to freeze or unfreeze the scene and color pointers.
- Drag the pointers to choose the color.
- Tap the capture button to add your colors to Swatches.
![]() Also, you can tapto unfreeze the scene and color pointers.
Also, you can tapto unfreeze the scene and color pointers.
Gradient lets you add a graduated blend of two or more colors or tints of the same color to your shape. You can use gradients to create color blends, add volume to vector objects, and add a light and shadow effect to your artwork. In Illustrator on the iPad, you can create, apply, and modify a gradient using the Fill panel.
- Linear Gradients: Blend colors along a straight path.
- Radial Gradients: Fill an object with a smooth gradient that radiates out from the central point.
- Point Gradients: Blend colors from point to point within the shape.
-
In the drawer, select Gradient and select Linear, Radial, or Point gradient. For a Linear or Radial gradient, the Gradient Annotator appears on the object.
For the linear and radial gradient types, when you select the Gradient tool in the toolbar, Gradient Annotator appears in the object. A Gradient Annotator is a slider that shows a starting point, an endpoint, a midpoint, and two color stops for the starting and endpoints.
- Add color stops: Select anywhere on the Gradient Annotator. Select the color stop and add color using the Color wheel or Swatches.
- Gradient annotator: Drag the Gradient annotator to modify the angle, location, and spread of a linear gradient; and the focal point, origin, and spread of a radial gradient. The gradient annotator snaps at every 45 degrees which lets you ensure precision.
- Gradient Annotator slider: Drag the slider located between two color stops to increase or decrease the range of the gradient.
- Delete color stops: To delete a color stop, select a color stop on the gradient annotator and select icon. By default, a gradient has two color stops.
Modify a point gradient
Point gradient lets you place color stops anywhere in the object. Therefore, a point gradient does not require a Gradient Annotator.
You can set the spread of a color stop in the points gradient. Spread is the circular area around the color stop in which a gradient is to be applied.
- Add color stops: To add one or more color stops, tap anywhere on the object.
- Change the position of color stops: Drag the color stop and place them at the desired location.
- Set the spread of a color stop: Select a point gradient and drag the circular spread.
- Delete color stops: To delete a color stop, select a color stop on the gradient annotator and select icon. By default, a gradient has two color stops.
To learn how to apply gradients in Illustrator on the desktop, see Gradients.
Modify color and appearance of objects


To change object color and appearance, select the object and tap Properties panel in the taskbar.
- Tap Fill to view and change the color options for fill color.
- Tap Stroke to view and change the color options for stroke color.
- Blend mode: Specify how colors interact with the overlapping objects. Choose a blend color from the drop-down list.
- Opacity: Create variations in transparency.
 You can also change the stroke weight using the contextual widget. Select the shape and tap
  to change the stroke width using the slider.
See also: Transparency and blending modes.
Copy appearance of an object
To copy objects from one place to another, tap the object and then tap ![]() to view Cut, Copy, Paste options.
to view Cut, Copy, Paste options.
To copy the appearance of an object onto another object,
- Tap the object and then tap Copy appearance.
- Select the object on which you want to copy appearance and tap Paste appearance.


Apply stroke for an object
When you create an object, the stroke of the object is set to zero (no stroke).
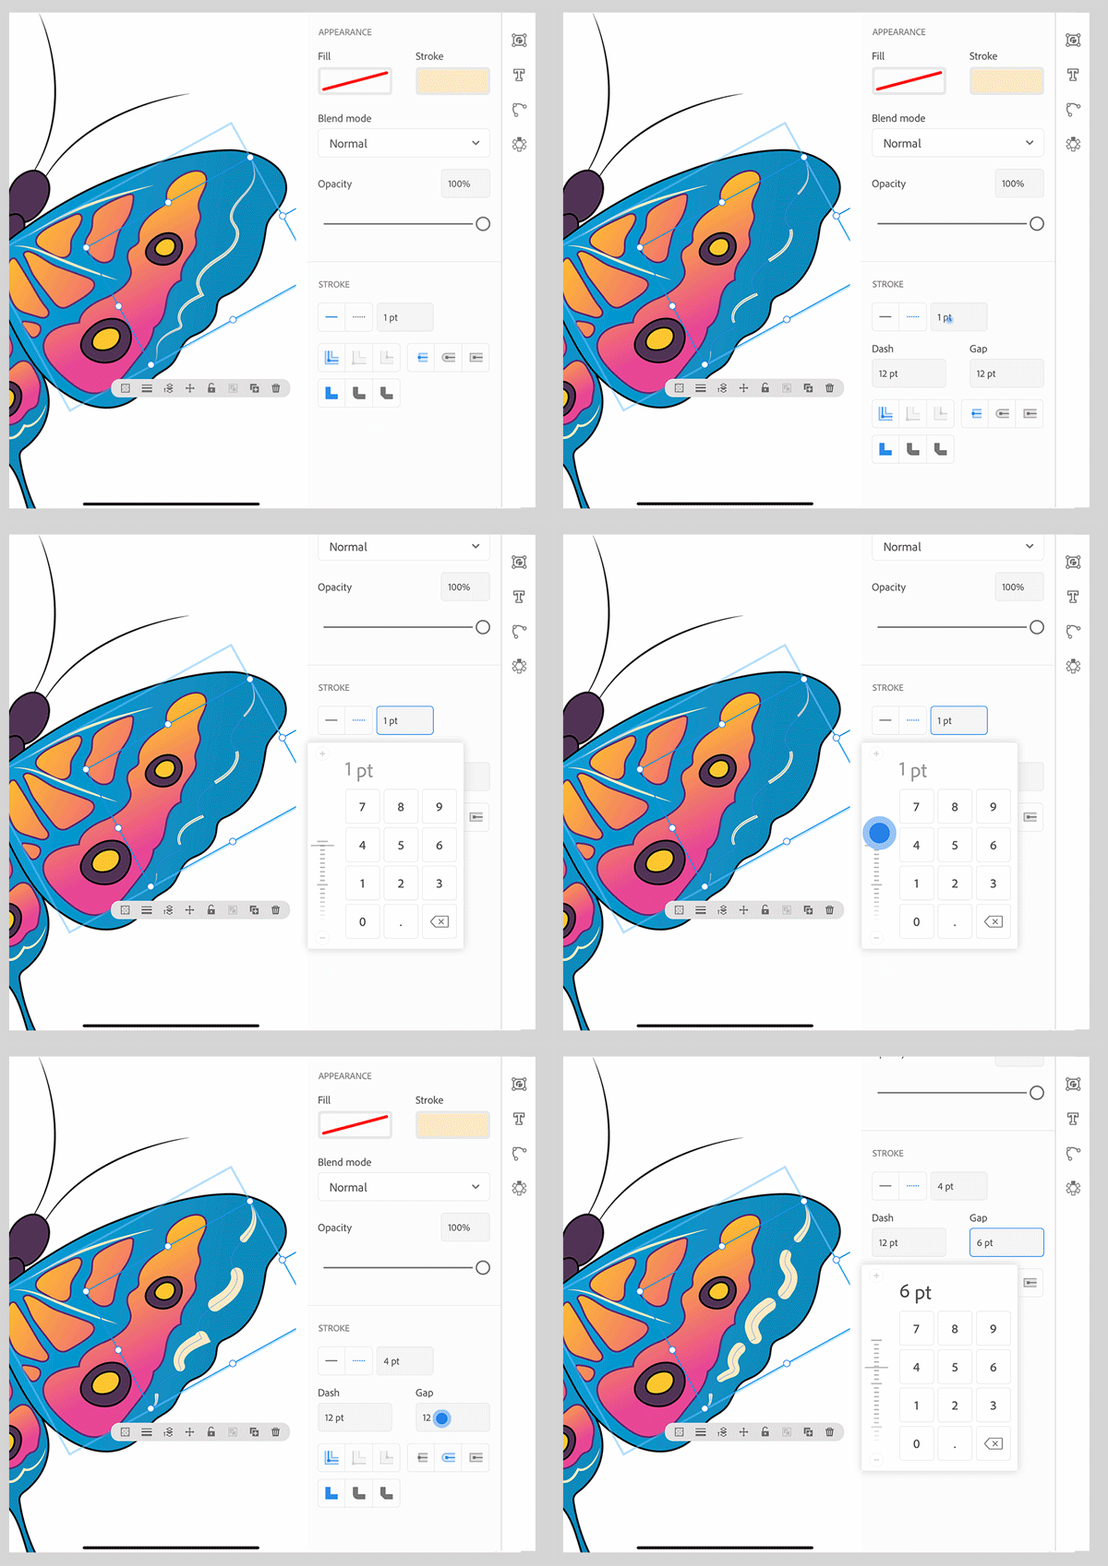


To set a stroke, do the following:
- Select the object and tap Properties panel.
- In the Strokes section, select a stroke type as solid or dashed line.
- To view more stroke options, click --
- In the Stroke weight field, type a weight you want to set for the stroke.
- In the Align Stroke options, choose:
 Align Stroke To Center
  Align Stroke To Inside
  Align Stroke To Outside
- In the Cap options, choose:
- Butt Cap to create stroked lines with squared ends.
- Round Cap to create stroked lines with semicircular ends.
- Projecting Cap to create stroked lines with squared ends that extend half the line width beyond the end of the line.
- In the Corner options, choose:
- Miter Join to create stroked lines with pointed corners.
- Round Join to create stroked lines with rounded corners.
- Bevel Join to create stroked lines with squared corners.
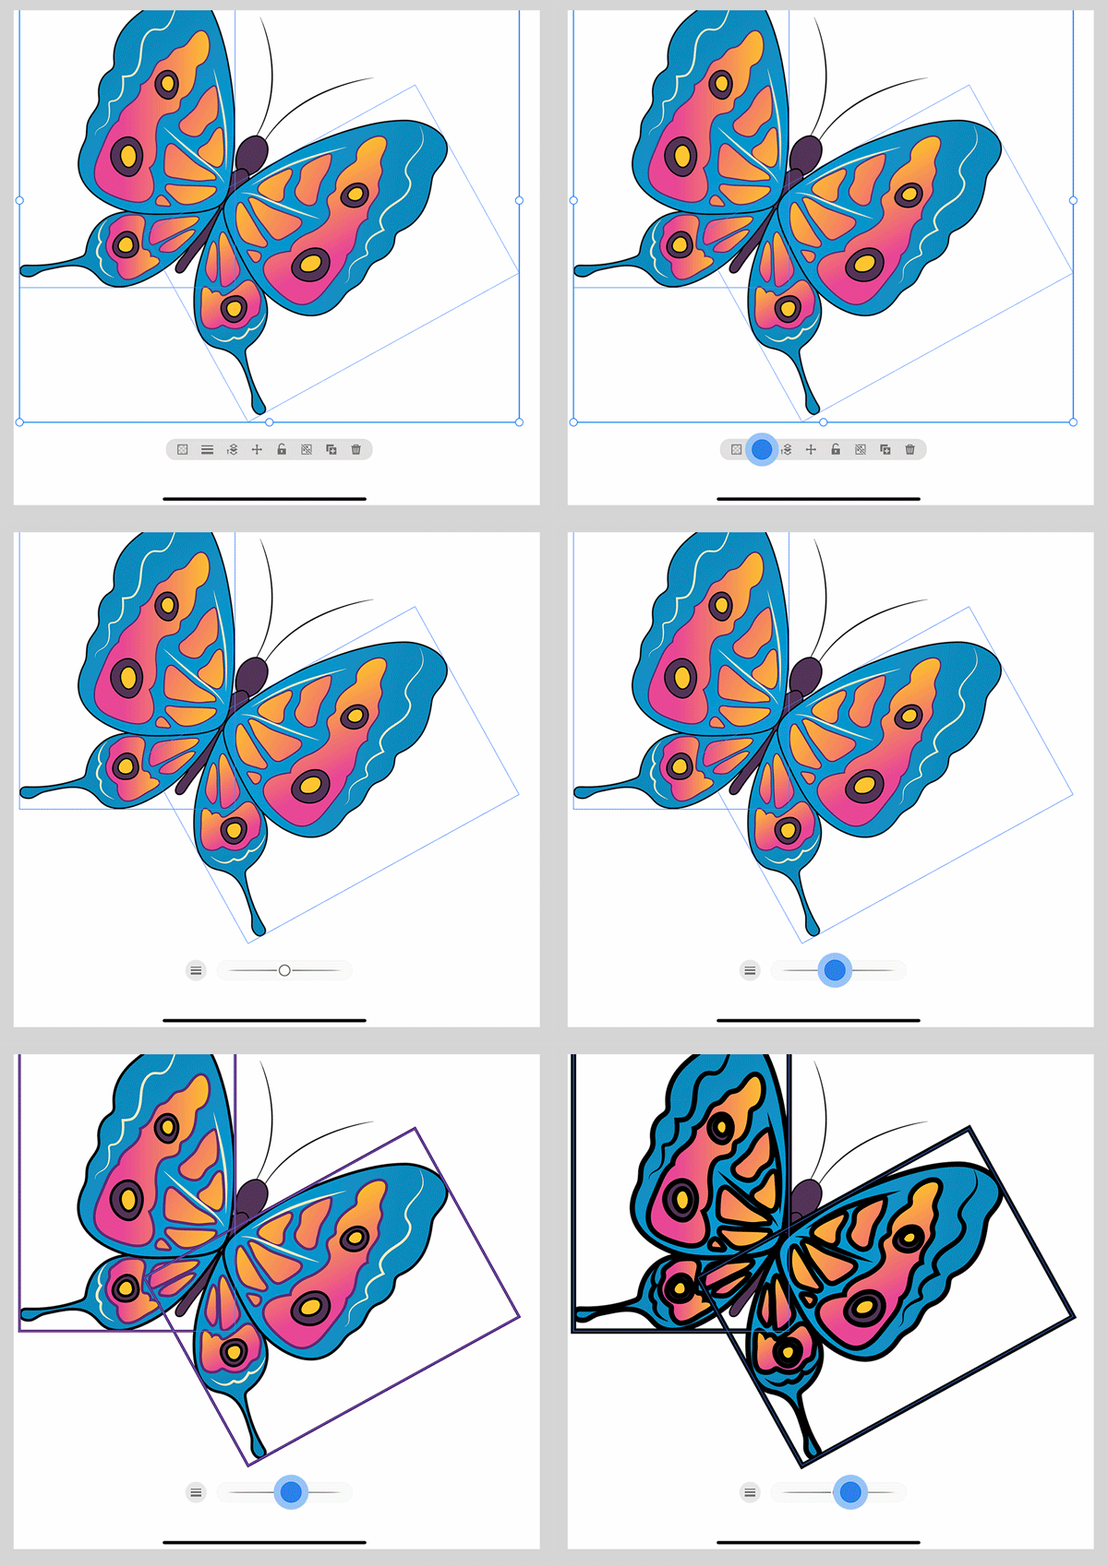
![]() You can also change the stroke weight using the contextual widget. Select the shape and tap
You can also change the stroke weight using the contextual widget. Select the shape and tap  to change the stroke width using the slider.
See also: Apply stroke on an object in Illustrator on the desktop.
Related resources
Got a question or an idea?
If you have a question to ask or an idea to share, come and participate in Adobe Illustrator Community. We'd love to hear from you.