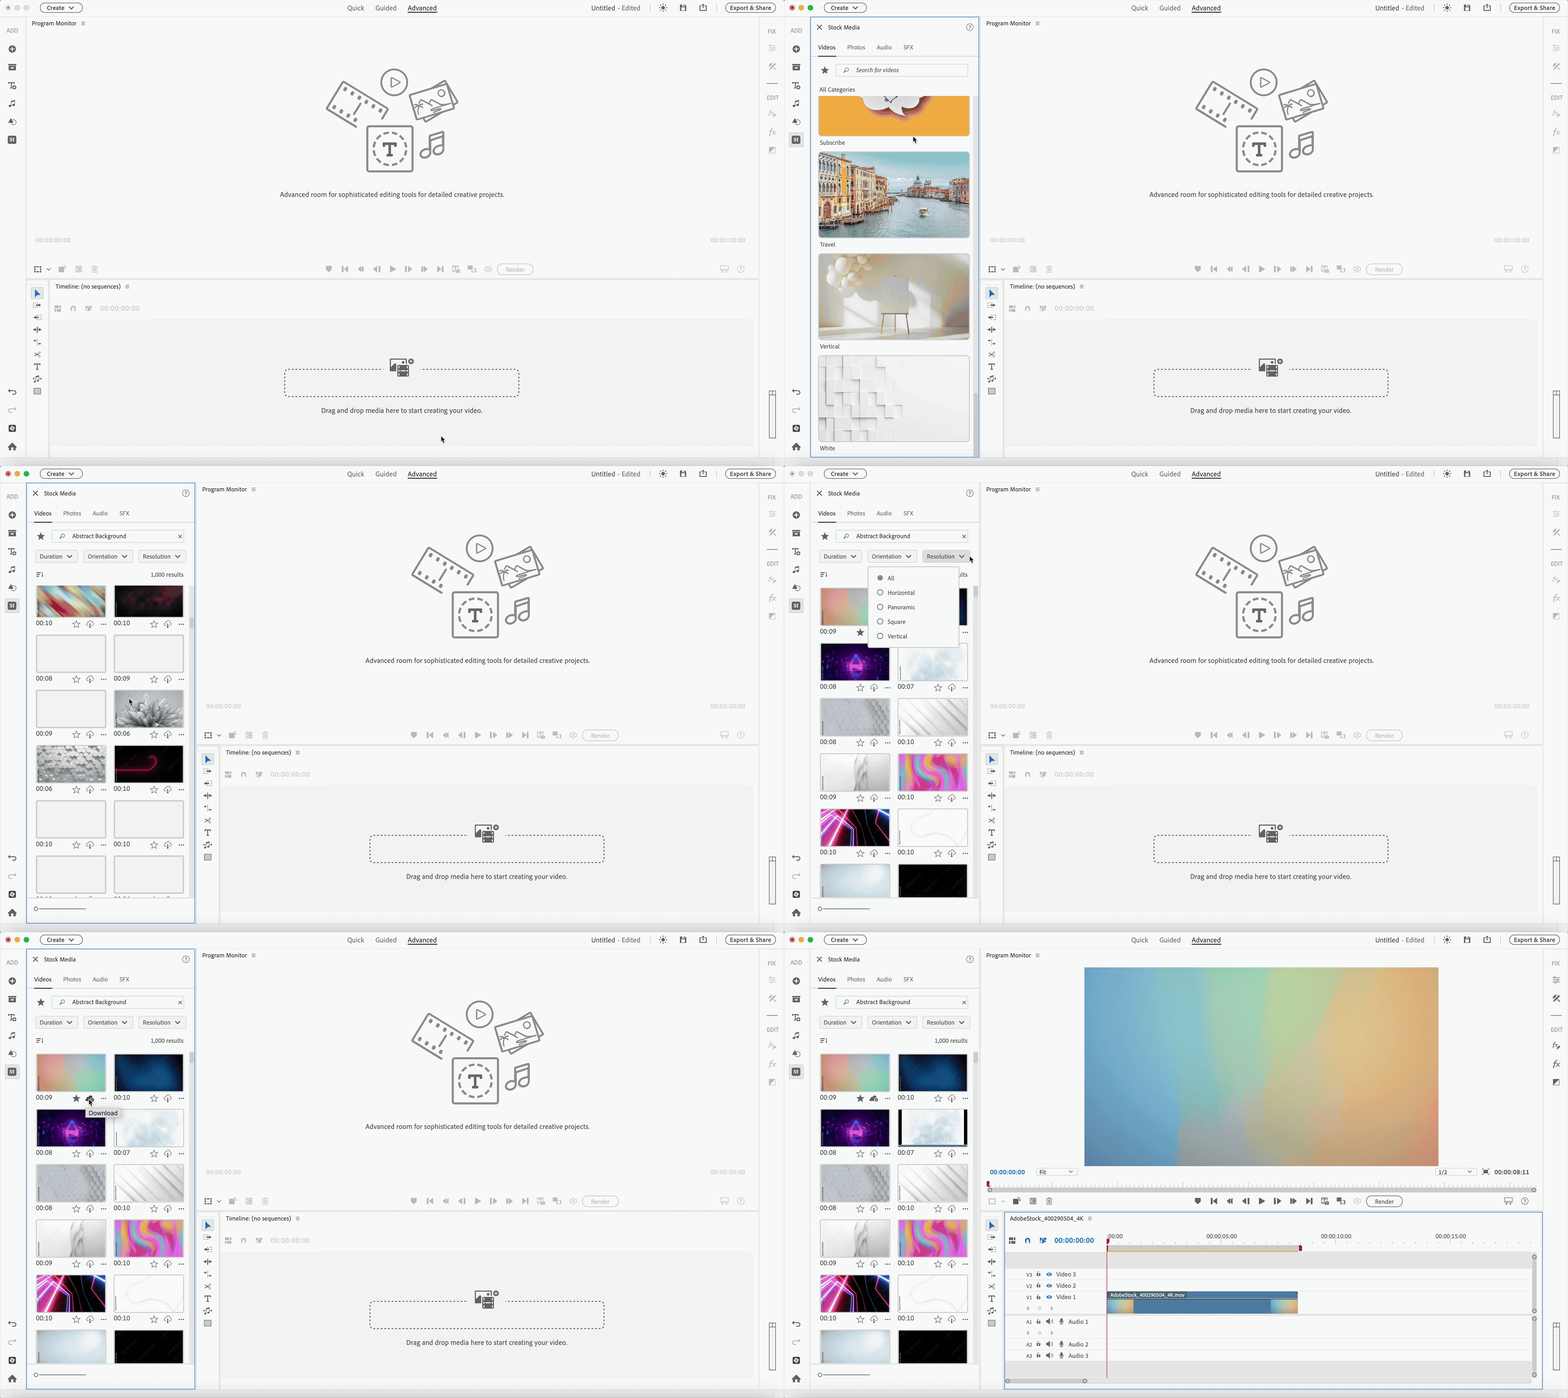
Click on the Stock Media icon.
- Get to know Premiere Elements
- Adobe Premiere Elements User Guide
- Introduction to Adobe Premiere Elements
- Workspace and workflow
- Working with projects
- 360° and VR Video Editing
- Importing and adding media
- Arranging clips
- Editing clips
- Reduce noise
- Select object
- Candid Moments
- Color Match
- Color Fonts and Emojis
- Smart Trim
- Freehand Crop
- Delete All Gaps
- Change clip speed and duration
- Split clips
- Freeze and hold frames
- Adjusting Brightness, Contrast, and Color - Guided Edit
- Stabilize video footage with Shake Stabilizer
- Replace footage
- Working with source clips
- Trimming Unwanted Frames - Guided Edit
- Trim clips
- Editing frames with Auto Smart Tone
- Artistic effects
- Color Correction and Grading
- Applying transitions
- Special effects basics
- Effects reference
- Applying and removing effects
- Create a black and white video with a color pop - Guided Edit
- Time remapping - Guided edit
- Effects basics
- Working with effect presets
- Finding and organizing effects
- Editing frames with Auto Smart Tone
- Fill Frame - Guided edit
- Create a time-lapse - Guided edit
- Best practices to create a time-lapse video
- Applying special effects
- Use pan and zoom to create video-like effect
- Transparency and superimposing
- Reposition, scale, or rotate clips with the Motion effect
- Apply an Effects Mask to your video
- Adjust temperature and tint
- Create a Glass Pane effect - Guided Edit
- Create a picture-in-picture overlay
- Applying effects using Adjustment layers
- Adding Title to your movie
- Removing haze
- Creating a Picture in Picture - Guided Edit
- Create a Vignetting effect
- Add a Split Tone Effect
- Add FilmLooks effects
- Add an HSL Tuner effect
- Fill Frame - Guided edit
- Create a time-lapse - Guided edit
- Animated Sky - Guided edit
- Select object
- Animated Mattes - Guided Edit
- Double exposure- Guided Edit
- Special audio effects
- Movie titles
- Creating titles
- Adding shapes and images to titles
- Adding color and shadows to titles
- Apply Gradients
- Create Titles and MOGRTs
- Add responsive design
- Editing and formatting text
- Text Styles and Style Browser
- Align and transform objects
- Motion Titles
- Appearance of text and shapes
- Exporting and importing titles
- Arranging objects in titles
- Designing titles for TV
- Applying styles to text and graphics
- Adding a video in the title
- Disc menus
- Sharing and exporting your movies
Learn how to easily use Adobe Stock media - Videos, Photos, Audio and SFX, in your workflows.
How to use Adobe Stock Videos in Premiere Elements


You can easily search for and preview videos from within Premiere Elements, without leaving your timeline, with instant access to high-resolution video assets that fit your project.
-
-
Click Videos in the Stock Media panel.
-
Select a category to browse its media, or use the search bar to quickly find a video.
-
You can refine your search results by using the Duration, Orientation, and Resolution dropdown filters. This helps you quickly locate assets that match your project requirements.
-
After selecting a category, pick the video you want to use. Download it using the download icon, then add it to your timeline by clicking the kebab (three-dot flyout) menu and selecting Add to Timeline, or simply drag and drop it directly onto the timeline.
-
When you select a video, you can choose to Add to Favorites, Download the media, Add to Timeline, Add to Project Assets, or Find Similar. The Find Similar option displays additional videos that closely match the one you selected.
How to use Adobe Stock Photos in Premiere Elements


In Premiere Elements, Adobe Stock photos provide a vast collection of high-quality, ready-to-use images that you can easily integrate into your creative projects. They span a wide range of categories and themes, giving you flexible options to enhance your videos, add visual appeal, or complement your narrative.
It’s easy to find and use Adobe Stock photos within Premiere Elements.
-
Click on the Stock Media icon.
-
Click Photos in the Stock Media panel.
-
Select a category to browse its media, or use the search bar to quickly locate a photo.
-
You can refine your search results by using the Orientation, Subcategory, and Size dropdown filters. This helps you quickly locate assets that best fit your project needs.
-
After selecting a category, select the photo you want to use. Click the Download icon to save it, then add it to your timeline either by selecting Add to Timeline from the kebab menu or by dragging and dropping it directly onto the timeline.
-
When you select a photo, you can choose to Add to Favorites, Download the media, Add to Timeline, Add to Project Assets, or Find Similar. The Find Similar option displays additional photos that closely match the one you selected.
Easily edit and share stunning videos
Get creative with colour, effects, transitions, text, and music.
Create reels, reframe and trim with AI powered tools.
How to use Adobe Stock Audio in Premiere Elements


You can integrate Adobe Stock audio directly into your Premiere Elements workflow. Choose from an ever-growing collection of tracks of current and trending music.
-
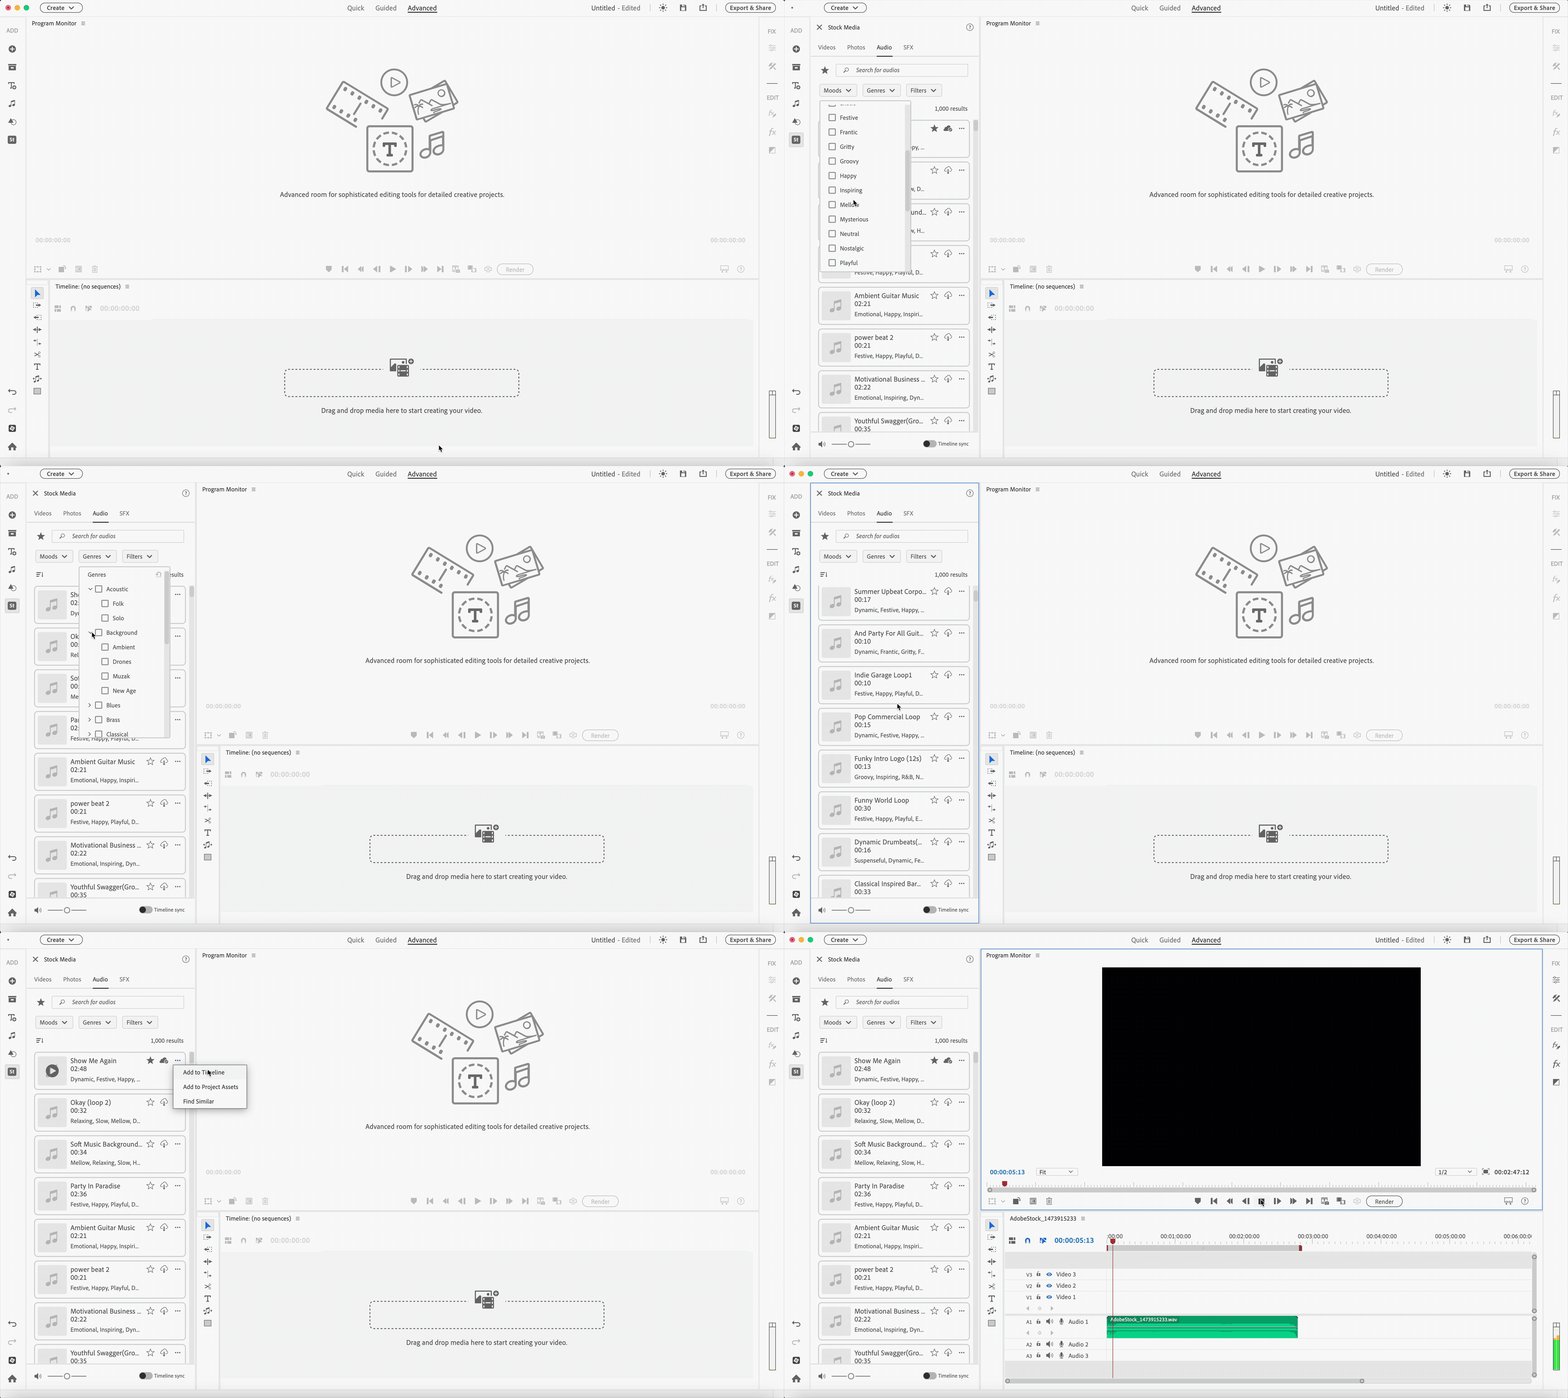
Click on the Stock Media icon.
-
Click Audio in the Stock Media panel.
-
You can use the search bar to quickly find the music you are looking for.
You can also refine your search using filters like Mood, Genre, Vocals, Tempo, and Duration.
-
After selecting an audio you want to use, click the Download icon to save it, then add it to your timeline either by selecting Add to Timeline from the kebab menu or by dragging and dropping it directly onto the timeline.
-
When you select an audio, you can choose to Add to Favorites, Download the media, Add to Timeline, Add to Project Assets, or Find Similar. The Find Similar option displays additional photos that closely match the one you selected.
-
Timeline Sync allows you to preview tracks together with your edit without leaving stock panel. If your first choice doesn’t fit the pacing, or the mood, simply try another and as many as you need.
How to use Adobe Stock SFX in Premiere Elements


Seamlessly integrate Adobe Stock sound effects into your Premiere Elements workflow by choosing from a library of over 1,000 high-quality SFX tracks..
-
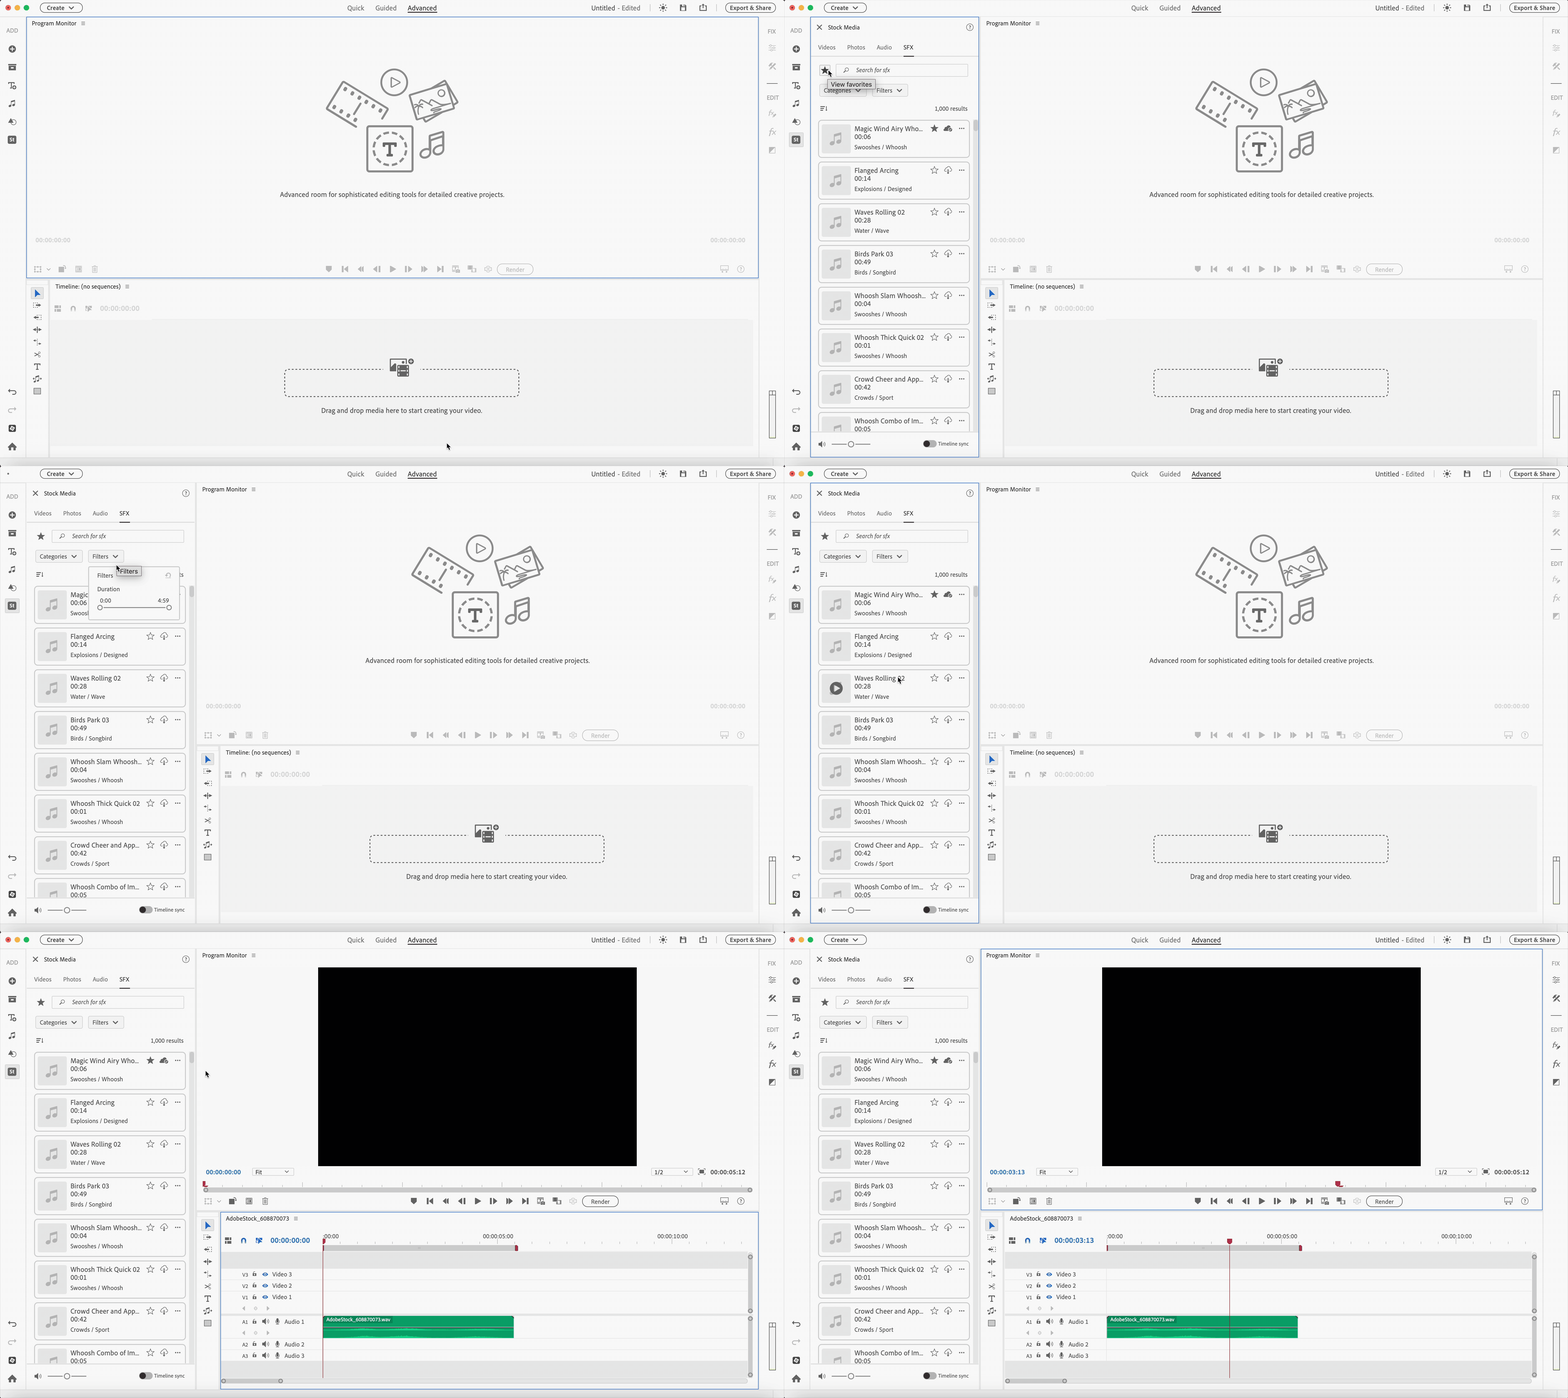
Click on the Stock Media icon.
-
Click SFX in the Stock Media panel.
-
Select a category to browse its sound effects, or use the search bar to quickly find a sound effect.
You can also filter sound effects by duration using the Filters dropdown.
-
After selecting a sound effect you want to use, click the Download icon to save it, then add it to your timeline either by selecting Add to Timeline from the kebab menu or by dragging and dropping it directly onto the timeline.
-
When you select a sound effect, you can choose to Add to Favorites, Download the media, Add to Timeline, Add to Project Assets, or Find Similar. The Find Similar option displays additional sound effects that closely match the one you selected.
-
Timeline Sync allows you to preview tracks together with your edit without leaving stock panel. If your first choice doesn’t fit the pacing, or the mood, simply try another and as many as you need.
For Videos, Photos, Audio, and SFX, you can sort results by Relevance, Most Recent, or Most Downloads using the Sort Results dropdown.
By default, stock content is saved in the following location:
- On Mac: ~/Library/Application Support/Adobe/Premiere Elements/Common/Stock Assets
- On Windows: C:\Users\<name>\AppData\Roaming\Adobe\Premiere Elements\Common\Stock Assets
The Sceneline only shows V1, V2, and A1 tracks. If these tracks are locked using the Lock/Unlock Track icon, they cannot be edited.
When you use Add to Timeline with all visible tracks locked, the media may be added to hidden tracks such as V3 or A2. Because these tracks aren’t shown in the Sceneline, it may appear as if nothing has been added.
This applies to all Video, Photo, Audio and SFX assets. To avoid this, ensure at least one visible track is unlocked before adding media.
TALK TO US


If you have questions about working with Adobe Stock Media in Premiere Elements, reach out to us in our Premiere Elements community. We would love to help.


