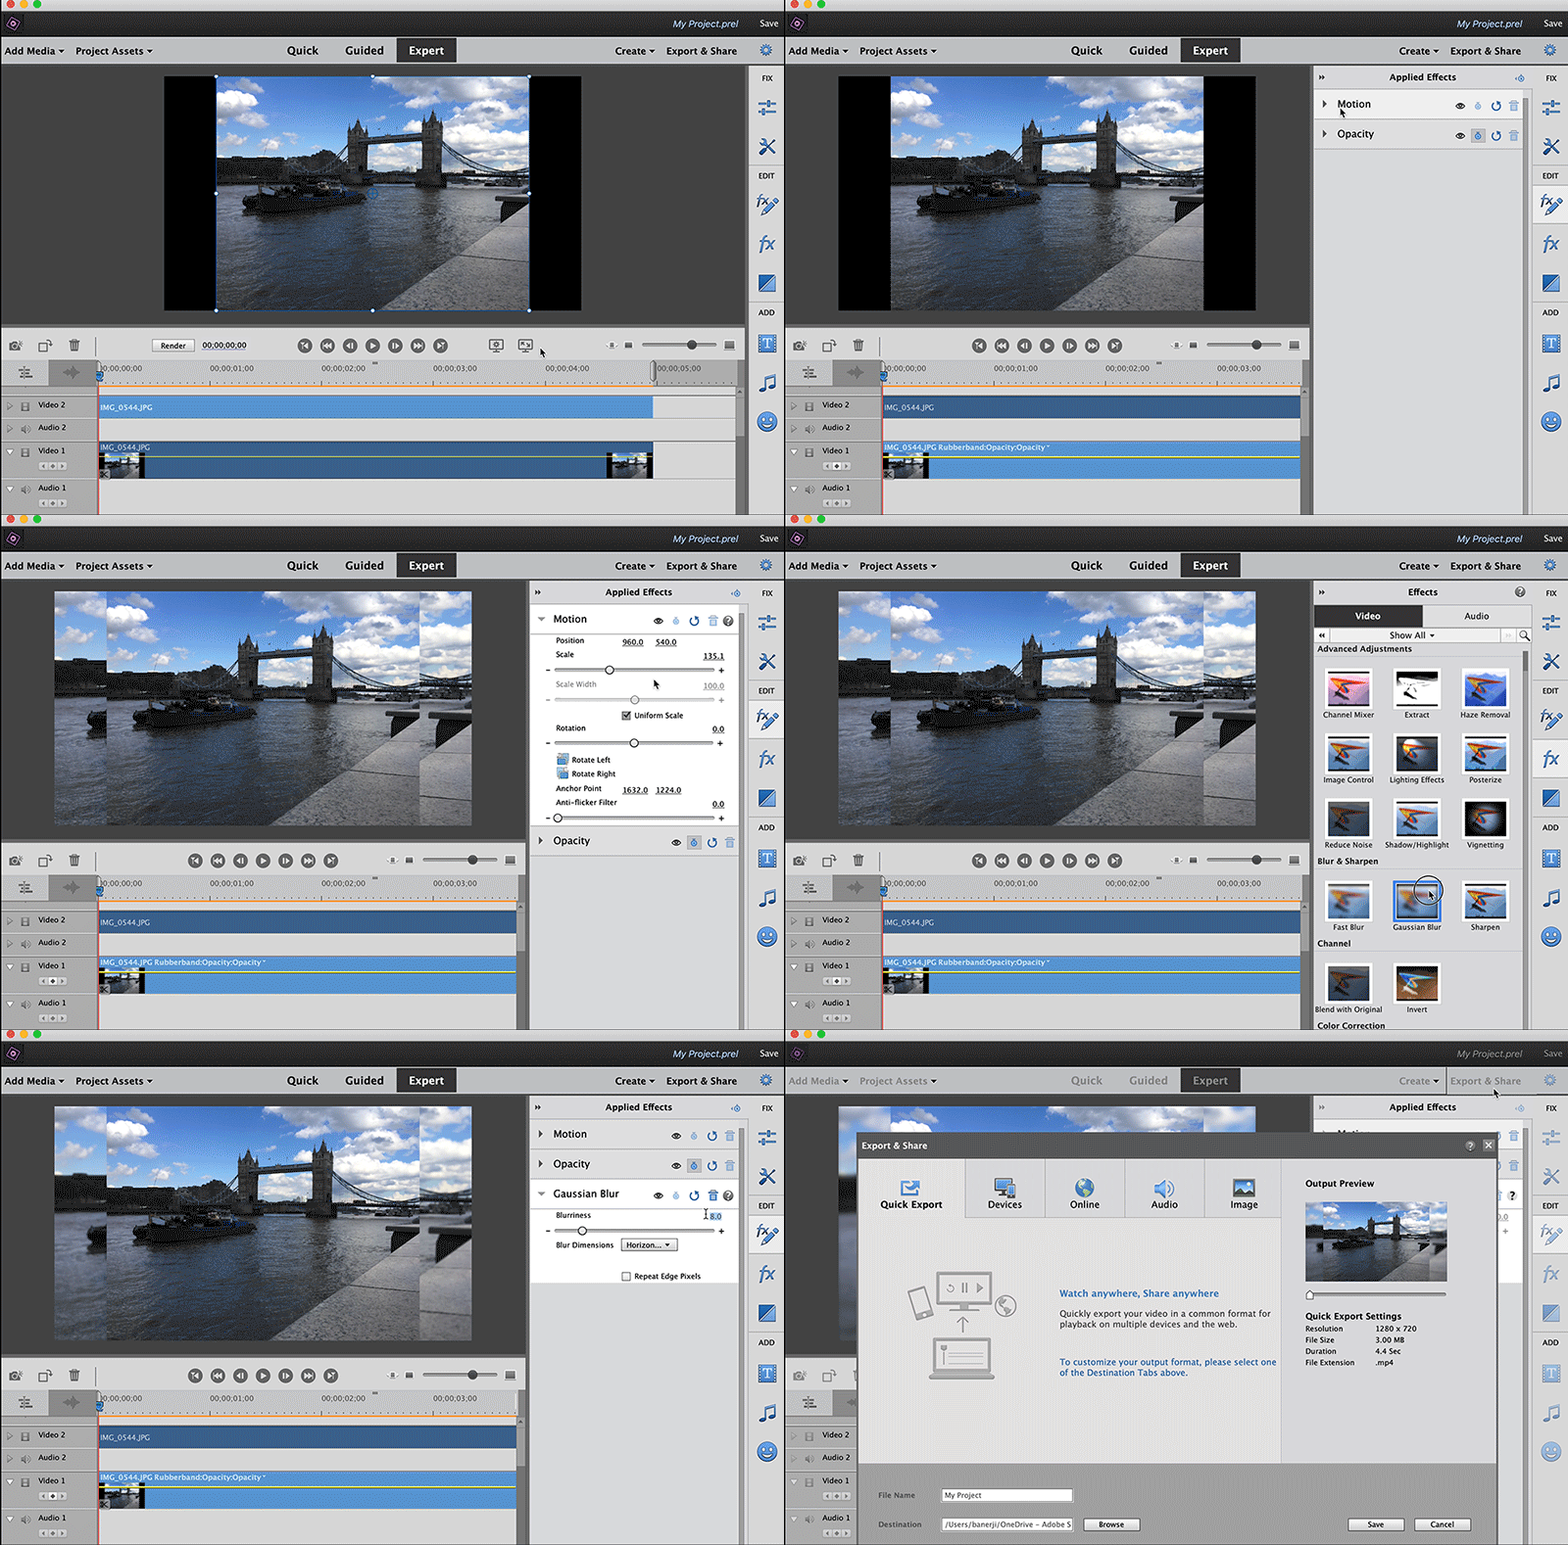
Click Add Media to import the video clip that you want to work with. Ignore if the video clip is already present in the timeline.
- Get to know Premiere Elements
- Adobe Premiere Elements User Guide
- Introduction to Adobe Premiere Elements
- Workspace and workflow
- Working with projects
- 360° and VR Video Editing
- Importing and adding media
- Arranging clips
- Editing clips
- Reduce noise
- Select object
- Candid Moments
- Color Match
- Color Fonts and Emojis
- Smart Trim
- Freehand Crop
- Delete All Gaps
- Change clip speed and duration
- Split clips
- Freeze and hold frames
- Adjusting Brightness, Contrast, and Color - Guided Edit
- Stabilize video footage with Shake Stabilizer
- Replace footage
- Working with source clips
- Trimming Unwanted Frames - Guided Edit
- Trim clips
- Editing frames with Auto Smart Tone
- Artistic effects
- Color Correction and Grading
- Applying transitions
- Special effects basics
- Effects reference
- Applying and removing effects
- Create a black and white video with a color pop - Guided Edit
- Time remapping - Guided edit
- Effects basics
- Working with effect presets
- Finding and organizing effects
- Editing frames with Auto Smart Tone
- Fill Frame - Guided edit
- Create a time-lapse - Guided edit
- Best practices to create a time-lapse video
- Applying special effects
- Use pan and zoom to create video-like effect
- Transparency and superimposing
- Reposition, scale, or rotate clips with the Motion effect
- Apply an Effects Mask to your video
- Adjust temperature and tint
- Create a Glass Pane effect - Guided Edit
- Create a picture-in-picture overlay
- Applying effects using Adjustment layers
- Adding Title to your movie
- Removing haze
- Creating a Picture in Picture - Guided Edit
- Create a Vignetting effect
- Add a Split Tone Effect
- Add FilmLooks effects
- Add an HSL Tuner effect
- Fill Frame - Guided edit
- Create a time-lapse - Guided edit
- Animated Sky - Guided edit
- Select object
- Animated Mattes - Guided Edit
- Double exposure- Guided Edit
- Special audio effects
- Movie titles
- Creating titles
- Adding shapes and images to titles
- Adding color and shadows to titles
- Apply Gradients
- Create Titles and MOGRTs
- Add responsive design
- Editing and formatting text
- Text Styles and Style Browser
- Align and transform objects
- Motion Titles
- Appearance of text and shapes
- Exporting and importing titles
- Arranging objects in titles
- Designing titles for TV
- Applying styles to text and graphics
- Adding a video in the title
- Disc menus
- Sharing and exporting your movies
This Guided edit is a walkthrough on how to fill in the black bars around the video to match the video frame.
You might have often seen black bars on the sides of your pictures or videos. This happens when the aspect ratio of media is different from the aspect ratio of the PRE project. This can often make your output look unappealing. Use the Fill Frame feature to fill the bars around your pictures and videos to match the video frame.


-
-
Select the appropriate import option and import media.
Add media to Premiere Elements Add media to Premiere Elements -
Once imported, the media file gets added to the Project Assets bin.
-
Drag-and-drop the media file from the Project Assets bin to the track Video 1 in the timeline.
-
Add the same media file to the Video 2 track in the timeline.
-
Select the file on the track Video 1 and open the Applied Effects panel from the right pane.
-
Move the Scale slider to adjust the scale and fill the bars. Increase the value until the bars are completely filled.
NoteRecommended scale is 3X for vertical/portrait files and 1.5X for horizontal/landscape files.
Scale and fill the side bars Scale and fill the side bars -
You can blur the image on the side bars by adding the Gaussian Blur effect. Open the Effects panel from the right pane.
A. Applied effects panel B. Effects panel
-
Select Gaussian Blur, and drag-and-drop it onto your media on the Video 1 track.
-
Use the Blurriness slider to adjust the effect.
NoteRecommended blurriness value is 30. This works best for most media.
Adjust blur using the slider Adjust blur using the slider -
To export the final output, select File > Export and Share. For information about various exports and share options available, see Export and share your videos.
Export and share Export and share


