If you have a question to ask or an idea to share, come and participate in Adobe XD Community. We would love to hear from you and see your creations.
- Adobe XD User Guide
- Introduction
- Design
- Artboards, guides, and layers
- Shapes, objects, and path
- Text and fonts
- Components and states
- Masking and effects
- Layout
- Videos and Lottie animations
- Prototype
- Create interactive prototypes
- Animate prototypes
- Object properties supported for auto-animate
- Create prototypes with keyboard and gamepad
- Create prototypes using voice commands and playback
- Create timed transitions
- Add overlays
- Design voice prototypes
- Create anchor links
- Create hyperlinks
- Preview designs and prototypes
- Share, export, and review
- Share selected artboards
- Share designs and prototypes
- Set access permissions for links
- Work with prototypes
- Review prototypes
- Work with design specs
- Share design specs
- Inspect design specs
- Navigate design specs
- Review and comment design specs
- Export design assets
- Export and download assets from design specs
- Group sharing for enterprise
- Back up or transfer XD assets
- Design systems
- Cloud documents
- Integrations and plugins
- Work with external assets
- Work with design assets from Photoshop
- Copy and paste assets from Photoshop
- Import or open Photoshop designs
- Work with Illustrator assets in Adobe XD
- Open or import Illustrator designs
- Copy vectors from Illustrator to XD
- Plugins for Adobe XD
- Create and manage plugins
- Jira integration for XD
- Slack plugin for XD
- Zoom plug-in for XD
- Publish design from XD to Behance
- XD for iOS and Android
- Troubleshooting
- Known and fixed issues
- Installation and updates
- Launch and crash
- Cloud documents and Creative Cloud Libraries
- Prototype, publish, and review
- Import, export, and working with other apps
Looking for information on aligning design assets using guides and grids? You have come to the right place!
When working on your designs, you can use guides to line up objects or manage spacing between elements on an artboard. Grids serve as a framework on which you can organize your design elements (images, glyphs, paragraphs) and ensure the symmetry of the layout.


Hello, I'm Jeanee! A lead visual designer working on a UX design project in XD that has multiple artboards and objects.


- She is looking for resources to quickly layout and position objects using guides.
- She needs help in aligning and defining the object structure within the design project using grids.
Does this sound familiar? If you're facing such challenges, read on to learn how to create and use guides and grids within your artboards.
New to Adobe XD?
Learn app basics.
Before you proceed
Create and manage guides
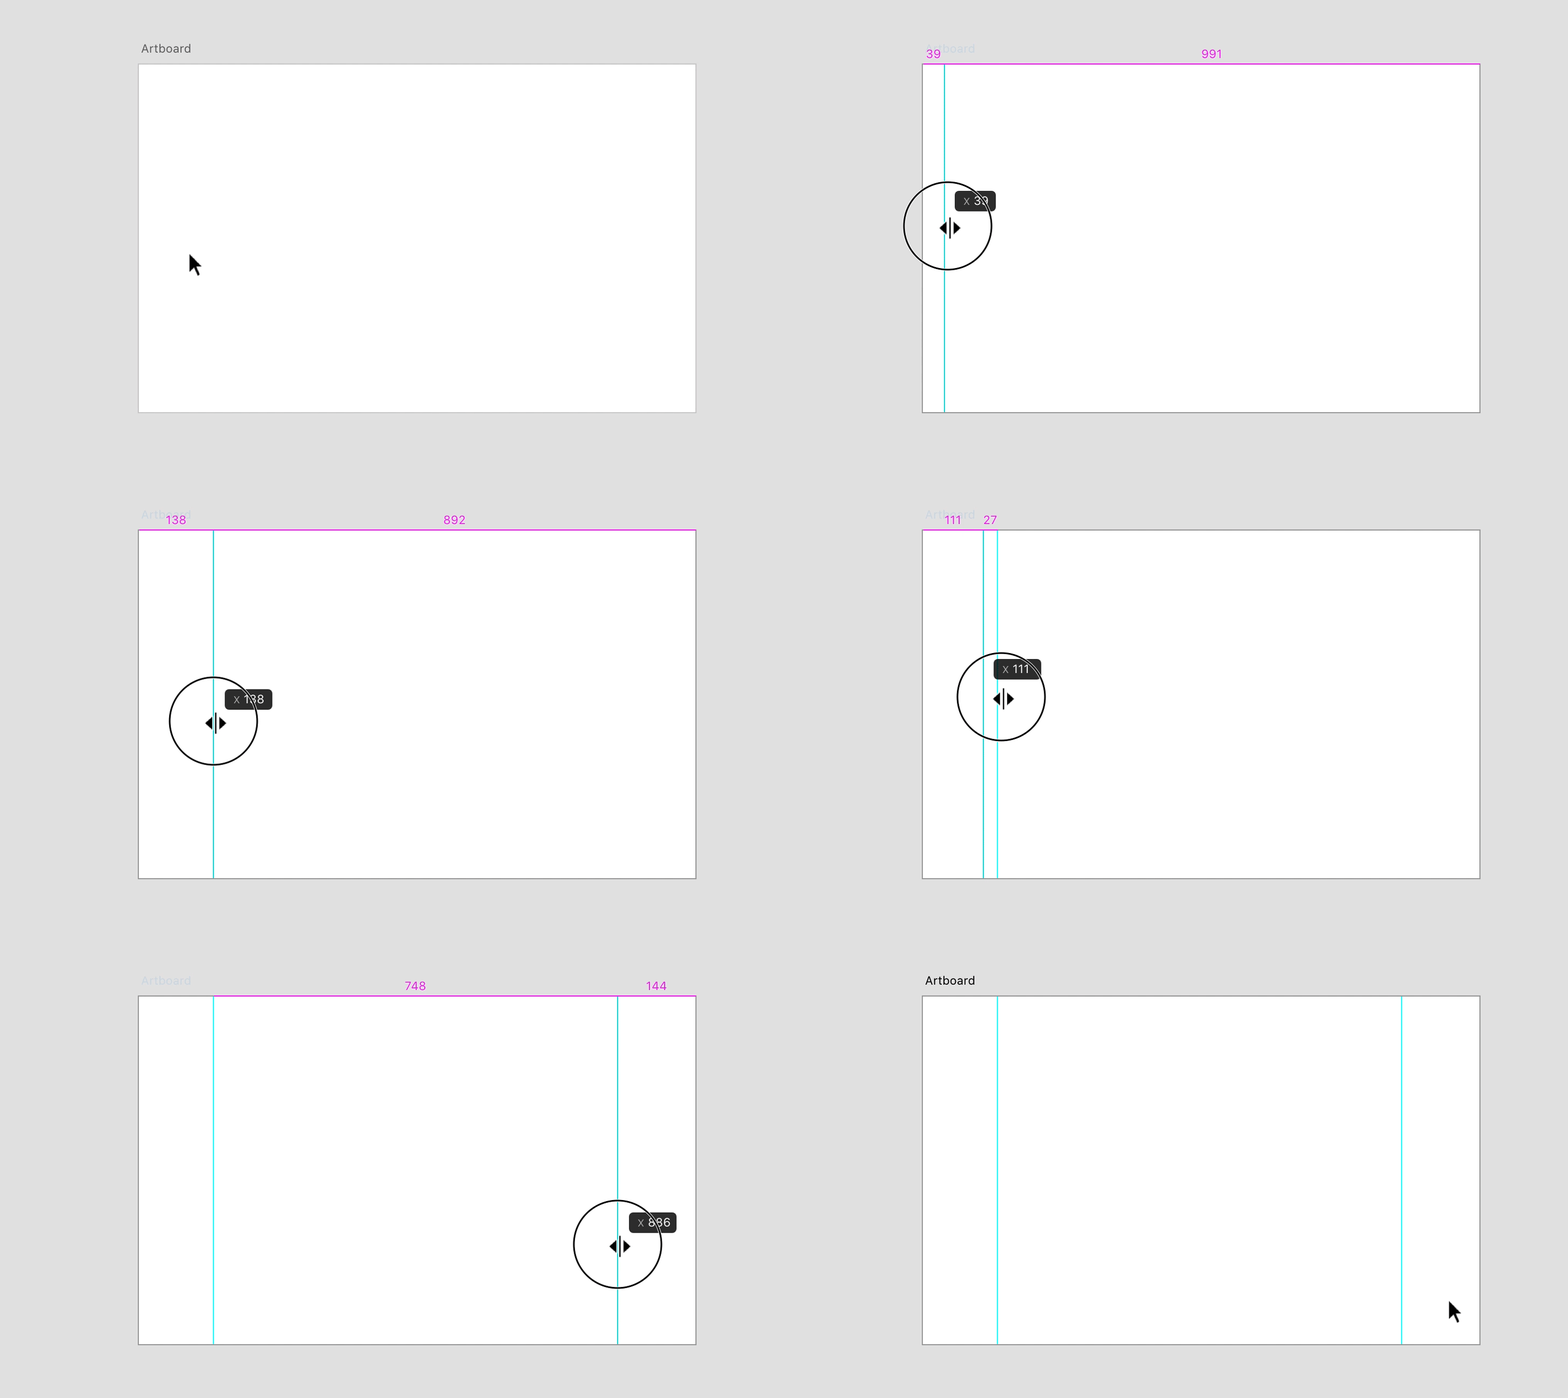
Once your artboards are laid out on design canvas,, an area is added to the top and left of your artboards that allow you to drag out guides. You can quickly snap to the horizontal and vertical centers, copy, and paste them across multiple artboards, remove them, and toggle their visibility.
Read on to learn how to create and manage guides.
Create guides
Do you want to align and position objects within your artboards from top to bottom? Use vertical guides. If you want to align and position objects from left to right, use horizontal guides.
Vertical guides


To create a vertical guide, hover the pointer over the left border of the artboard until the  icon appears. Click and hold the icon and then drag it to the desired position.
Horizontal guides


To create a horizontal guide, hover over the top border of the artboard until the  icon appears. Drag-and-drop to the desired position.
Copy and paste guides
Now that you have created guides, you can use the Copy/Paste Guides option to quickly duplicate the them.
Copy guides


To copy guides from an artboard, select the artboard, click View > Guides > Copy Guides.
Paste guides


To paste the copied guides, click View or right-click on the artboard > Guides > Paste Guides.
Remove guides
You can choose to remove one or more guides at a time.
To remove a guide, click and drag the guide out of the artboard.
To remove multiple guides on an artboard, select the artboard and click View option right-click on the artboard. Select Guides > Clear Guides.


Hide and lock guides
Do you want to temporarily hide guides and turn them on when needed? Use the Hide All Guides option.
You can also choose to lock guides across all the artboards to prevent them from being accidentally moved or adjusted.
To hide and lock guides on macOS and Windows:
Hide guides


- Click View > Hide All Guides option from the top menu bar. You can also use Command + ; to hide guides in macOS.
- Right-click on the artboard and select Guides > Hide All Guides. You can also use Ctrl + ; to hide guides in Windows.
Lock guides


- Click View > Lock All Guides option from the top menu bar. You can also use Command + Shift + ; to lock guides in macOS.
- Right-click on the artboard and select Guides > Lock All Guides. You can also use Ctrl + Shift + ; to lock guides in Windows.
Snap-align objects using Smart guides
Now that you are done with the basics of how to create and manage guides, you can use smart guides to temporarily snap the guides when you create or manipulate objects or artboards.


Smart guides are enabled by default. When you move an object or artboard, smart guides let you align, edit, and transform objects or artboards relative to the other objects, artboards, or both by snap-aligning.
Position objects using grids
Now that you know the basics of guides in XD, go ahead and learn how to define the design structure and align objects within your artboard using Layout or Square grids.
To add layout or square grids, select one or more artboards. Navigate to the Grid section in the Property Inspector and choose either Layout or Square.
Layout grids


Layout grids are column grids that are useful when aligning design objects or designing for different screen sizes. You can easily and quickly adjust them based on your needs.
Square grids


Square grids have horizontal and vertical lines for precise sizing and aligning objects when designing mobile apps or icons.
Set grid preferences
Once layout and square grids are added to artboards, you can personalize the display options for your grids by adjusting the preferences in the Grid section of the Property Inspector. Read on to learn how to change the grid size, number of columns, gutter properties, and margins for your grids.
Based on your design needs, you can change the grid size for square grids.


Grid size is the distance between the gridlines in the square grid. To edit the grid size value, enter the required number in the Square Size field of the Property Inspector.
With a layout grid applied to an artboard, you can set the number of columns, column width, gutter properties, and margin sizes from the Grid section of the Property Inspector.
Change number of columns


Enter the value in the Columns field. For web designs, 12 or 16-column grids are commonly used.
Change column width and gutter properties


To change the width of the columns, enter the value in the Column Width field. To define your own gutter width, edit the default Gutter Width field.
Now that you've modified the number of columns, gutter width, and column width, learn how to adjust the margins of the artboard. Margins are the distance between the layout grid and the edge of the artboard. Read on to learn how to adjust margins on all sides.
Change linked left or right margin


To adjust the linked margin on left and right side, click the  icon and edit the value.
Change margin of each side


To adjust the left, right, top, and bottom margins individually, click the  icon, and then enter the values.
Do more with grids
Now that you know how to set preferences for your grids, read on to learn how to add grid colors and control their visibility.
Add colors
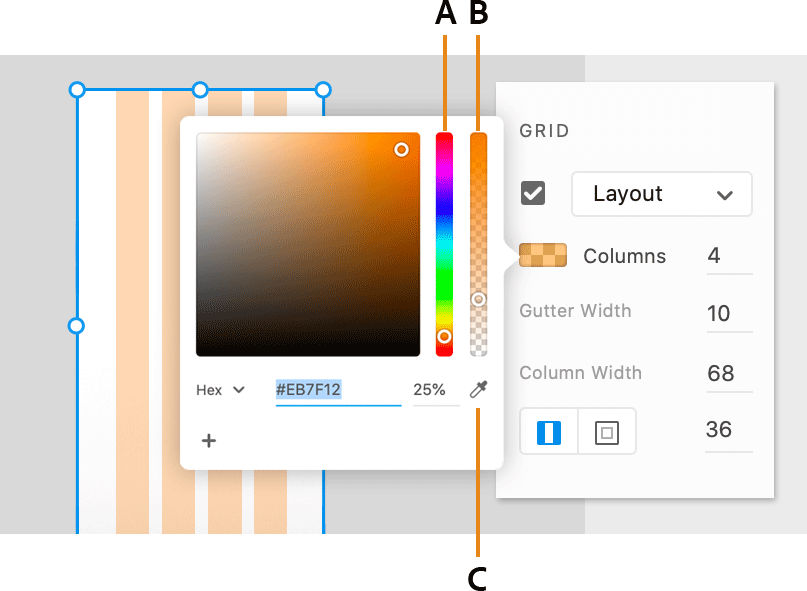
Do you want to modify the appearance of grids? Use the color picker in the Property Inspector to add and change the grid color.

A. Color field B. Color slider C. Eyedropper

Click the box next to Square Size for square grids and Columns for layout grids.
From the color picker, you can:
- Adjust the color using the color field and color slider.
- Use the Eyedropper tool to select a color from an artboard.
- Set the opacity of the fill by using the color slider or typing a value in percentage. If you set the value to 0, the layout grid switches to outline view.
Hide and show grids
You can control the visibility of layout and square grids using the Hide Layout/Square Grids or Show Layout/Square Grids option.
Hide layout grid


- Choose View > Hide Layout Grid. You can also use Command + Shift + ' to hide layout grids in macOS.
- In the Property Inspector, select a grid type from the Grid drop-down list, and select the check box next to the drop-down list. You can also use Ctrl + Shift + " to hide layout grids in Windows.
Show square grid


- Choose View > Show Square Grid. You can also use Command + ' to show square grids in macOS.
- In the Property Inspector, select a grid type from the Grid drop-down list, and select the check box next to the drop-down list. You can also use Ctrl + " to show square grids in Windows.
Video: How do I add guides and layout grids?
"When working on design projects, lay out guides to better assist you when lining up objects or to make sure that the elements are spaced properly"- says Howard Pinsky, Senior XD Evangelist.
Tips and tricks
- To snap an object to a layout or square grid, drag an object toward the grid until one of the object’s edges is within the grid’s snap-to zone.
- Guides snap to selected objects or top-level objects drawn on the canvas. To disable the snapping behavior, press ⌘ (on macOS) or Ctrl (on Windows).
- To position the guide in increments of 10 px on the canvas, press Shift.
- To revert to the default square or layout grid appearance, click Use Default option on the Grid section of the Property Inspector.
What's next?
We've got you started with how to position and align objects within artboards using guides, and grids. Take a step forward and learn how to use repeat grids to create objects with repeatable elements.
Have a question or an idea?


