- Substance 3D home
- Home
- Getting started
- Interface
- Create with Clay
- Create with Primitives
- Get started with primitives
- Primitive parameters
- Organize primitives
- Organize your scene
- Export Mode
- Render mode
- Technical support
- Release notes
- V1.22 (Current release)
- V1.21
- V1.19
- V1.18
- V1.17
- Public Beta V1.21.50 (Current release)
- Public Beta Archive
- V1 Archive
- V0 Archive
Scope and scene structure
With Modeler it's possible to create amazing creations without ever worrying about layers or groups. Sometimes a single layer is all you need. However, for more complex creations, Modeler's scene assembly tools and scene hierarchy can accelerate the creative process in a number of ways. In order to use the assembly tools effectively, you'll first need to understand how Modeler sees the scene.
The scene and scene objects
The scene is a container that holds everything you create in Modeler. When you create a new scene, it isn't empty - Modeler automatically creates a layer so that you can immediately start placing clay. So when you create a new scene, Modeler sees it like this:


The Layer is a "Scene object", which just means that it's something that can exist inside the scene. There are a couple of other types of scene object:
- Groups
- Instances - don't worry about these for now.
Just like the scene, groups act like containers that can hold other things - they can even hold other groups. So, you can create a group of layers, or a group of groups and layers. Here's how that could look to Modeler:


- Scene
- Group 1
- Layer 1
- Layer 2
- Group 2
- Layer 3
- Layer 4
- Group 3
- Layer 5
- Group 4
- Layer 6
- Layer 7
- Group 1
Now you know the basics of how Modeler sees the scene, it's time to see how this is related to focus and scoping.
Focus and scoping
Focus is how Modeler understands what you are working on in the scene hierarchy. If you've already used Modeler to do some sculpting, you have been using focus without realizing it. We mentioned that Modeler automatically creates a layer when you make a new scene, well Modeler also sets your focus to that layer.
When you are focused on a scene object - like a layer - you are able to modify the contents of that object.
- Layers hold clay, so when you are focused on a layer, you can modify the clay in that layer.
- Groups hold other scene objects. So, when you are focused on a group you can modify the scene objects that the group is holding.
There is only one special case when it comes to layers - to use the Clay tool, you have to be focused on a single layer. This is because Modeler needs to know which layer you are adding the clay to. If multiple layers are in focus, then Modeler doesn't know which layer the clay should be added to. Instead, if you try to use the Clay tool while you aren't focused on a single layer, Modeler will create a new layer for you to add clay.
Focus describes what you're currently working on, but sometimes you need to change your focus. This is where Scoping comes in. We use Scope and Scoping to describe changing your focus. There are two scoping operations - scope in, and scope out.
- When you scope in you are narrowing your focus to an object. For example, if you scope into a layer, you will be focused on that layer.
- When you scope out, you are widening your focus to include other objects. If you scope out of a layer, you are widening your focus to a higher level of the hierarchy.
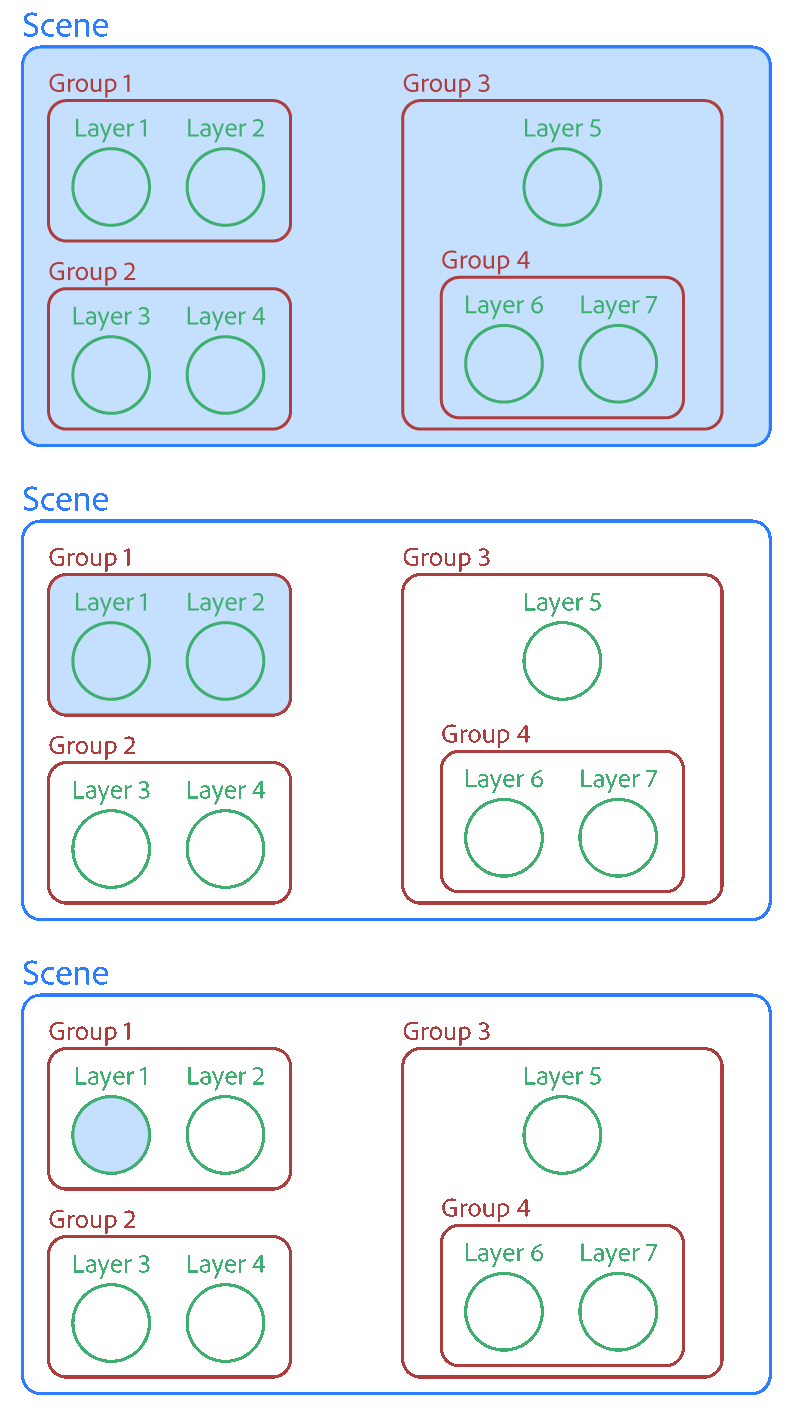
We can update the scene diagram to include focus. When you create a new scene, this is how Modeler understands the scene:


- Scene
- Layer 1
In this case, you can see that focus is limited to Layer 1. This means you can only change things inside Layer 1. For example, you can use tools from the Palette to modify the contents of Layer 1, but you can't do things like move the layer. To do that you need to scope out:


- Scene
- Layer 1
This is how Modeler understands the scene when you scope out. Scoping out means moving up one layer in the hierarchy. When you scope out, more things are in focus - in this case, the entire scene is in focus, even though there is nothing else in the scene beyond Layer 1.
Focus works with groups in the same way. You can scope into a group to control the things within that group, or you can scope out of a group to manipulate the group as a whole.


- Scene
- Group 1
- Layer 1
- Layer 2
- Layer 3
- Group 2
- Group 3
- Layer 4
- Layer 5
- Layer 6
- Group 3
- Group 1
The animation above starts at with the whole scene in focus. Then we scope in to Group 1, then Layer 1.
- When the whole scene is in focus, Group 1 and Group 2 are in focus, so it's possible to modify them. You can also use tools to modify any clay in the scene, since the whole scene is in focus.
- When we scope into Group 1, then Layer 1, Layer 2, and Layer 3 are in focus, so it's possible to move each of them individually, or modify them with tools from the Palette.
- When we scope into Layer 1, then only the contents of Layer 1 are in focus, so we can't move Layer 1 around, but we can modify the clay. We can also add clay with the Clay tool, since we are scoped into a single layer.
Put it into practice
Now you have a basic idea of how Modeler understands scene objects and focus, it's time to learn how to use this knowledge in practice. Below, we'll go through the steps to create a scene with a hierarchy, navigate through the hierarchy with scope, and use basic scene assembly tools to make a composition.
Start by launching Modeler and creating a new scene.


We're going to make a hand. To begin, place some clay with the clay tool inside Layer 1 and use the Warp tool to adjust it into a palm-like shape.


Next, we'll create a finger. First, we'll create layers for each joint of the finger, and then we'll group them so that we can move the finger as a whole.
To create the first joint:
- Scope out of Layer 1, so that the whole scene is in focus.
- Equip the Select tool to automatically scope out of the layer.
- 🥽 Use SJ ↓ to quickly scope out.
- Equip the Clay tool.
- When you equip the Clay tool without being focused on a layer, Modeler will automatically create a new layer for you.
- Use the Clay tool to create a cylinder that will act like the first joint of a finger.


With the first joint created, we need to finish the rest of the finger. We could follow the process above to create the other two joints, but it's much faster to duplicate and move Layer 2 to create the other joints.
To duplicate and move Layer 2:
- Scope out by equipping the Select tool.
- Select the cylinder of layer 2.
- With the Select tool equipped, select the cylinder. The Cylinder will be highlighted in blue when it is selected.
- Open the Actions menu and use the Create duplicate button.
- Move the layer.
- 💻Use the gizmo to position the layer.
- 🥽You can either move the layer freely or use the gizmo.
You can repeat the actions above to create the third joint of the finger.


Now it's time to group the layers that make up the finger so that we can manipulate them all as one object.
To group the finger:
- Use the Select tool to select the layers you want to group.
- Open the Actions menu.
- Select the Group action.
Notice that when you hover over any of the finger layers with the Select tool, the whole finger is highlighted. This shows that the layers are grouped.


Next, we can create the other fingers. We can use Create duplicate action that we covered earlier to make this process quick and easy.
Just like before:
- Open the Palette and select the Select tool.
- Select the finger group.
- Use the Create duplicate action in the Actions menu.
- Position the new finger.


You can repeat the steps above to create the remaining two fingers, but the thumb may be a little tricky. Thumbs are laid out a little differently than fingers, so we need to modify the individual layers inside the thumb group.
To do this you can scope into the thumb group:
- Equip the Select tool from the Palette
- Scope into the thumb group.
- 💻 Double click on clay in the thumb group.
- 🥽 Hover the cursor over the thumb group and move SJ ↑.
- Now you can use the select tool to reposition the individual joints of the thumb.
At the end of this process, you should have a hand that looks something like the image below, but more importantly you have a hierarchy of groups and layers so that you can pose the hand quickly and easily.


Of course, this is a quite basic hand. But by following this process it's possible to quickly make and pose models. You could use this technique to create a full body where every bone has a layer, and layers are grouped into things like arms, legs, torso etc. Following this technique makes it very quick to pose and work with hierarchical structures like anatomy. It's possible to make large scenes with many uniquely posed sculpts very quickly.
Art examples
The scenes below by Theis Haagh Jakobsen are great examples of the workflow outlined above to create posable creatures.
In this piece, the locusts are all duplicates of a hierarchy. Some locusts have been posed by transforming groups and layers to add more dynamism.


All of the zombies in this scene are the same base sculpts with layers and groups transformed to create unique poses. Some have also had clothing added after posing to make them more unique.

