Documentation for Substance 3D Painter is now available on Experience League. After March 14th, HelpX pages will automatically redirect to the equivalent Experience League page.
Refer to the FAQ for more information about which documentation is affected.
- Substance 3D home
- Home
- Getting Started
- Getting Started overview
- Activation and licenses
- System requirements
- Project creation
- Export
- Export overview
- Export window
- Output templates
- Export overview
- Glossary
- Getting Started overview
- Interface
- Interface overview
- Assets
- Substance 3D Assets
- Color picker
- Display settings
- History
- Layer stack
- Main menu
- Project configuration
- Properties
- Settings
- Shader settings
- Texture Set
- Toolbars
- Viewport
- Miscellaneous
- Painting
- Painting overview
- Paint tools
- Path tools
- Path tool overview
- Paint along path
- Ribbon path
- Filled path
- Erase along path
- Smudge along path
- Straight line
- Lazy mouse
- Symmetry
- Fill projections
- Presets
- Presets overview
- Creating and saving presets
- Creating particles presets
- Photoshop brush presets
- Dynamic strokes
- Advanced channel painting
- Vector graphic (.svg & .ai)
- Text resource
- Effects
- Baking
- Content
- Creating custom effects
- Importing assets
- Creating custom effects
- Features
- Automatic resource update
- Automatic UV Unwrapping
- Physical size
- Smart Materials and Masks
- Subsurface Scattering
- Dynamic Material Layering
- UV Reprojection
- UV Tiles
- Color Management
- Post Processing
- Iray Renderer
- Plugins
- Sparse Virtual Textures
- Custom Shaders
- SpaceMouse® by 3Dconnexion
- Universal Scene Description (USD)
- Send to
- Technical Support
- Performance Guidelines
- Configuring Pens and Tablets
- Exporting the log file
- Exporting a DXDiag
- Technical issues
- GPU Issues
- Crash when working with overclocked GPU
- Forcing the external GPU on Mac OS
- GPU drivers compatibility
- GPU drivers crash with long computations (TDR crash)
- GPU has outdated drivers
- GPU is not recognized
- GPU is not recognized and is mentionned as GDI Generic
- Issues with Nvidia GPUs on recent Mac OS versions
- Multi/Bi-GPU
- Running on integrated GPU
- Painter doesn't start on the right GPU
- Startup Issues
- Rendering Issues
- Stability Issues
- Miscellaneous Issues
- GPU Issues
- Workflow Issues
- Export Issues
- Tools Issues
- Project Issues
- Library Issues
- Viewport Issues
- Plugins Issues
- License Issues
- Pipeline and integration
- Installation and preferences
- Configuration
- Resource management
- Scripting and development
- Scripts and plugins
- Shader API Reference
- Shader API overview
- Changelog - Shader API
- Libraries - Shader API
- Lib Alpha - Shader API
- Lib Bayer - Shader API
- Lib Defines - Shader API
- Lib Emissive - Shader API
- Lib Env - Shader API
- Lib Normal - Shader API
- Lib PBR - Shader API
- Lib PBR Aniso - Shader API
- Lib Pom - Shader API
- Lib Random - Shader API
- Lib Sampler - Shader API
- Lib Sparse - Shader API
- Lib SSS - Shader API
- Lib Utils - Shader API
- Lib Vectors - Shader API
- Parameters - Shader API
- Shaders - Shader API
- Release notes
- Release notes overview
- All Changes
- Version 12.0
- Version 11.1
- Version 11.0
- Known issues
- Old versions
- Version 10.1
- Version 10.0
- Version 9.1
- Version 9.0
- Version 8.3
- Version 8.2
- Version 8.1
- Version 7.4
- Version 7.3
- Version 7.2
- Version 2021.1 (7.1.0)
- Version 2020.2 (6.2.0)
- Version 2020.1 (6.1.0)
- Version 2019.3
- Version 2019.2
- Version 2019.1
- Version 2018.3
- Version 2018.2
- Version 2018.1
- Version 2017.4
- Version 2017.3
- Version 2017.2
- Version 2017.1
- Version 2.6
- Version 2.5
- Version 2.4
- Version 2.3
- Version 2.2
How to bake mesh maps
Substance 3D Painter's dedicated baking mode makes it easy to bake mesh maps that can power awesome smart materials and other tools. Read on, or watch the video below to learn how to start baking with Substance 3D Painter.
1 - Switch to baking mode
By default, Painter starts in Painting mode when creating or opening a project. To be able to bake mesh maps, you need to switch to Baking mode. Use one of the following options to switch to Baking mode:
-
Use the Baking mode button (Croissant icon) in the contextual Toolbar at the top right of the Viewport
NoteSometimes the Baking mode button can be hidden behind other panels depending on your workspace layout.
-
Use the Mode menu and select Bake mesh maps.
-
Use the F8 keyboard shortcut.
2 - Select Texture Sets and UV Tiles
Inside the Texture Set list, use the checkbox next to each Texture set (and UV Tiles number if present) to select which parts to bake:


3 - Select bakers
Inside the Mesh Map Bakers window, use the check boxes to select the maps that you want to be baked:


4 - Change common settings
In the Mesh map bakers panel, click on the common settings to change the settings like baked map resolution, dilation width, and high poly parameters, that are shared across all maps:


In the common settings, you can define which files to be used as high definition meshes. Selecting high definition meshes allows you do define how the cage is generated for your meshes:
- Distance based: Inflate the vertices away from the mesh a uniform distance across the model to create a cage.
- Automatic (experimental): Painter will analyse your mesh and generate a cage automatically, trying to keep the cage close to the surface without creating intersections for best results.
- Custom file: Import a file that you have created to use as the cage. Note that imported files must have the same number of vertices as the base mesh to work correctly.
If you are not baking from a high-poly mesh, enable the Use Low Poly Mesh as High Poly Mesh checkbox instead.
5 - Adjust the cage
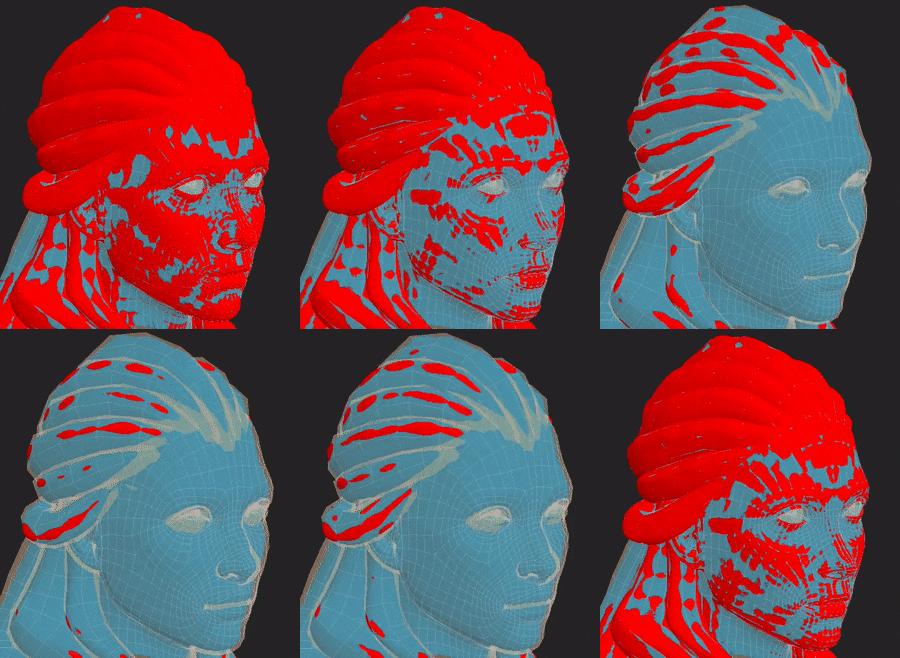
Different options are available to adjust the cage based on which cage method you're using. With a distance-based cage, you can adjust the Frontal and Rear distances to minimise the amount of intersection between the cage and your mesh.


Red spots appear when the cage intersects with the model's geometry. An intersecting cage generally leads to artifacts and issues in the intersecting area.
6 - Start the baking process
At the bottom of the viewport, click on the Bake button to start the baking process.


7 - Inspect the Baking Log for errors
Once the baking process has finished, you can take a look at the Baking Log window to check if there are any errors reported.
If there are any, use the arrow next to the error message to view the relevant baker settings:

