Documentation for Substance Designer 3D is now available on Experience League. After March 14th, HelpX pages will automatically redirect to the equivalent Experience League page.
Refer to the FAQ for more information about which documentation is affected.
- Substance 3D home
- User guide
- Glossary
- Getting started
- Workspace
- Workspace
- Customizing your workspace
- Home screen
- Main toolbar
- Preferences
- Explorer
- Graph view
- Library
- Properties
- 2D view
- 3D view
- Dependency manager
- Resources
- Resources
- Importing, linking and new resources
- Bitmap resource
- Vector graphics (SVG) resource
- 3D scene resource
- AxF (Appearance eXchange Format)
- Font resource
- Warnings from dependencies
- Substance graphs
- Substance graphs
- Substance graph key concepts
- Creating a Substance graph
- Instances and subgraphs
- Graph parameters
- Manage parameters
- 'Visible if' expressions
- Inheritance in Substance graphs
- Output size
- Values in Substance graphs
- Publishing Substance 3D asset files (SBSAR)
- Exporting bitmaps
- Exporting PSD files
- Sample Substance graphs
- Warnings in Substance graphs
- Nodes reference for Substance graphs
- Nodes reference for Substance graphs
- Atomic nodes
- Node library
- Node library
- Texture generators
- Texture generators
- Noises
- Noises
- 3D Perlin noise
- 3D Perlin noise fractal
- 3D Ridged noise fractal
- 3D Simplex noise
- 3D Voronoi
- 3D Voronoi fractal
- 3D Worley noise
- Anisotropic noise
- Blue noise fast
- BnW spots 1
- BnW spots 2
- BnW spots 3
- Cells 1
- Cells 2
- Cells 3
- Cells 4
- Clouds 1
- Clouds 2
- Clouds 3
- Creased
- Crystal 1
- Crystal 2
- Directional noise 1
- Directional noise 2
- Directional noise 3
- Directional noise 4
- Directional scratches
- Dirt 1
- Dirt 2
- Dirt 3
- Dirt 4
- Dirt 5
- Dirt gradient
- Fluid
- Fractal sum 1
- Fractal sum 2
- Fractal sum 3
- Fractal sum 4
- Fractal sum base
- Fur 1
- Fur 2
- Fur 3
- Gaussian noise
- Gaussian spots 1
- Gaussian spots 2
- Grunge concrete
- Grunge Damas
- Grunge galvanic large
- Grunge galvanic small
- Grunge leaks
- Grunge leaky paint
- Grunge map 001
- Grunge map 002
- Grunge map 003
- Grunge map 004
- Grunge map 005
- Grunge map 006
- Grunge map 007
- Grunge map 008
- Grunge map 009
- Grunge map 010
- Grunge map 011
- Grunge map 012
- Grunge map 013
- Grunge map 014
- Grunge map 015
- Grunge rough dirty
- Grunge rust fine
- Grunge scratches dirty
- Grunge scratches fine
- Grunge scratches rough
- Grunge shavings
- Grunge splashes dusty
- Grunge spots
- Grunge spots dirty
- Liquid
- Messy fibers 1
- Messy fibers 2
- Messy fibers 3
- Microscope view
- Moisture noise 1
- Moisture noise 2
- Perlin noise
- Plasma
- Caustics
- Voronoi
- Voronoi fractal
- Waveform 1
- White noise
- White noise fast
- Patterns
- Patterns
- 3D linear gradient
- 3D volume mask
- Alveolus
- Arc pavement
- Brick 1
- Brick 2
- Brick generator
- Checker 1
- Cube 3D
- Cube 3D GBuffers
- Fibers 1
- Fibers 2
- Gaussian 1
- Gaussian 2
- Gradient axial
- Gradient axial reflected
- Gradient circular
- Gradient linear 1
- Gradient linear 2
- Gradient linear 3
- Gradient radial
- Height extrude
- Mesh 1
- Mesh 2
- Panorama shape
- Polygon 1
- Polygon 2
- Scratches generator
- Shape
- Shape extrude
- Shape mapper
- Shape splatter
- Shape splatter blend
- Shape splatter data extract
- Shape splatter to mask
- Splatter
- Splatter circular
- Star
- Starburst
- Stripes
- Tile generator
- Tile random
- Tile random 2
- Tile sampler
- Triangle grid
- Weave 1
- Weave 2
- Weave generator
- Filters
- Filters
- Adjustments
- Adjustments
- Apply color palette
- Auto levels
- Channel mixer
- Chrominance extract
- Clamp
- Color match
- Color to mask
- Contrast/Luminosity
- Convert to linear
- Convert to sRGB
- Create color palette (16)
- Grayscale conversion advanced
- Hald CLUT
- HDR range viewer
- Height map frequencies mapper
- Highpass
- Histogram compute
- Histogram equalize
- Histogram range
- Histogram render
- Histogram scan
- Non-uniform histogram scan
- Histogram select
- Histogram shift
- ID to mask grayscale
- Invert
- Lighting cancel high frequencies
- Lighting cancel low frequencies
- Luminance highpass
- Min max
- Modify color palette
- Pow
- Quantize color (Simple)
- Quantize color
- Quantize grayscale
- Replace color
- Replace color range
- Threshold
- View color palette
- Blending
- Blurs
- Channels
- Effects
- Effects
- 3D texture position
- 3D texture SDF
- 3D texture surface render
- 3D texture volume render
- Ambient occlusion (HBAO)
- Ambient occlusion (RTAO)
- Anisotropic Kuwahara color
- Anisotropic Kuwahara grayscale
- Bevel
- Bevel smooth
- Cross section
- Curvature
- Curvature smooth
- Curvature sobel
- Diffusion color
- Diffusion grayscale
- Diffusion UV
- Directional distance
- Edge detect
- Emboss with gloss
- Extend shape
- Flood fill
- Flood fill mapper
- Flood fill to Bbox size
- Flood Fill to gradient
- Flood Fill to grayscale/color
- Flood Fill to index
- Flood Fill to position
- Flood Fill to random color
- Flood Fill to random grayscale
- FXAA
- Glow
- Mosaic
- Multi directional warp
- Non-uniform directional warp
- Reaction diffusion fast
- RT irradiance
- RT shadow
- Shadows
- Shape drop shadow
- Shape glow
- Shape stroke
- Summed area table
- Swirl
- Uber emboss
- Vector morph
- Vector warp
- Normal map
- Tiling
- Transforms
- Material filters
- Material filters
- 1-click
- Effects (Material)
- Transforms (Material)
- Blending (Material)
- PBR utilities
- Scan processing
- Mesh-based generators
- Mesh-based generators
- Mask generators
- Weathering
- Utilities (Mesh-based generators)
- Spline & Path tools
- Spline & Path tools
- Working with Path & Spline tools
- Paths to spline
- Path tools
- Spline tools
- Spline tools
- Point list
- Scatter on Spline color
- Scatter on Spline grayscale
- Scatter Splines on Splines
- Spline 2D transform
- Spline (Cubic)
- Spline (Poly quadratic)
- Spline (Quadratic)
- Spline append
- Spline bridge (2 Splines)
- Spline bridge (List)
- Spline bridge mapper color
- Spline bridge mapper grayscale
- Spline circle
- Spline fill
- Spline flow mapper
- Spline mapper color
- Spline mapper grayscale
- Spline merge list
- Spline render
- Spline sample height
- Spline sample thickness
- Spline select
- Spline warp
- UV mapper color
- UV mapper grayscale
- 3D view (Library)
- 3D view (Library)
- HDRI tools
- Node library
- Substance function graphs
- Substance function graphs
- What is a Substance function graph?
- Create and edit a function
- The Substance function graph
- Variables
- FX-maps
- FX-Maps
- How it works
- The Iterate node
- The Quadrant node
- Using Substance function graphs in FX-Maps
- Warnings in Substance function graphs
- Sample Substance function graphs
- Nodes reference for Substance function graphs
- Nodes reference for Substance function graphs
- Function nodes overview
- Atomic function nodes
- Function node library
- MDL graphs
- Working with 3D scenes
- Bakers
- Best practices
- Pipeline and project configuration
- Color management
- Package metadata
- Scripting
- Scripting
- Plugin basics
- Plugin search paths
- Plugins packages
- Plugin manager
- Python editor
- Accessing graphs and selections
- Nodes and properties
- Undo and redo
- Application callbacks
- Creating user interface elements
- Adding actions to the Explorer toolbar
- Using color management
- Using spot colors
- Logging
- Using threads
- Debugging plugins using Visual Studio Code
- Porting previous plugins
- Packaging plugins
- Scripting API reference
- Technical issues
- Release notes


Remaps the grayscale values in an image using a custom gradient.
This node serves a dual purpose: It may be simply used as a grayscale-to-color conversion node, or to colorize grayscale input my mapping it to a custom color ramp.
The node offers an advanced and feature-rich gradient editor to map multiple colors with precision: go to the Gradient editor section in this page to learn more.
|
Color mode Boolean |
Sets the output mode to Color or Grayscale. |
|
Gradient adressing Boolean |
Sets the gradient to either repeat (tile) or clamp values that are out of the [0, 1] range. |
|
Gradient Array of gradient keys |
The custom gradient ramp used to map the input grayscale values.
May be edited in place or using the Gradient editor. |
This window offers controls to edit the reference gradient used by the Gradient Map node to map grayscale values to colors.
It can be opened from the Gradient Map node's Properties in the following ways:
- Click LMB on the Gradient Editor button;
- Double-click LMB on a pin in the gradient bar. The clicked pin will then be automatically selected in the Gradient Editor so you can directly edit its values.


Editing the gradient pins
The colors and their positions along the gradient is controlled by pins placed along the gradient bar.
Each pin sets a color at its position along the gradient.
The portions of the gradient before and after the first and last pins are set to those pin's colors respectively.


The following controls are available to edit pins:
Add pin
Click LMB on the gradient or just below to add a pin at the position you clicked in the gradient bar.
The new pin will be set to the gradient's color at that position.


Move pin
Hold LMB and drag the selected pins along the gradient bar to move them.
You can also set the position of a pin with a numerical value by selecting it and using the Position parameter. The position is a value in the [0;1] range where 0 is the start of the gradient and 1 is its end.


When multiple pins are selected, they can all be moved concurrently. When one or more pins reach and end of the gradient as they are moved, two behaviours are available depending on the mouse button used for moving:
- LMB: Pins remain at the end, meaning they will be stacked at that location as they reach it and their relative positions are changed;
- MMB: Pins loop back around to the other end of the gradient, meaning their relative positions remain unchanged.
Delete pin
Select the pins and press Delete, or drag the pins off the gradient bar to delete them.


Invert positions
Mirrors the positions of the selected pins on the gradient.


Clear all
Removes all the pins from the gradient bar.


Invert colors
This button switches the colors of the selected pins to their negative.
Desaturate
This button desaturates the colors set on the selected pins.
Interpolation modes
Once pins are set up, you can control how colors transition from one pin to the next using the available interpolation modes:
The default interpolation mode: applies a simple linear interpolation between each pin, so the gradient progresses uniformly.
When thinking about the transition between gradients as Bezier curves where pins are points of the curve, this mode sets these points to have horizontal tangents.
This results in a transition that is evocative of a smoothstep interpolation.
When this mode is selected, the Midpoint parameter is enabled and lets you offset the horizontal position of the curve's vertical midpoint between the points. This effectively tips the scale between the 'out' and 'in' tangents.
Applies smoothing to the interpolation curve between each point.
When this mode is selected, the Smoothness parameter is enabled and lets you adjust the intensity of the smoothing where a value of 0 is equal to the Linear interpolation mode.
Color only changes at a pins' location, and stays constant until the next pin along the gradient bar.
This results in hard steps between colors, and only the colors set by the pins are present on the gradient.
color picker


The Color Picker lets you set a color in several ways:
-
Gradient and hue bar
Tweak the positions of the gizmo in the gradient and of the notch in the hue bar to set a color.
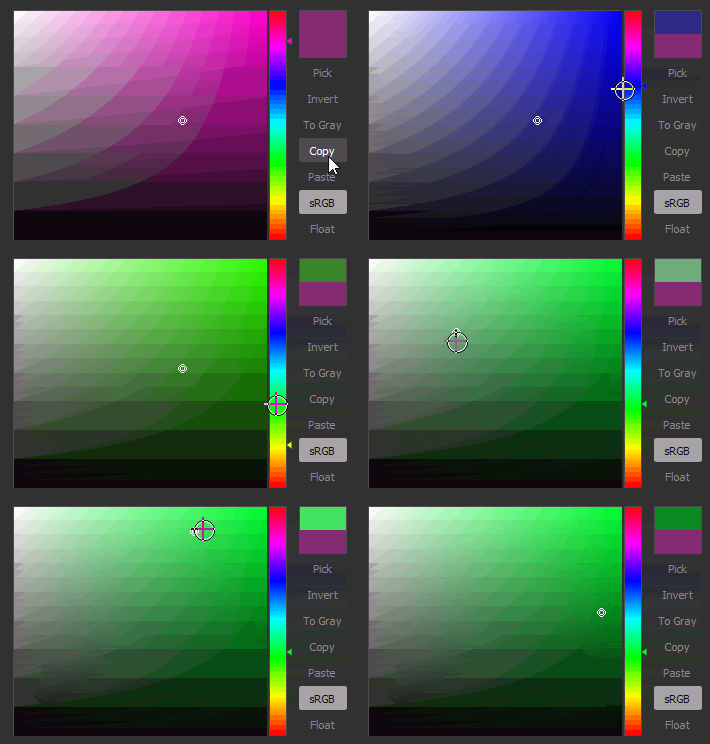

-
RGB, HSV, and Alpha sliders
The RGB, HSV and Alpha sliders let you set a color precisely, by tweaking the sliders or directly setting their numerical values.
Alternatively, use a hexcode in the dedicated input field below the sliders.
-
Pick on screen
Use the Pick button and click LMB anywhere in the screen to sample the color at that location.
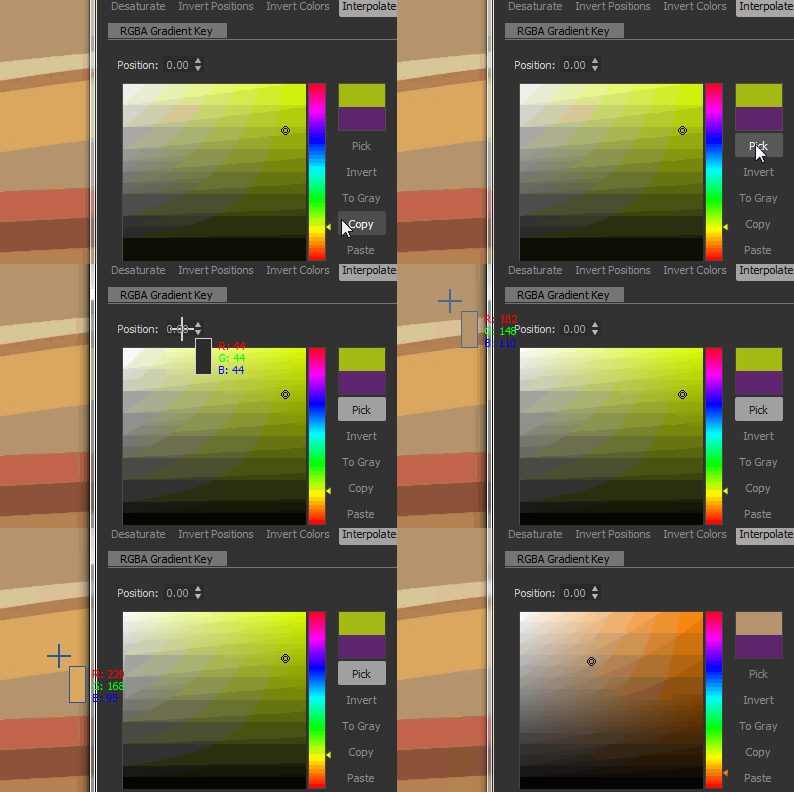

The selected color is previewed in the upper half of the color thumbnail.
The lower half displays the previously used color. Double-click LMB on it to revert the tweaked color to it.


When multiple pin are selected, the RGB, HSV and Alpha sliders turn into delta (Δ) sliders, meaning they are used to offset the value of each pin by the same amount.
Additionally, the following capabilities are available below the color thumbnail as buttons:
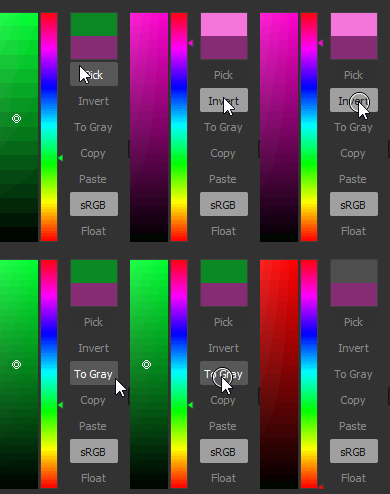
Invert: Switches the color to its negative;
To Gray: Desaturates the color;
Copy: Copy the currently selected color to the clipboard;
Paste: Switch to the color currently in the clipboard;
sRGB: Use the sRGB color space to display colors. When disabled, the Linear color space is used;
Float: Display RGB, HSV and Alpha slider values in floating point.

Gradient Eyedropper
The Gradient Eyedropper is one of the most useful features this node offers, as you can create complex gradients just by drawing a line on a reference picture.
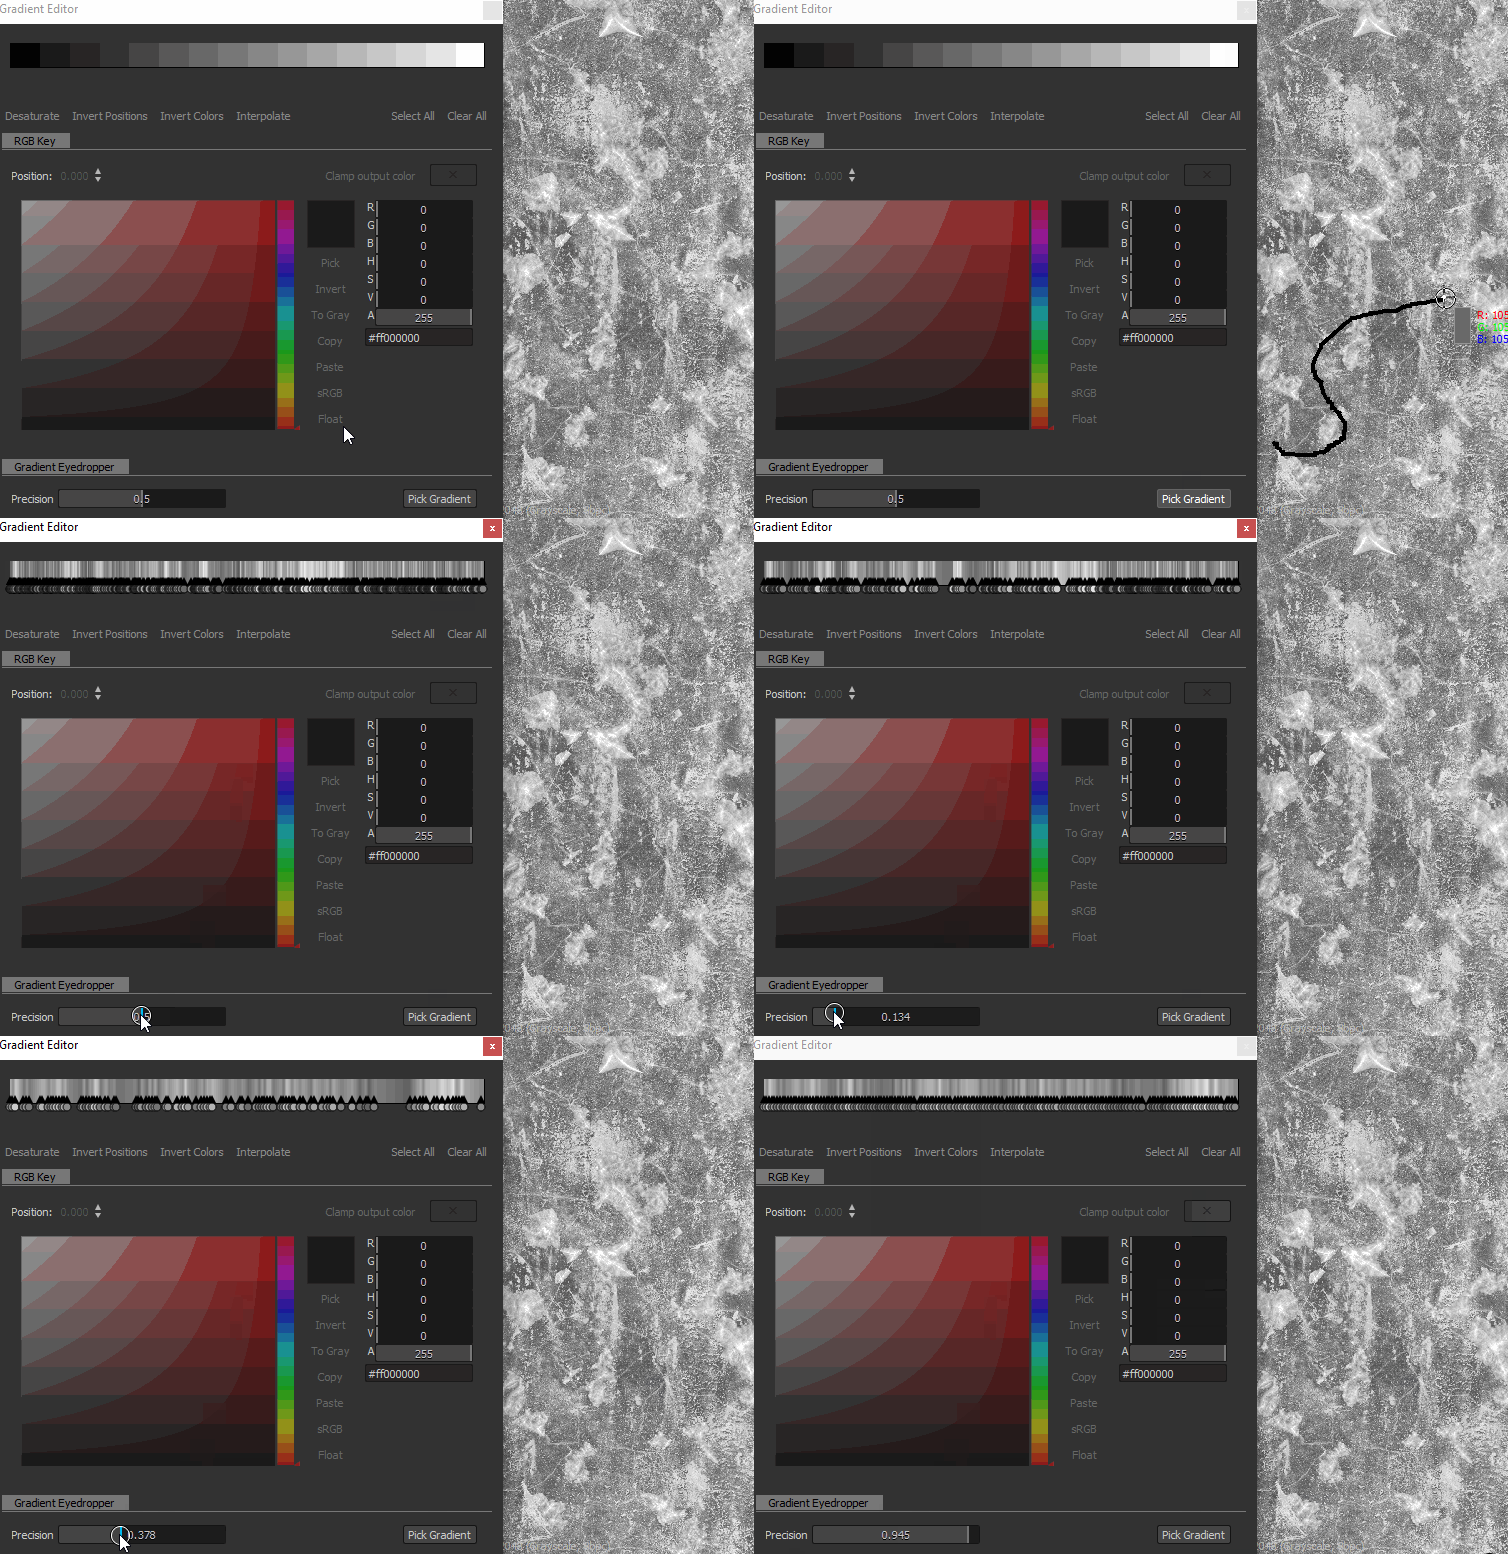

The Precision slider will help you adjust your newly created gradient by increasing or decreasing the number of keys: the lower their values, the more precise your gradient will match your picked values.
|
Input Grayscale PRIMARY |
The grayscale image to be processed. |
|
Output Grayscale |
|
Coming soon.
